2DI TV2 Care And Use Manual
Easy touch display monitors, alarms, logs and charts
Hide thumbs
Also See for TV2:
- User manual (3 pages) ,
- User manual (4 pages) ,
- Installation and use manual (38 pages)

Related Manuals for 2DI TV2


Summary of Contents for 2DI TV2
- Page 1 Two Dimensional Instruments, LLC • P O Box 159 • Crestwood, KY 40014 (877) 241-0042 • (502) 243-0039 fax • (502) 243-0042 international...
- Page 2 Sensor Accuracy: The TV2 logs and displays information it receives from its sensors. The accuracy of that data depends on the sensors. The digital wired sensors are accurate to ±0.3°C, the wireless thermistor sensors are accurate to ±...
- Page 3 Powering the TV2 Display: The TV2 display is powered via a USB cable, which can be plugged into a computer or the wall plug (100vac-230vac). An optional DC connector is also available which will accept 5-30 volt dc. Lithium backup batteries are installed in the TV2 and will keep it running for over 100 hours if normal power is missing.
-
Page 4: Table Of Contents
Quick Start pg 7 Sensor Setup pg 8 Setting the Alarms pg 9 Installation Tips pg 10 TV2 Status Screen pg 11 LED & Reset controls pg 12 Navigating with Easy Touch pg 14 Main Menu pg 17 Operational Modes... -
Page 5: Component And Packing List
Component and Packing List Your TV2 monitor should have come with 1. One or more sensors (these could be wired or wireless sensors) 2. A six-foot USB cable 3. A wall transformer 4. A printed quick start guide If any of these items are missing please contact the factory or the distributor/reseller from whom you ordered the TV2 for a replacement. -
Page 6: Quick Start
Your TV2 can be installed and operating in just a few minutes by following these simple steps. 1. Connect the TV2 to a power supply (computer or wall plug) and touch the LCD. If the display remains blank press the reset button by inserting a paper clip into the small hole to the left of the green LED on the face of the TV2. - Page 7 Setting up sensors 1. Plug the wired sensor into the TV2, or if you are using wireless sensor, place a 9vdc battery in the transmitter that is attached to the actual sensor. 2. After a few seconds, the TV2 will recognize the sensor and change the display to the Sensor Setup menu.
-
Page 8: Setting The Alarms
It can also be downloaded from our website here. Touch 'Escape' until you return to the Status Screen. You are done! P O Box 159 • Crestwood, KY 40014 • (877) 243-0042 • (502) 243-0039 fax • www.e2di.com info@2di.com... -
Page 9: Installation Tips
(the black box) outside the refrigerator or freezer so the signal can be transmitted back to the TV2. 3. Power for TV2. Plug the USB cable into the TV2 into a USB port on a computer or into the power cube (wall plug) supplied. - Page 10 Appears in red if the reading is above or below the alarm settings. Since the TV2 has an easy touch screen, additional information can be viewed by touching various 'hot spots'. For example: 1. Touch a temperature to see the logged data for that sensor.
-
Page 11: Navigating With Easy Touch
(Your settings and data will be preserved). Navigating with Easy Touch Where to touch Touch any value to see the logged data for that sensor. P O Box 159 • Crestwood, KY 40014 • (877) 243-0042 • (502) 243-0039 fax • www.e2di.com info@2di.com... - Page 12 Touch 'Main Menu' to change settings. Touch a Max/Min temperature to reset it P O Box 159 • Crestwood, KY 40014 • (877) 243-0042 • (502) 243-0039 fax • www.e2di.com info@2di.com...
- Page 13 Touch 'Main Menu' at the bottom of the Status Screen to enter the menu system. When the Main Menu opens, the System Setup field will be highlighted. Touch ‘Enter’ to enter the System Setup Menu. P O Box 159 • Crestwood, KY 40014 • (877) 243-0042 • (502) 243-0039 fax • www.e2di.com info@2di.com...
- Page 14 Network menu, and put the TV2 into a deep sleep mode. (Warning – Do not use deep sleep mode unless you intend the TV2 to be in this mode for a long time. You will lose some or all of your data).
- Page 15 Operational Tip: Keeping your finger on ‘Up’ or “Down’ scrolls through possible values at a fast rate. The longer you hold your finger on the screen, the faster it scrolls. P O Box 159 • Crestwood, KY 40014 • (877) 243-0042 • (502) 243-0039 fax • www.e2di.com info@2di.com...
- Page 16 The Current Status Display The TV2 main display (current status) will change depending on how many sensors you are receiving data from. If you have one sensor plugged into or linked to the TV2, the display will look like the one below.
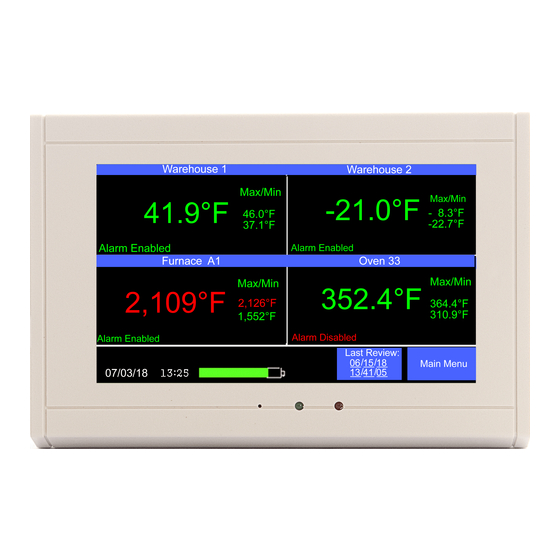
- Page 17 Once a third sensor is plugged into or linked to the TV2 display the current status screen will change to a screen divided into quadrants, one quadrant for each sensor as illustrated below. TV2 with four sensors P O Box 159 • Crestwood, KY 40014 • (877) 243-0042 • (502) 243-0039 fax •...
-
Page 18: Operational Modes
Note: It is possible a max or min temperature was too high or low but an alarm was not triggered. This would happen if the violation was shorter than the delay time. 2. If a wireless sensor is not linked to the TV2, a message stating "Sensor Not Installed' will be displayed in that quadrant. - Page 19 5. The battery icon shown at the bottom of the current status display is for the TV2 internal rechargeable backup-battery. To see a history chart for a sensor, touch that sensor's temperature on the display. Chart for sensor #2 Hot Spots to switch sensors 1.
- Page 20 To return to the status screen touch 'Escape'. P O Box 159 • Crestwood, KY 40014 • (877) 243-0042 • (502) 243-0039 fax • www.e2di.com info@2di.com...
-
Page 21: Sleep Mode
1. In Sleep Mode, the display is blank. The TV2 automatically enters sleep mode after power to the TV2 is cut, to preserve the battery. The TV2 will still collect data and perform all other functions while in sleep mode. -
Page 22: Calibration
Touch Enter to see the sensor setup menu. Touch 'Left' to highlight Calibrate Sensor and touch 'Enter". The calibration table for that sensor will be shown. Calibration Table P O Box 159 • Crestwood, KY 40014 • (877) 243-0042 • (502) 243-0039 fax • www.e2di.com info@2di.com... - Page 23 Note: Once either an actual value has been entered into one of these fields the values displayed in these fields will not change. Even if the TV2 sensor is showing some very different value on the current status screen, the measured and actual values shown on the calibration menu will remain fixed.
-
Page 24: Tview Software
Downloading, or copying data from a TV2 to a personal computer is done via the USB cable or from your local area network, if a TV2 is present on the LAN. You can unplug the USB cable from the power cube and plug it into a USB socket on your computer. This will not affect the data you have already collected. - Page 25 Click on ‘Setup’ and then ‘Add TV2’. a. Key in the IP address if the TV2 is on your LAN, or click on the USB radio button if the TV2 is plugged into your computer with a USB cable.
- Page 26 Once you have identified your TV2s, you are ready to copy data from them. 1. To copy data from a TV2 you must first select it. Click the small arrow on the right side of the box entitled 'Select Device to Download'. All known TV2s will be listed by name.
- Page 27 If there is already data from the same TV2 on your screen you will be asked if you want to replace the existing data. If you answer yes, the displayed chart will be erased. If you do not want to erase the data, click 'no' and save the existing data before downloading additional data.
- Page 28 You can also set the Y-axis for temperature and humidity by typing a value into the boxes provided. P O Box 159 • Crestwood, KY 40014 • (877) 243-0042 • (502) 243-0039 fax • www.e2di.com info@2di.com...
- Page 29 Exit. This closes the program and stops any further activity. P O Box 159 • Crestwood, KY 40014 • (877) 243-0042 • (502) 243-0039 fax • www.e2di.com info@2di.com...
- Page 30 Note: You must have rights to create and to write files on your computer when you schedule an auto download. iii. Add ThermaViewer. Allows you to add a TV2 that is connected to your LAN or a computer via a USB cable.
- Page 31 After reviewing the alarm, click 'Mark as Reviewed' to hide it or right click an alarm and delete to remove the alarm from this list. iii. Email alerts. A log of all emails sent can be seen for any registered TV2 which is auto-downloading.
- Page 32 2di technician. All activity of the TView software is archived. This information can be saved to a file and emailed to 2di. 4. 'TView Communications Diagnostics' Menu archives all communications between TView and TV2s for support and troubleshooting.
- Page 33 Can I tell if a temperature high/low alarm occurred by looking at the TV2 display? Yes – If an alarm was triggered an upper-case “A” is placed on the chart at the time the alarm began and a lower-case “a” at the time the alarm was silenced or expired.
- Page 34 How is the data transmitted from the sensor to the TV2? The sensor is attached to a transmitter which sends a signal to the TV2, which has a built- in base-station that receives data. This transmission uses 433mhz.
- Page 35 So, for example, if the TV2 is set to Zoom=2X then each column will show two temperatures connected by a vertical line whose top is the higher temperature and whose bottom is the lower temperature. If the chart is zoomed out further than 2X to say Zoom = 6X, the measurements...
- Page 36 When you open a file with Excel that has been saved with TView only the first 65000 data points will be saved. (This is a limitation of the Excel program not the TV2 or TView). The TView program has no such limitation and will save and display all data.
- Page 37 Alarm started 6/25/2013 7:40 AM. There is a problem with the freezer. The device name is the name the user gave to the TV2 when it was first identified by TView. To change the device name go to ‘Setup’ and click on ‘Manage TV2s’...
-
Page 38: Appendix
5. If the TV2 firmware is modified in any way it will be rendered inoperable and non-responsive. It is not possible for firmware that has been changed to be upgraded in the field. In this case the TV2 display must be returned to Two Dimensional Instruments, LLC for reprogramming for which service additional charges may be incurred. -
Page 39: Warranty
Warranty The TV2 line of Instruments is warranted by the manufacturer to be free from defects in material and workmanship for a period of twelve months after delivery. In the event of a claim under this warranty, the product or part must be returned to the factory for repair or replacement (shipping prepaid) with a Return Authorization Number. -
Page 40: Addendum
TView to download data it identifies the TV2 by its MAC address. When the TV2 is plugged into a hub or switch the TV2 will be assigned an IP address by the DHCP server on your network. Access the 'Network Menu' on the System Setup page on the TV2. - Page 41 1. Plug the TV2 into a USB port on the computer with the TV2_WIFI-Network_Setup_utility installed (This utility can be downloaded from the e2di website under the ‘Support’ tab). This utility works best if only one TV2 is plugged into the computer and if the computer has a WIFI card installed.
- Page 42 ‘Commands and Responses’ field. 7. It can take up to one minute for the TV2 to connect to the network. Once it does, the red X will disappear from the icon at the bottom of the TV2 main display.
- Page 43 Your IT department will provide the IP address to access the web page below with a browser. You will be able to view the information below but you can not make changes to the TV2 or go to the chart display remotely.
Need help?
Do you have a question about the TV2 and is the answer not in the manual?
Questions and answers