Table of Contents
Advertisement
Quick Links
TD0301 User Manual
Interface
Key Button
Key
Illustrate
Power
On/Off, power on after press 3 seconds; power off after press 3 seconds
WPS
On/Off, enable/disable the WPS function of Wi-Fi after press 3 seconds
Reset
Software reset after short click
Reload to default settings after press 6 seconds
Hardware reset after press 12 seconds
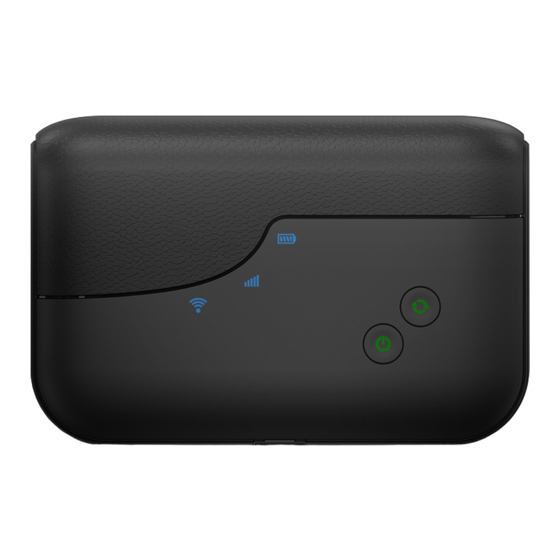
LED Indication
Indicator
Working status
Blue light active for Wi-Fi enabled
WiFi LED
Blue light flash quickly for the WPS function is enabled
Off for Wi-Fi disabled
Blue light active for 2G/3G/4G network registered
Signal LED
Red light active for 2G/3G/4G network not registered
Blue light flash slowly for data connection established
Red light active for battery low without charging
Battery LED
Purple light flash for battery charging
Blue light flash for battery changing full
Blue light active for battery normal state
Advertisement
Table of Contents

Summary of Contents for JACS TD0301
- Page 1 TD0301 User Manual Interface Key Button Illustrate Power On/Off, power on after press 3 seconds; power off after press 3 seconds On/Off, enable/disable the WPS function of Wi-Fi after press 3 seconds Reset Software reset after short click Reload to default settings after press 6 seconds...
-
Page 2: Installation
Installation Follow the diagram to install the SIM card. Tips: Always switch the device off and disconnect the charger before removing the SIM card. 1. Remove the back cover. 2. Insert the SIM card. Ensure that the contact area on the card is facing down and that the beveled corner on the card is facing the beveled corner on the holder. - Page 3 Wi-Fi devices can be connected with the TD0301 Wi-Fi connection for Internet access. Computers & laptops etc. may be connected to the TD0301 via USB cable for Internet Access. TD0301 connectsto computer via a USB cable for the first time, you need to follow the prompts.
- Page 4 In order for a Wi-Fi device to establish a connection with the TD0301 for the first time, you will need to select the TD0301SSID (Wi-Fi name) & enter the relevant Wi-Fi password, which you may find them in the following ways:...
- Page 5 Install the driver and connecting the device USB Connection:Windows 10 for example 1. Keep TD0301 powering on, Plug the device into your computer,it will install the default RNDIS driver automatically. 2. Check the network card is installed correctly,like the following pictures...
- Page 6 Otherwise, you need to check your wireless network card is working properly. In the Wi-Fi list, select the SSID consistent with TD0301 Wi-Fi, click Connect. Then enter the correct Wi-Fi password, click ok. A moment later, Wi-Fi connection is displayed next to the name,...
- Page 7 1. Enter the correct Wi-Fi password, click Next 2. After a moment, the prompt “Connected” is displayed below the name, it means the connection is established.
- Page 8 WebUI ● Home First part of the main display network connection status, connected devices and data, system message, such as IPaddress, system run time, traffic statistics, SIM card status, type and quality of the network signal, whether it is roaming, with or without a new message, and so on. ●...
- Page 10 You can quickly set network type, parameters and Wi-Fi settings through the wizard function.
- Page 11 WPS (Wi-Fi Protected Setup) provides easy and secure establishment of a wireless network. You can configure WPS here via the PIN code or the WPS button,premise is your wireless card support WPS function. TD0301 supports three kinds of WPS authentication:AP PIN, WPS Buttonand Client PIN Code. Default is WPS Button.
- Page 12 ●AP PIN authentication: You can click button “Generate New PIN “to get a PIN, then share it to your wireless client to connect TD0301. ●WPS Buttonauthentication: The first scenario: Please click the WPS button on this interface (or press the physical WPS button on the router), then press the WPS button on the wireless client and wait for about 2 minutes to make the connection.
- Page 13 Youcan press the WPS button on theTD0301 until the Wi-Fi light flash quickly, to activate the WPS, then you can see connecting process. ●Client PIN Code: Start the client WPS process and get the client PIN code. Enter the client's PIN code on the Client PIN code field and click Start.
-
Page 14: Wi-Fimac Filter
●Accept Mode:It only allows the devices in the list to connect to the router. ●Reject Mode: The devices which mac addressin the filter list will be prohibited connect to the TD0301. 4. ClientList This page displays the currently connected clients and their respective MAC addresses in the list. -
Page 15: Dhcp Server
● LAN 1. LAN IP This section allows you to configure the local network settings of your router. ●IP Address: The IP address of router. ●Subnet Mask:The subnet mask for router. ●Domain Name: You can specify a domain name for router to instead of IP address to login this management UI. - Page 16 3. Client List This page displays the currently connected clients and their respective MAC addresses in the list. ● Cellular 1. Connection Set up the cellular network related information.
- Page 17 ConnectionSetting:You can set allow data roaming or not. And you also can set Connection Mode. ●AutoMode: When you turn on TD0301 without additional operations, the device will connect to the networkautomatically. ●Manual Mode:You need to connect to the network manually after opening theTD0301 management page.
-
Page 18: Pin Management
●Preferred Network:You can set preferred networkonthis page, the default is Auto, and other options are GSM, WCDMA, and LTE. ●PLMN: Default is Auto. If you select Manual, you should click button Searchto get available networks and choose one to register by manual. 3. - Page 19 You can send to no more than 5 numbers and 10 text messages at same time, the phone number is separated by „,‟. Also you can setting the SMS center, storage location of messages, and so on. 5. USSD Unstructured Supplementary Service Data (USSD) allows ISP-specific applications to be activated with an SMS message...
-
Page 20: Url Filter
● Firewall 1. General Enable the firewall to protect your local area network against attacks from hackers. The firewall filters the incoming and outgoing packets based on the filter rules. ●Enable Firewall: You can enable or disable the firewall function. Default is disable. Also you can setting the matching packets rule to receive or reject. - Page 21 3. IP Filter IP Filter blocks the LAN to WAN packet exchanges and restricts devices from using specific network services. For example, if you do not want the device to use the Internet service, key in 80 in the destination port.
- Page 22 ● System 1. System Change the router login password, time zone, and NTP server settings. ●System: You can modify the login password for administrator interface. Also you can setting the time to logout the UI automatically. ●Basic Config: Config time zone and NTP server. ●Remote Access Config: Enable or disable remote access, and set IP address, port.
-
Page 23: Firmware Upgrade
2. Firmware Upgrade You can upgrade the firmware on this page. Click “Upload” button to get the file which extension name is “bin” file to upgrade. NOTE: Do not disconnect the power adapter or interrupt the update process. Your device will reboot when the update is complete. -
Page 24: System Log
configuration pages will be restored to the factory defaults. ●Save Setting:Save the current settings to a file. ●Restore Setting:Restore the settings from a file. ●Reboot Setting:Restart router. 4. System Log This page shows the detailed system's activities. 5. Scheduled Tasks This feature allows you to reset the Internet connection on your router by periodically resetting the connection, by configuring the options on this page to proceed on a predetermined schedule. -
Page 25: Power Management
6. Power Management Your MiFi device can switch to low-power Standby mode when idle. To exit Standby mode, press the power button. Power Management ● Suspend: Set the time to enter into standby mode,when there is no Wi-Fi client connected to router. -
Page 26: Device Information
●Battery Status: Indicate the battery status. 7. Device Information This page can view related equipment information. Warning · Please only use original accessories provided with purchase. Use of unauthorized chargers or other accessories may cause damage to the device and can result in fire, explosions, or other hazards. - Page 27 charger from the device and unplug the charger from the power outlet. · The built-in battery is non-removable. Please do not attempt to change or disassemble the battery by yourself. This may result in damage to the battery or the device.
- Page 28 FCC Statement This equipment has been tested and found to comply with the limits for a Class B digital device, pursuant to part 15 of the FCC Rules. These limits are designed to provide reasonable protection against harmful interference in a residential installation.
Need help?
Do you have a question about the TD0301 and is the answer not in the manual?
Questions and answers