
Related Manuals for Inalto IIF241


Summary of Contents for Inalto IIF241
- Page 1 U S E R M A N U A L I N A L T O . H O U S E 248L Integrated Refrigerator MODEL CODES I I F 2 4 1 F O R A L L A U S T R A L I A N H O M E S V 3 .
- Page 2 It is important that you read through the following use and care manual thoroughly to familiarise yourself with the installation and operation requirements of your appliance to ensure optimum performance. Again, thank you for choosing an InAlto appliance and we look forward to being of service to you.
-
Page 3: Table Of Contents
Purchase Details Warranty Information Customer Care InAlto recommends the use of original spare parts. When contacting our customer service team, please ensure that you have the following information at hand (which can be found on your appliances’ rating plate). •... -
Page 4: Safety Warnings
Safety Warnings IMPORTANT SAFETY INSTRUCTIONS READ CAREFULLY AND KEEP FOR FUTURE REFERENCE Read this manual thoroughly before first use, even if you are familiar with this type of product. The safety precautions enclosed herein reduce the risk of fire, electric shock and injury when correctly adhered to. - Page 5 WARNING • Do not use mechanical devices or other means to accelerate the defrosting process, other than those recommended by the manufacturer. • Usage restriction: This appliance is not intended for use by persons (including children) with reduced physical, sensory or mental capabilities, or lack of experience and knowledge, unless they have been given supervision or instructions concerning use of the appliance by a person responsible for their safety.
- Page 6 Safety Warnings (Continued) Electrical Safety • Voltage: Before connecting and turning on the appliance, ensure the electrical voltage and circuit frequency correspond to that indicated on the appliance rating label. • Earthing: This appliance should be properly earthed for your safety. The power cord of this appliance is equipped with a three-prong plug for use in standard wall outlets to minimise the possibility of electrical shock.
- Page 7 WARNING Ventilation: To ensure proper ventilation, keep any ventilation openings, in the appliance enclosure or in the built-in structure, clear of obstructions. Ensure adequate air circulation around the appliance to prevent overheating. Level: Install the appliance level in order to ensure proper operation. Cleaning and Maintenance Disconnect: Unplug the appliance before cleaning or servicing.
-
Page 8: Getting Started
Getting Started Unpacking Your Fridge • Packaging materials: This appliance has been packaged to protect it against transportation damage. Remove all packaging materials, bottom cushions, foam pads and tapes from around and inside the appliance, tear off the protective film on the doors and refrigerator. Keep the original packaging carton and materials in a safe place. -
Page 9: Product Overview
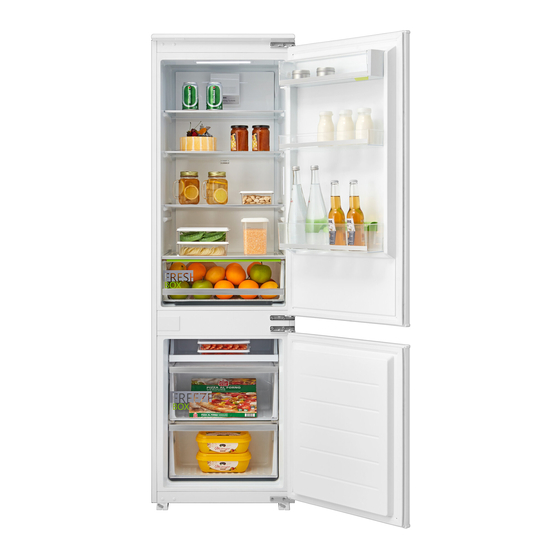
Product Overview Your InAlto Integrated Refrigerator Temperature control panel LED Lighting 4 × Glass shelves 3 × Door trays Fruit & vegetable crisper drawer Sliding freezer box 2 × Freezer storage drawers Refrigerator Compartment This compartment helps keep for food for short-term storage and is suitable for storing a variety of fruits, vegetables, beverages and other food items ideally between 3 to 5 days. -
Page 10: Operation Instructions
Operation Instructions The temperature control panel is located on the inside of your fridge on the right side. Functions Setting 1 • Set Key: Press this button to select the desired temperature ® Setting 2 setting of your refrigerator. • Setting 1: 8° C ®... -
Page 11: Usage Tips
Usage Tips • Do not store food uncovered in the fridge. Always use good quality, fridge-proof packaging to maintain food quality. Remove air from packages of solid food and seal bags tightly before freezing. • Keep portions small to ensure they are frozen (and subsequently defrosted) rapidly. •... -
Page 12: Installation
Installation Placement • Transport: Use a padded trolley to protect the refrigerator during moving. • Packaging materials: Remove all packaging materials and bottom pad of the refrigerator and carry them indoors. • Two person installation: Use two or more people to move and install the appliance. Failure to do so can result in back or other injury. - Page 13 Cabinetry dimensions A: Thickness of cabinet plank B: Outside width of cabinet...
- Page 14 Installation (Continued) Placing refrigerator inside the cabinetry 1. Remove the refrigerator packing carton and take out the installation accessories inside the door. 2 × Lower hinge decorative cover 2 × Upper hinge decorative cover 2 × Top baffle cover cap 1 ×...
- Page 15 3. Move the refrigerator into the cabinet slightly, then open the limit hook at the lower of the refrigerator. Adjust the position of the refrigerator to make it cling to the cabinet on one side of the refrigerator hinge, and make the flanging of top baffle cling to the edge of the cabinet. Hook the bottom edge of the cabinet by support limit hook.
- Page 16 Installation (Continued) Installation of the upper door 1. Close the upper door of the refrigerator. Take out the positioning card on the door of the refrigerator and place it in the positioning hole of the upper door fixing plate. Fit it with the upper end of the cabinet.
- Page 17 3. Place the assembled door on the double-headed stud of the refrigerator door body after installation, then close the door. Check the matching of wooden door and cabinet. Confirm the closing effect and fasten it with flange nut. Then install the support under the door. Lock the refrigerator door body and cabinet with cross groove countersunk head tapping screw and cross groove pan head tapping screw.
- Page 18 Installation (Continued) Installation of the lower door 1. Close the lower door of the refrigerator, and take out the positioning card strip on the lower door of the refrigerator. Place it in the positioning hole of the lower door fixing plate, and fit it with the lower end face of the cabinet door.
- Page 19 3. Place the assembled door on the double-headed stud of the refrigerator door body after installation, then close the door. Check the matching of wooden door and cabinet. Confirm the closing effect and fasten it with flange nut. Then install the support under the door. Lock the refrigerator door body and cabinet with cross groove countersunk head tapping screw and cross groove pan head tapping screw.
- Page 20 Installation (Continued) Adjusting the cabinetry door Adjustment of upper end of the cabinet door: 1. Adjust the adjustable height (Z) (about 5mm) of double nut with wrench. 2. Slightly loosen the flange nut, then move the door left and right to the adjustable left and right position (X) (about 5 mm).
- Page 21 Installation final touches 1. Install the top baffle cap. 2. Install the bottom support cap. 3. Install the hinge cap. 4. Install the decorative cover on the door. 5. Install the decorative cover under the door. 6. Install the sealing strip.
-
Page 22: Reversing The Door
Reversing the Door Reversing the door The door opening direction is left opening by default as a factory standard. To change the door swing to right opening, follow these steps: 1. Open the door, then take off the hinge decorative cover, the insert nail of upper and lower beam and also the screw cap of middle beam. - Page 23 3. Remove the upper and lower hinges of the door, and fix the hinges on the door after changing over the position. 3. Install the door and lock it, then install the insert nail, the middle beam screw cap and the hinge cover, then the opening direction change of door is completed.
-
Page 24: Maintenance & Cleaning
Maintenance and Cleaning Defrosting The refrigerator is made based on the air-cooling principle and thus has automatic defrosting function. Frost formed due to change of season or temperature may also be manually removed by disconnection of the appliance from power supply or by wiping with a dry towel. WARNING Other mechanical devices or other means shall not be used to accelerate except those recommended by the manufacturer. - Page 25 Out of Operation • Power failure: In case of power failure, even if it is in summer, foods inside the appliance can be kept for several hours; during the power failure, the times of door opening shall be reduced, and no more fresh food shall be put into the appliance.
-
Page 26: Troubleshooting
Troubleshooting Fault Indication The following warnings my appear on the control panel display indicating the corresponding faults of your appliance. Though the refrigerator may still be in operation with a fault, we highly recommend our after sales support line for maintenance to optimise the performance of your appliance. Fault Code Fault Description Setting 1 is flashing... - Page 27 Moisture forms on • This is normal. When the ambient humidity is too high, condensation the inside appliance on the exterior surface and door seals will appear. Wipe the walls. condensate with a clean towel. • Ensure the door is fully closed Moisture forms on •...
- Page 28 THIS PAGE IS INTENTIONALLY LEF T BL ANK...
-
Page 29: Product Specifications
Product Specifications Model: IIF241 Product Dimensions: W: 540mm, D: 545mm, H: 1785mm Weight (Net/Gross): 63.5kg/67.5kg Refrigerator Capacity: 180L Freezer Capacity: Total Capacity: 248L Energy Rating: 3 Stars MEPS Refrigerant, Amount: R600a, 47g Standards This product complies with AS/NZS IEC 62552.1/2/3:2018 electrical safety, and with EN 55014-1:2006+A1:2009 A2:2011 for electromagnetic compatibility. - Page 30 Attach Your Receipt Here...
-
Page 31: Purchase Details
Purchase Details For your records, please record details of your purchase Your serial number can be found on the rear below and staple your receipt on the opposite page. of your integrated fridge. STORE DETAIL S STORE NAME ADDRESS TELEPHONE PURCHASE DATE PRODUCT DETAIL S MODEL NO. -
Page 32: Warranty Information
Warranty Information WARRANTY TERMS AND CONDITIONS IN THIS WARRANTY REFRIGERATION APPLIANCES (a) ‘acceptable quality’ as referred to in clause 10 of this warranty has the same meaning referred This document sets out the terms and conditions to in the ACL; of the product warranties for Residentia Group (b) ‘ACL’... - Page 33 You will bear the cost of transportation, travel 10. For Appliances and services provided by and delivery of the Appliance to and from Residentia Group in Australia, the Appliances Residentia Group or its ASR. If you reside outside come with a guarantee by Residentia of the service area, you will bear the cost of: Group that cannot be excluded under the (a) travel of an authorised representative;...
- Page 34 THIS PAGE IS INTENTIONALLY LEF T BL ANK...
- Page 35 Simply visit the below website, or ask your retailer the dealer/ retailer for servicing. These products, for help: www.inalto.house/nz/registration unless stated otherwise, have a 12 month warranty from original date of purchase with WARRANTY: 24 months on the microwave magnetron;...
- Page 36 D E S I G N E D I N M E L B O U R N E F O R A L L A U S T R A L I A N H O M E S —...
Need help?
Do you have a question about the IIF241 and is the answer not in the manual?
Questions and answers