
Related Manuals for Raven RVI-600


Summary of Contents for Raven RVI-600
- Page 1 RVI-600 User Guide Copyright © 2017 RAVEN ELECTRONICS CORPORATION 4655 Longley Lane Reno #106, Nevada 89502 Last Updated on January 25, 2017 Rev 1...
-
Page 2: Table Of Contents
LED Status Indicators ........................... 7 Voter Display ..............................8 Advanced Setup ..............................9 Telnet Configuration ............................. 9 System-Wide Settings ..........................10 Channel Specific Settings ........................... 10 Raven Electronics Corporation 4655 Longley Lane Reno, NV 89502 Page 1 of 10... -
Page 3: Initial Setup
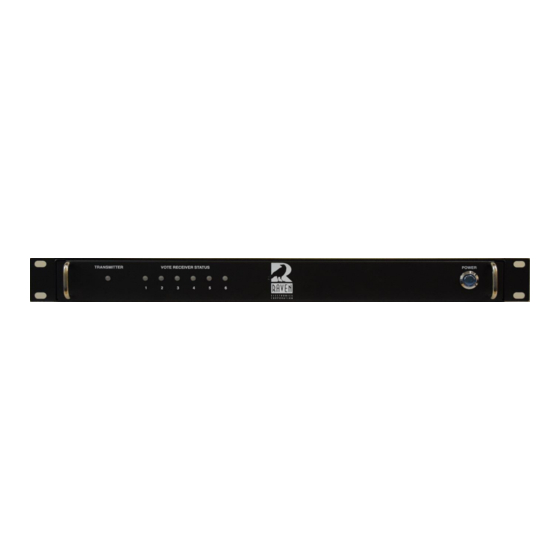
Figure 1-2: RVI-600 Front Panel Refer to Figure 1-2 and press the power button on the front of the RVI-600 to start the unit. A fan will start and the power button will have blue backlighting. - Page 4 Once the unit is powered on, it is time to configure the RVI-600 Voter. The unit is configurable through a web- based software which is accessible by using any browser on your computer. Please refer to Figure 1-3. Configure your PC with an IP address in the range of 10.1.1.1 – 10.1.1.252 and a subnet of 255.255.255.0.
-
Page 5: Change Ip Address Of Rvi-600
After selecting Save Changes, the yellow popup in Figure 1-7 will appear. Click on the Apply Now button on the right of the yellow box. Please note that this will restart the unit. Raven Electronics Corporation 4655 Longley Lane Reno, NV 89502 Page 4 of 10... -
Page 6: Change Login And Password
A prompt will appear as in Figure 1-4 to enter the new Username and Password. After a successful change and login, Figure 1-9 will appear. Figure 1-9: Administration Raven Electronics Corporation 4655 Longley Lane Reno, NV 89502 Page 5 of 10... -
Page 7: Connections And Status Indicators
(TX1). If tone keying (default), the RVI-600 turns off its keying when console audio comes in and allows the keying tone sequences from the console to key the transmitter. If relay keying, the transmitter port will provide the PTT for keying of the radio when the console is active. -
Page 8: I/O's
This indicates a squelch status (status tone being detected or no COR detected) on a receiver port. For the transmitter port this indicates no TX activity. Raven Electronics Corporation 4655 Longley Lane Reno, NV 89502 Page 7 of 10... -
Page 9: Voter Display
2.5 Voter Display The RVI-600 can be monitored remotely for voter operation as shown in figure 2-3. Transmit, receive, COR, PTT, vote state and fault indications are shown. Figure 2-3: RVI-600 Voter Display Raven Electronics Corporation 4655 Longley Lane Reno, NV 89502... -
Page 10: Advanced Setup
Additional parameters can be set via a telnet session. Use a telnet client such as putty (www.putty.org) or use the Windows Telnet client. These settings are considered to be advanced and used in fewer voting environments. Use with some caution or contact Raven for assistance. User credentials follow the same as configured through the web interface. -
Page 11: System-Wide Settings
1 = standard EIA keying tones are used to key the transmitter of this port. useKeyingTonesForTransmit 0 = PTT/wireline on pins 3 and 6 are used to key the transmitter of this port. Raven Electronics Corporation 4655 Longley Lane Reno, NV 89502 Page 10 of 10...
Need help?
Do you have a question about the RVI-600 and is the answer not in the manual?
Questions and answers