
Related Manuals for OSS OSS-CPCIe3-3U-10GbE-x4-QUAD


Summary of Contents for OSS OSS-CPCIe3-3U-10GbE-x4-QUAD
- Page 1 OSS- -3U-10GbE-x4-QUAD CPCIe3 INSTALLATION GUIDE OSS-CPCIe3-3U-10GbE-x4-QUAD www.onestopsystems.com...
-
Page 2: Table Of Contents
Device is not detected or recognized ..............................14 Device is recognized but the front LED indicator is not coming ON ......................14 Intel82599 devices are showing UP with a Yellow Exclamation mark ..................... 14 Broken OSS-529 board .................................... 14 Contacting Technical Support ............................15 10.1 Returning Merchandise to One Stop Systems ........................... -
Page 3: Getting Started
Turning ON the Device SFP module and Cable Installation LED Panel Indicator Verify Device Installation Unpacking Check and identify the standard supplied item. Inspect the card / module to make sure it is free from physical defects / damages. OSS-CPCIe3-3U-10GbE-x4-QUAD... -
Page 4: Description Of Parts
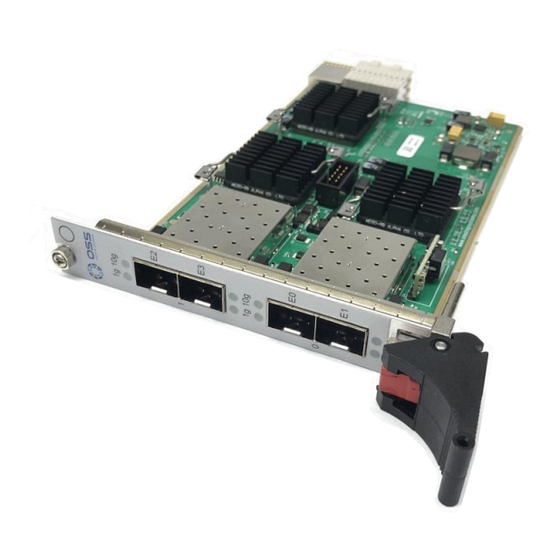
One Stop Systems Description of Parts Side Front OSS-CPCIe3-3U-10GbE-x4-QUAD... -
Page 5: Module Installation
With the injector/ejector handle in the down position, carefully slide the module to the rear of the chassis. Caution: Ensure that the module is aligned perpendicularly to the chassis as you begin sliding it in. Otherwise, it’s possible for components on the module (or on adjacent modules) to be damaged by contact between modules. OSS-CPCIe3-3U-10GbE-x4-QUAD... - Page 6 Secure the module front panel to the chassis using the captive front panel mounting screws. The module has two captive mounting screws. mounting screw on top mounting screw (bottom) beneath the injector/ejector OSS-CPCIe3-3U-10GbE-x4-QUAD...
-
Page 7: Sfp Module And Cable Installation
Carefully insert SFP+ Cable (Fiber or Cat6) to any available port on the module. Supported SFP and SFP module What are the SFP+ and SFP module requirements for the Intel® Ethernet Converged Network Adapter X520 Series? Check Intel website for further information on the supported SFP and SFP modules. https://www.intel.com/content/www/us/en/support/articles/000005528/network-and-i-o/ethernet-products.html OSS-CPCIe3-3U-10GbE-x4-QUAD... -
Page 8: Turning On The Device
Once the SFP modules are inserted correctly, you can turn ON the expansion unit. After the expansion unit is powered UP, the LED located on the front module will illuminate depending on the link connection (either 1G or 10G). LED Panel Indicator 10g: Indicates 10G link 1g: Indicates 1G link OSS-CPCIe3-3U-10GbE-x4-QUAD... -
Page 9: Verify Device Installation
See output below, four Intel 82399ES are detected To find out the device assigned name, type the command below on the terminal window. $ lspci - c network –businfo See output below, four 82599ES are detected and each has their corresponding device name (i.e. enp9s0f0) OSS-CPCIe3-3U-10GbE-x4-QUAD... - Page 10 The following two photos below represent the device slot address /B/D/F (Bus#, Device#, Function#) and its corresponding physical SFP port on the card. The OSS-PXIE-10GBe-QUAD uses a PLX PEX 8732. You can check or query the PEX 8732 by using the command below on the terminal window. $ lspci –v | grep –I ‘PEX 8732’. See output below...
-
Page 11: Windows
Right click the PCI standard PCI-to-PCI bridge with your mouse, then select properties. Select the “Details” tab, below the “Property”, select “Compatible Ids”, it will show the Vendor Device of 8732. This is the PEX 8732 chip on the card. All four “PCI standard PCI-to-PCI bridge” devices will have the same PCI\VEN DEV 8732 OSS-CPCIe3-3U-10GbE-x4-QUAD... - Page 12 Collapse or click the ‘+’ or ‘>’ sign next to PCI standard PCI-to-PCI bridge and you will find four instances of Intel 82599 10 Gigabit Dual Port Network Connection devices, see screenshot below. The following four screenshots represent the “Bus#, Device#, Function#” and its corresponding physical SFP port on the card. OSS-CPCIe3-3U-10GbE-x4-QUAD...
- Page 13 One Stop Systems OSS-CPCIe3-3U-10GbE-x4-QUAD...
-
Page 14: Troubleshooting
Broken OSS-529 board If you received a brand new DOA (Dead on Arrival) board, please contact OSS to RMA board and request for a replacement. If you have an out of warranty board, please contact OSS Sales team and buy a new replacement board. -
Page 15: Contacting Technical Support
10.1 Returning Merchandise to One Stop Systems If factory service is required, you must contact OSS Service Representative to obtain a Return Merchandise Authorization (RMA) number. Put this number and your return address on the shipping label when you return the item(s) for service. One Stop Systems will return any product that is not accompanied by an RMA number. - Page 16 One Stop Systems OSS-CPCIe3-3U-10GbE-x4-QUAD...
Need help?
Do you have a question about the OSS-CPCIe3-3U-10GbE-x4-QUAD and is the answer not in the manual?
Questions and answers