Table of Contents
Advertisement
Quick Links
CARE INSTRUCTIONS:
WIPE CLEAN WITH SOFT DAMP CLOTH. DO NOT USE SCOURERS, ABRASIVES OR CHEMICAL SOLVENTS. STORE IN A DRY PLACE AND KEEP AWAY FROM DIRECT WATER
AND SUNLIGHT. FOR INDOOR AND DOMESTIC USE.
WARNING:
DO NOT STAND OR SIT ON THE PRODUCT. DO NOT USE THE PRODUCT AS A STEP LADDER. DO NOT USE THE PRODUCT UNLESS ALL BOLTS AND SCREWS ARE FIRMLY
SECURED.LOAD DRAWER EVENLY TO PREVENT FROM TIPPING OVER. FAILURE TO FOLLOW THESE WARNING COULD RESULT IN SERIOUS INJURY. MAXIMUM SAFE
LOAD:10KGS FOR TOP PANEL,3KGS FOR DRAWER.
A
8PCS
6X35mm
B
8PCS
15x9mm
C
8PCS
6x30mm
D
8PCS
4X35mm
E
4PCS
Glide
1
5
4
3
6
6
6
Assembly Instructions
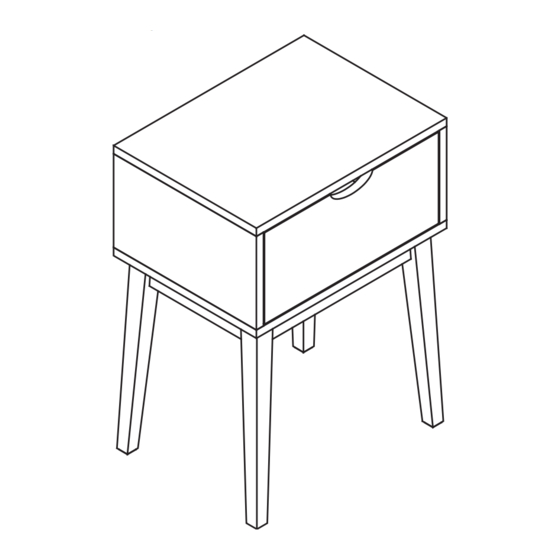
42909279 BEDSIDE DRAWER WHITE
Hardware list
M6X45mm
F
Flat Washer
G
H
Spring Washer
I
Allen Key
2
7
10
11
9
6
8PCS
8PCS
1
8PCS
1PC
4
7
10
1PC
1PC
2
1PC
1PC
5
1PC
1PC
8
1PC
1PC
11
1PC
3
4PCS
6
1PC
9
Advertisement
Table of Contents

Related Manuals for KMART 42909279


Summary of Contents for KMART 42909279
- Page 1 Assembly Instructions 42909279 BEDSIDE DRAWER WHITE CARE INSTRUCTIONS: WIPE CLEAN WITH SOFT DAMP CLOTH. DO NOT USE SCOURERS, ABRASIVES OR CHEMICAL SOLVENTS. STORE IN A DRY PLACE AND KEEP AWAY FROM DIRECT WATER AND SUNLIGHT. FOR INDOOR AND DOMESTIC USE.
- Page 2 STEP 1 STEP 3 Fix part A onto board 1 into the corresponding position Put board 5 onto board 2 & 3 into the corresponding position as per diagram. as per diagram. STEP 2 STEP 4 Attach board 4 onto board 2 & 3 with part C & D. Attach board 2 &...
- Page 3 STEP 5 STEP 7 Fix part A onto board 11 into the corresponding position as per diagram. Attach leg 6 onto board 4 with part G,H,F & I. STEP 6 STEP 8 Peel off self-adhesive tape of Glide E, stick them on the bottom of each leg . Attach board 7 &...
- Page 4 STEP 9 STEP 11 Put board 10 onto board 7 & 9 into the corresponding position as per diagram. Attach the drawer onto Step 6 and then adjust drawer runner into corresponding position as STEP 10 per diagram. STEP 12 Finish the assembly.
Need help?
Do you have a question about the 42909279 and is the answer not in the manual?
Questions and answers