Advertisement
Quick Links
Advertisement

Related Manuals for PackshotCreator PackshotOne Mark II


Summary of Contents for PackshotCreator PackshotOne Mark II
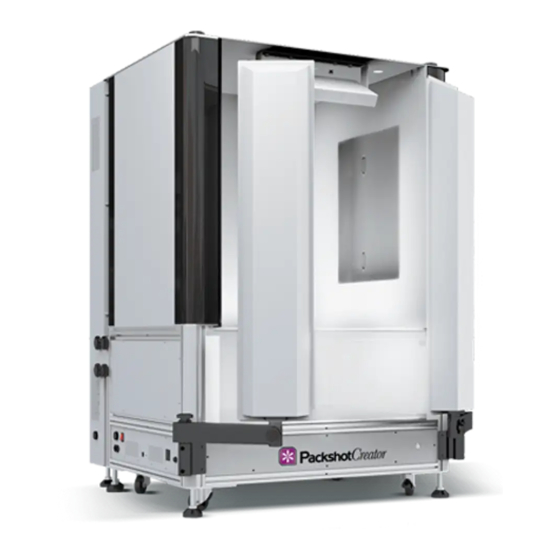
- Page 1 PackshotOne Mark II QuickStart I N S T A L L A T I O N G U I D E...
- Page 2 Round acrylic stand Bottom glass © Sysnext. All rights reserved. This material is not to be interpreted as a guarantee of earnings and may not be copied, reproducved, modified, published, uploaded, posted or distributed in any way, without PackshotCreator’s prior consent.
-
Page 3: Specifications
PackshotOne Mark II SPECIFICATIONS Dimension (L x W x H): 105 x 95 x 150 cm Light Box Body: 105 x 76 x 150 cm Back Light Panel: 105 x 17 x 150 cm Maximum Target Size Top Shots: 77 x 74 cm... -
Page 4: System Placement
PackshotOne Mark II SYSTEM PLACEMENT ROLLING THE UNIT: Once the desired height is Use the #24 wrench to adjust the Rotate the bottom nut to make the obtained, tighten the top nut leg height. Start by loosening the leg higher or lower. -
Page 5: Hardware Installation
PackshotOne Mark II SYSTEM PLACEMENT GUIDING THE UNIT THROUGH A DOORWAY /2: Support the back light panel in the Move the light box and back vertical position while removing light panel through the doorway the 4 white hand screws and separately. - Page 6 PackshotOne Mark II HARDWARE INSTALLATION SWING LIGHT INSTALLATION 2/3: Use an Allen key to attach the Remove the front swing lights from Prepare the screws and washers as holding brackets on each front inside. pictured. corner as pictured. Place the light panel that has a...
- Page 7 PackshotOne Mark II HARDWARE INSTALLATION SWING LIGHT INSTALLATION 3/3: Re-attach the back light panel to Attach the diusion cover. Plug the swing lights into the main the light box. system then rotate the external ring to tighten. ACRYLIC PANEL INSTALLATION 1/2:...
- Page 8 PackshotOne Mark II HARDWARE INSTALLATION ACRYLIC PANEL INSTALLATION 2/2: Remove also the related fixing Slide out the middle glass. Slide in the large panels from the blocks holding the middle glass. front. TOP LIGHT PANEL INSTALLATION 1/2: Remove the 2 front light columns.
- Page 9 PackshotOne Mark II HARDWARE INSTALLATION TOP LIGHT PANEL INSTALLATION 2/2: String the top light power cable Plug it into the port on the top of through the ceiling hole. the back light panel. Rotate the ring to tighten. CABLE CONNECTIONS 1/2: Plug the power and USB cables Plug the connection cable “A”...
- Page 10 “ON” position. adaptor to power your camera. (OPTIONAL) ADDITIONAL BOTTOM GLASS INSTALLATION STEP A 1/2: (Follow step A if you buy PackshotOne Mark II with 50 kg load capacity in advance) Remove the small white hand Follow the...
- Page 11 PackshotOne Mark II HARDWARE INSTALLATION (OPTIONAL) ADDITIONAL BOTTOM GLASS INSTALLATION STEP A 2/2: Replace the small white hand Slide in the additional bottom Slide in the additional acrylic screws on the holding bar. glass from the front. diffusion plate from the front.
- Page 12 PackshotOne Mark II HARDWARE INSTALLATION (OPTIONAL) ADDITIONAL BOTTOM GLASS INSTALLATION STEP B 1/2: (Follow step B if you are upgrading the load capacity of PackshotOne Mark II from 20 kg to 50 kg) There are 6 hole in total. Follow the steps...
Need help?
Do you have a question about the PackshotOne Mark II and is the answer not in the manual?
Questions and answers