Table of Contents
Advertisement
Quick Links
Advertisement
Table of Contents

Related Manuals for Right Weigh 221-SK

Summary of Contents for Right Weigh 221-SK
- Page 1 Installation Manual STRAIN SENSOR EPOXY KIT FOR STEER AXLES 221-SK...
- Page 2 It is also important to be aware of vehicle manufacturer policies before making modi cations to the vehicle. Right Weigh, Inc. is not liable or responsible for issues regarding warranties with other manufacturers. This is the responsibility of the customer.
-
Page 3: Table Of Contents
CONTENTS Parts Included Tools Required How It Works Installation Instructions Axle Preparation Applying Epoxy Epoxy Jig Assembly Tension Bar Pickup Coil & Metal Cover Connect To Scale Warranty Return Policy & Repairs... -
Page 4: Parts Included
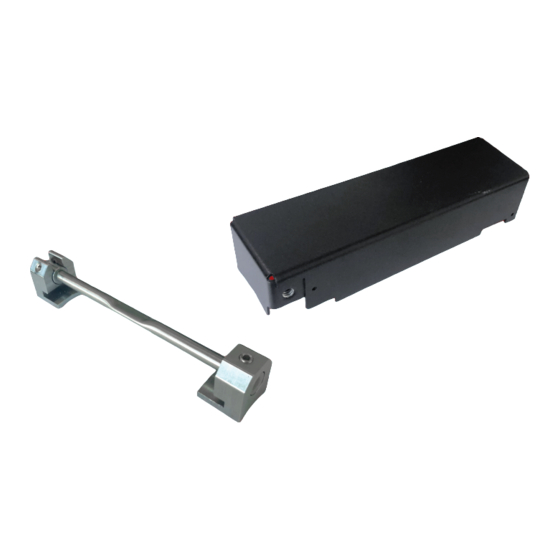
PARTS INCLUDED 4 x Worm Drive Hose Clamps Extension Cable (25’) (1 large, 2 medium, 1 small) Pick-Up Coil Metal Cover RW #EL-004-0054 RW #HW-010-0047 Loop Clamp Washer Bolt... - Page 5 PARTS INCLUDED Screws Mounting Block Alignment Dowel Mounting Block Tension Bar Epoxy Jig RW #EL-001-0002 Assembly 7” 11” Cable Cable Ties Ties 2 x Butt 1 x Heat Connectors J-B Weld Shrink...
-
Page 6: Tools Required
TOOLS REQUIRED 7/16” Wrench Tape Nut Drivers Measure 1/4” and 5/16” Allen Wrench Marker Stirring Stick (1/8”) for Epoxy Angle Grinder Paper Plate or Sander Drive Torque Wrench Sockets 1/4” and 5/16”... -
Page 7: How It Works
HOW IT WORKS The sensor is mounted so that it compresses or extends as the axle bends. The change in length of the sensor is measured and converted to weight by the Right Weigh gauge after calibration. EMPTY LOADED The tension bar is a wear item, whose life span depends on environmental conditions and severity of use. -
Page 8: Installation Instructions
AXLE PREPARATION FIND THE CENTER OF THE AXLE Use the tape measure to find the center of the axle and mark location with a marker. The sensor must be placed on the TOP of the axle AXLE PLACE EPOXY JIG ON AXLE AXLE Place the Epoxy Jig Assembly on MOUNTING... -
Page 9: Applying Epoxy
APPLYING EPOXY PLACE EPOXY JIG BACK ON AXLE Place Epoxy Jig back on the axle and take 2 medium hose clamps and wrap them over the bottom edge of the epoxy blocks and around the axle loosley. MIX EPOXY Mix J-B Weld evenly in a 1:1 ratio. SPREAD OVER AXLE Liberally spread the epoxy over where the mounting... -
Page 10: Epoxy Jig Assembly
EPOXY JIG ASSEMBLY PLACE BLOCKS OVER EPOXY AREAS Move the mounting blocks over the epoxy areas. Tighten down hose clamps and torque to 80 in-lbs using the torque wrench. WAIT 24 HOURS FOR EPOXY TO CURE Don’t drive truck a signi cant amount during this time to avoid block movement REMOVE ALIGNMENT DOWEL Loosen the set screws and remove the dowel. -
Page 11: Tension Bar
TENSION BAR INSTALL TENSION BAR Carefully install the tension bar into the blocks so that the grooved side is in the block with only one set screw. TENSION BAR TIGHTEN DOWN SET SCREWS Firmly tighten the set screws, without touching the tension bar, making sure to tighten the side with the single set screw rst. -
Page 12: Pickup Coil & Metal Cover
PICKUP COIL & METAL COVER INSERT AND CLAMP PICKUP COIL Install pickup coil over the PICKUP COIL tension bar so that the cable points in desired direction on the axle. Tighten using small hose clamp and nut driver. TENSION BAR HOSE CLAMP INSTALL COVER... -
Page 13: Connect To Scale
CONNECT TO SCALE INSTALL LOOP CLAMP LOOP CLAMP Bend the loop clamp over the cable about 4” from the pickup coil. CABLE LOOP CLAMP WASHER Tighten to the cover using the BOLT bolt and washer and the wrench. COVER ROUTE CABLE TO GAUGE Route the cable to the gauge, and connect using supplied butt connectors. -
Page 14: Warranty
In no event shall Right Weigh, Inc. be liable for direct, indirect, special, incidental or consequential damages (including loss of pro ts or loss of time) resulting from the performance of a Right Weigh, Inc. product. In all cases, Right Weigh, Inc. liability will be limited to the original cost of the product in question. -
Page 15: Return Policy & Repairs
Right Weigh, Inc. will return the product at its expense via a shipping method (carrier to be at sole discretion of Right Weigh, Inc.) equal to or faster than the method used by the customer. Products or parts thereof not covered by warranty will be repaired or replaced at customer expense upon authorization by the customer. - Page 16 For additional support contact: Right Weigh, Inc. (503) 628-0838 (888) 818-2058 - Toll Free (USA ONLY) www.rwls.com support@rwls.com ©2015-2020 Right Weigh, Inc. All rights reserved.
Need help?
Do you have a question about the 221-SK and is the answer not in the manual?
Questions and answers