
Subscribe to Our Youtube Channel
Related Manuals for Bartlett V6-CF

Summary of Contents for Bartlett V6-CF
- Page 1 Operation Manual Model V6-CF Controller BARTLETT INSTRUMENT COMPANY 1404 Avenue M Fort Madison, IA 52627 319-372-8366 WWW.BARTINST.COM...
-
Page 2: Table Of Contents
WELCOME !! ...............................3 PRECAUTIONS............................3 CONTROLLER FRONT PANEL.......................4 OVERVIEW OF HOW THE CONTROLLER FUNCTIONS ..............5 GETTING STARTED ..........................6 PROGRAMMING ............................7 1. CONE FIRE ............................7 To use CONE FIRE: ..........................7 CONE FIRE Example ..........................8 2. VARY-FIRE ............................8 VARY-FIRE Example ..........................9 RECALL PROGRAM is used to recall a previously programmed firing profile........9 3. -
Page 3: Welcome
WELCOME !! Thank you for purchasing a Model V6-CF temperature controller. The Model V6-CF is an enhanced version of previous controllers which have been offered. We hope this manual helps you learn to use your controller quickly and efficiently. Additional information can be found on the internet at www.bartinst.com FEATURES ∗... -
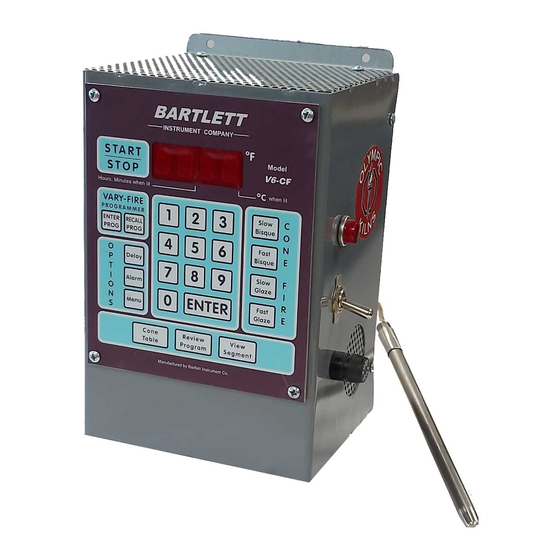
Page 4: Controller Front Panel
Controller Front Panel Start-Stop button LED DISPLAY - for starting and four digit display stopping firings. showing times and temperatures. VARY-FIRE Programmer for Number keys setting and saving section for your own firing entering profiles temperatures and times. OPTIONS section for setting delay start and alarm. -
Page 5: Overview Of How The Controller Functions
Overview of How the Controller Functions You enter a program that tells the controller what temperature you want to fire to and at what rate you want the temperature to rise. The controller uses a thermocouple (t/c) to sense the temperature in the kiln. The temperature is measured at the tip of the t/c so it is important that the tip be 1½"... -
Page 6: Getting Started
Getting Started Read all precautions before using your controller. If your kiln has individual manual controls for each heating element, turn all the dials to HIGH. If your kiln has a manual shut-off device, use one higher cone number than you are firing to in the device. If there is a timer, set it for longer than the estimated firing time. -
Page 7: Programming
PROGRAMMING 1. CONE FIRE The CONE FIRE mode allows you to fire to a cone number with one of four different speeds. To use CONE FIRE: 1. Make sure the temperature is flashing. Pressing the “1” key will clear the display of errors (Err) or FAIL. Press one of the 4 firing speed buttons (see appendix A to see the ramp speeds) Slow Bisque - Used for setting a slow bisque firing profile. -
Page 8: Cone Fire Example
2. VARY-FIRE The V6-CF has 6 vary-fire user programs to store and reuse. Each program has from 1 to 8 segments (2 – 16 segments if 16-S option is on). Each segment has a firing rate, a soak temperature, and a hold time. It is best to write out the firing profile that you plan to program before you begin programming. -
Page 9: Vary-Fire Example
VARY-FIRE Example The following steps are used to program User 1 program for the firing profile above. Step Press Display Comment ENTER alternately flashing: The display alternates between USEr and the last selected PROG USEr & No. user number. Selects user (USEr) profile number 1 ENTER alternately flashing: The displays flashes between SEG and the number of... - Page 10 Cone Table - Used to look up the temperature of various cone numbers. The temperature which is displayed is for self-supporting cones with a heating rate of 108°F/hr. To use, press Cone Table, enter the cone number you want to look up, press ENTER; the cone temperature will be displayed followed by CPL. Review Program - The information displayed when Review Program is pressed varies depending on whether you are using Cone Fire or Vary Fire.
-
Page 11: Options Section
4. OPTIONS SECTION Delay - This key is used to delay the start of a firing. Example: Program a one hour delay to the start of a firing. Remember: the temperature must be flashing before beginning to program. Step Press Display Comment Delay... - Page 12 Preheat Example: Set a preheat time of 2 hours. Remember: the temperature must be flashing to start the programming. Step Press Display Comment If PrHt does not show on the display, even after cycling through the Other options, it means that CONE FIRE mode has not been selected. Exit the PrHt menu and select a CONE FIRE speed, then return to the Other menu.
- Page 13 Step Press Display Comment Other, CnoS If CnoS does not show on the display, press the Other key until CnoS displays. Other ENTER Alternately flashing: Cone Offset has been selected; the word ConE and the last entered cone ConE & # number will alternately flash on the display.
- Page 14 ErCd - Used to turn on or turn off the error codes. When you receive your controller the error codes are turned on. In most cases, you want the error codes on to protect your firings. They can be turned off if you are doing special firings, such as jewelry or glass firing where the kiln is left open.
-
Page 15: Zone Control
2. GENERAL DESCRIPTION The V6-CF advanced 3-zone control system is programmed the same as the single zone control but it has new features to ensure even firing from the top to the bottom of the kiln. A 3-zone control has 3 temperature sensor inputs (thermocouples) and 3 independent outputs so the kiln can have 3 separately controlled sections (zones). -
Page 16: Error Codes (Ercd) Or Error Checking
6. ERROR CODES (ErCd) or ERROR CHECKING The zone control has the same standard error checking features of the single zone controller. Errd was introduced to monitor whether any zone or section gets more than 100 degrees above the travelling set-point but this feature also functions with the single zone controller. -
Page 17: Appendix A - Cone Fire Temperature Profiles
APPENDIX A - CONE FIRE TEMPERATURE PROFILES Firing Profiles for cone 04, temperature 1945°F (1063°C) Slow Bisque Slow Glaze Segment Rate°F /hr Temperature Stage Time Segment Temperature Stage Time Rate°F /hr 2.25 1.20 1000 3.75 1676 3.61 1100 1.00 1926 2.08 1676 3.31... - Page 18 The temperature is more than 50 degrees below the travelling set- Decreasing Ramp segment point temperature during a ramp segment where the temperature is > 50°F below travelling set-point temp. Err5 programmed to decrease. The temperature must stay 50 ° below this Persists >...
-
Page 19: Appendix C - Common Questions And Situations
APPENDIX C - Common Questions and Situations Q. During programming of a firing, I typed a wrong number. How do I correct this? Before pressing ENTER, enter zero until all zeros are displayed, then enter the correct number. If you have already pressed ENTER, you must press enter to progress through to the end of the program then start the program again. -
Page 20: Appendix E - Connection Diagram
APPENDIX E - Connection Diagram Connect For Single Connect Output here Thermocouple Zone here Controller OUTPUT 4 Relay OUTPUT 1 ( TOP) Relay OUTPUT 2 ( MIDDLE ) Middle T/C 1 YELLOW OUTPUT 3 ( BOTTOM ) Relay AC 1 Bottom T/C2 YELLOW...
Need help?
Do you have a question about the V6-CF and is the answer not in the manual?
Questions and answers