Table of Contents
Advertisement
Quick Links
Advertisement
Table of Contents

Related Manuals for Tyredog TD2000A-X


Summary of Contents for Tyredog TD2000A-X
- Page 1 - 0 -...
-
Page 2: Table Of Contents
IMPORTANT INFORMATION ................. 3 TPMS ADVANTAGES ....................4 EXCLUSIVE FEATURES ..................... 5 NSTALLATION ........................5 PERATION ........................6 ESIGN ..........................6 TYRE PRESSURE & SAFETY INFORMATION ........... 7 PACKAGE CONTENTS / PARTS CHECKLIST ............ 8 SYSTEM COMPONENTS ..................11 GUI LAYOUT ....................... 14 INSTALLATION ...................... - Page 3 ALLING ELAY ...................... 27 HANGING ETWEEN RAILERS ..................29 ETTING EASUREMENT NITS ..................30 ETTING IGH AND ARNINGS ................31 HANGING THE ISUAL AYOUT ................33 ID ..................37 ROGRAMMING ELAY ROGRAMMING EPLACEMENT ENSORS ................ 39 ROGRAMMING DDITIONAL ENSORS ................41 ADVANCED FUNCTIONS ..................
-
Page 4: Important Information
IMPORTANT INFORMATION This product is designed to indicate the conditions of the air inside your vehicle’s tyres. It should not be considered as a device that will prevent any traffic accident, injury or death. Tyres and valve stems must be checked before installation. It is very common for rubber valve stems to require replacement without showing signs of wear. -
Page 5: Tpms Advantages
TPMS Advantages A Tyre Pressure Monitoring System (TPMS) is an efficient and effective solution to many current automotive safety issues. TPMS will help minimize driving risks and reduce fuel consumption. Some benefits include: Ensures safe driving conditions. Tyre pressures can alter ride comfort and handling response. ... -
Page 6: Exclusive Features
TYREDOG has helped major players in the trucking industry improve safety and reduce operational costs. The major feature of TYREDOG TPMS is the use of the world’s smallest valve cap sensor. The extremely lightweight, compact sensor has been designed to simplify installation and remove the need to have wheels balanced when fitted. -
Page 7: Operation
433MHz devices, even other TYREDOG systems. All TYREDOG kits undergo strict field testing to ensure quality. The TD2000A-X can monitor tyres with pressures up to 180psi so all applications are supported. Sensors are treated for anti-corrosion during manufacture and use rubber seals to prevent liquid and fine particles from coming in contact with the circuitry. -
Page 8: Tyre Pressure & Safety Information
The monitor will automatically make connections when it is powered on. It is normal for some readings to freeze until sensor updates are received. All Tyredog sensors have their own unique codes and are designed to reject interference from other devices operating on the same frequency. -
Page 9: Package Contents / Parts Checklist
Package Contents / Parts Checklist Item Package #1 - Monitor Kit LCD Monitor User Guide AA Battery (LR6) Bracket Base ONE SET Monitor Bracket Bracket Adapter Ball Joint Ring Cigarette adapter. - Page 10 Package #2 – Relay & Sensor Kit Relay Relay Mounting Bracket 4mm Relay Bolt FOUR AA Battery (LR6) Relay Power Cord Relay Cover 3mm Cover Bolt...
- Page 11 Optional Parts/Accessories 3-way adapter The 3-way adapter is sold set supplied with individually and only available from fixing screws. an authorized TYREDOG re-seller. (RECCOMMENDED ONLY FOR DEEP DISH OR TRUCK WHEELS) Replacement Replacement sensors are sold learnable sensor. individually and only available from an authorized TYREDOG re-seller.
-
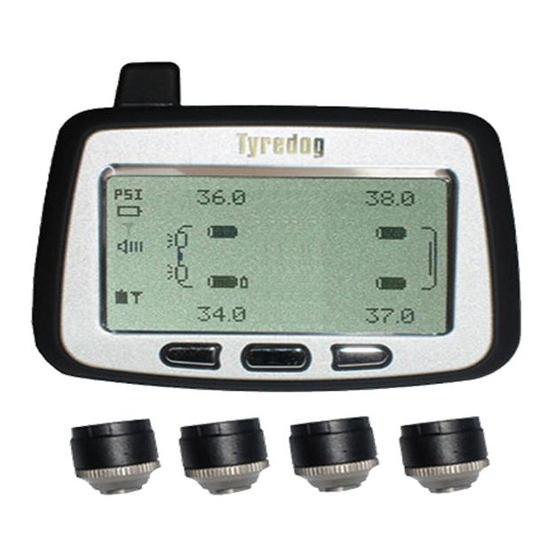
Page 12: System Components
System Components Monitor Antenna Screw hole for bracket LCD Display Battery Cover Power Switch Backlight Cigarette adapter socket Temperature Mute Front of Monitor Back of Monitor Mounting Bracket... - Page 13 Relay The relay is the main link between the sensors and the monitor. Without it, the system will not function. It is recommended the relay be mounted in a central location with considerably even distance between the furthest forward and furthest rearward sensors.
- Page 14 Tyredog Sensor The sensor has two sections: The sensor cap and sensor body. Its lightweight design and external application is intended to aid the user to install tyre pressure system at home without any technical knowledge or assistance. Battery cover...
-
Page 15: Gui Layout
GUI Layout... -
Page 16: Installation
Installation RELAY The relay can be powered by the supplied AA batteries, or the power cable. Permanent 12v is required for correct functionality of the relay. You must ensure the relay is NOT connected to a switched power source such as accessories or ignition, as this will cause synchronization issues with the monitor when powered up. - Page 17 Vehicle/trailer structure (chassis/body density etc) Please remember that any metal between the sensors/relay/monitor will play a part in limiting the signal transmission between Tyredog components. Although a metal object may not be in the direct line of sight between the components, it may still hinder signal transfer if the object is nearby or offside to the signal transmission path.
- Page 18 When mounting the Relay, be sure that it is mounted away from moving parts, (tail shaft, axle, etc.) sources of heat (exhaust) and is fitted in such a place that would keep it protected from potentially damaging terrain. The Relay can be mounted using the supplied heavy duty bracket, or on its own using the mounting holes at the top of the unit.
-
Page 19: Monitor
MONITOR The LCD monitor can be powered by 2x AA batteries, or your car’s power using the supplied cigarette lighter adapter. Please follow the steps below outlining how to install batteries into the monitor and sensors and powering up the system for the first time. -
Page 20: Sensors
If any sensors fail to come online, please try a battery from another sensor, or consult your nearest Tyredog dealer. Once all sensors are online, proceed to fitting the sensors to your tyre valves. - Page 21 1. After removing the original valve caps, slide the SecureFit fixing ring over the valve stem with the flat surface towards the wheel. 2. Screw the Tyredog sensor on in a clockwise direction until you feel the valve stem come under pressure.
-
Page 22: Mounting Bracket
MOUNTING BRACKET 1. Slide the threaded Ball Joint Ring over the ball joint 2. Insert the Ball Joint into the Bracket Adapter until it ‘pops in’ 3. Screw the Ball Joint Ring onto the Bracket Adapter until hand tight. - Page 23 4. Place the Monitor Bracket into the Bracket Adapter clips 5. Using gentle force, push the Monitor Bracket against the adapter clips and slide down until the Monitor Bracket locks in place. 6. Hook the Monitor Bracket onto the Monitor, line up the Monitor Screw and turn until tight.
-
Page 24: Operation
Operation Main button locations Mute Power Temperature Backlight When the unit is switched on, the boot up Power Switch screen will be displayed, followed by the CALL RELAY screen, then the home screen. -
Page 25: Main Button Functions
MAIN BUTTON FUNCTIONS Pressing the mute button will disable all audible Mute warnings. This is indicated by a strike through the speaker icon on the GUI. Pressing the temperature button will display all Temperature temperatures for 3 seconds. When on battery power, pressing the backlight Backlight button will illuminate the screen for 3 seconds. -
Page 26: Advanced Button Functions
ADVANCED BUTTON FUNCTIONS The three operation buttons perform different functions throughout the GUI. On all but the home screen, the appropriate function for that menu will be displayed above the corresponding button. For the next section, a table like below will be noted at the beginning of each menu option’s instructions. -
Page 27: Entering The Settings Menu
Press LIGHT to enter the selected menu option. Various adjustments can be made in each of these menu options to customize and optimize the way you use your Tyredog. When adjustments are completed, you can return to the main settings menu. -
Page 28: Calling The Relay
1. CALL RELAY – Manually connect to present Relays. Settings SET THRESHOLD No function Cancel Relay Call No function In the advanced settings menu, highlight ‘CALL RELAY’ and press enter. The system will enter the Relay Call Screen and attempt to communicate with the present relay(s). - Page 29 If the Relay Call is unsuccessful, COMMUNICATE FAIL will be displayed. If a Trailer Relay is programmed, the process will repeat. If the TEMP button is pressed at any time whilst the Relay Call is in progress, COMMUNICATE FAIL will be displayed, and the Relay Call will be cancelled. To cancel a Trailer Relay call, the TEMP button must be pressed during the Relay Call for the respective Relay.
-
Page 30: Changing Between Trailers
TD-2000A and the selected wheel layout requires two relays to be used. For further instruction regarding programming and alternating between trailer relays, please refer to the user manual supplied in your trailer kit. For more information, please consult your Tyredog reseller. -
Page 31: Setting Measurement Units
3. SET UNIT – Change the units used to display measurements. Settings SET UNIT NEXT ADJ (adjust) ENTER In the advanced settings menu, highlight ‘SET UNIT’ and press enter. The arrow ( ) symbol will be displayed next to the parameter you wish to change. -
Page 32: Setting High And Low Warnings
4. SET THRESHOLD – Change the alarm warning levels. Settings SET THRESHOLD NEXT DEC (decrease) ADD (increase) In the advanced settings menu, highlight ‘SET THRESHOLD’ and press enter. The arrow ( ) symbol will be displayed next to the parameter you wish to change. - Page 33 As settings are being adjusted, the corresponding axle set will flash. The axles are separated into groups, pressing NEXT after adjusting the Hi Temperature warning will advance to the next axle. If you wish to have the same values for all wheels, pressing and holding NEXT will enable the unit to make all adjustments within one setting.
-
Page 34: Changing The Visual Car Layout
5. SET CAR TYPE – Change the layout of your vehicle. Settings SET CAR TYPE NEXT ADJUST ENTER In the advanced settings menu, highlight ‘SET CAR TYPE’ and press enter. Thirty different wheel layout types can be selected to suit your particular application. - Page 35 Available wheel layout options: VISUAL NO. OF NO. OF TRAILER TYPE LAYOUT WHEELS RELAYS...
-
Page 38: Programming The Relay Id
6. SET RELAY ID – Relay Code Learning Mode. Settings SET RELAY ID ESC (escape) FRONT REAR In the advanced settings menu, highlight ‘SET RELAY ID’ and press enter. The SET RELAY ID screen will display the current car type. If the car type uses a single relay, only the MUTE button will be functional on screen. - Page 39 Once the Relay location is selected, press the SYNC button on the Relay you wish to program into that location. When the monitor has learned the code from the Relay, it will beep and then begin a Relay Call. Once the Relay Call is successful, the unit will return to the SET RELAY ID screen.
-
Page 40: Programming Replacement Sensors
This feature is used to program ‘Learnable’ replacement sensors in the event that one or more of the original sensors are damaged or stolen. As with the original Tyredog sensors, all ‘learnable’ sensors are numbered. Replacement sensors are designed only to replace originals of the same number. - Page 41 Press the ‘SYNC BUTTON’ on the Relay you wish to program the sensor(s) to. The L.E.D. will illuminate and the relay location will be displayed on the screen. The L.E.D. will illuminate meaning the Relay is ready to learn the sensor code. Insert the supplied CR1632 battery into your new ‘learnable sensor,’...
-
Page 42: Programming Additional Sensors
Programming additional sensors The TD-2000A system can be upgraded to monitor more sensors than it was originally supplied with. These instructions must be strictly adhered to ensure correct programming of the new sensors. Using the SET CAR TYPE function (p32) set your desired car layout. This layout must use the exact number of sensors you wish to run. - Page 43 Now using the SET RELAY ID function (p36) the Relay Code must be re-learnt to ensure correct synchronization between the relay and monitor. Press the SYNC button on the Relay to confirm to the monitor that the Relay is operating in the correct wheel layout. Using the SET SENSOR ID function (p38) you can now program any addition sensors providing they are applicable to the previously chosen layout.
- Page 44 Pressing the ‘SYNC BUTTON’ on the Relay will ‘Activate’ it as the receiving relay for the new sensors. If you wish to add sensors to an additional relay (such as a trailer relay), be sure to program ALL sensors to the first relay before activating the next.
-
Page 45: Advanced Functions
ADVANCED FUNCTIONS Initialization After powering up, the system will run the initial relay call. This will take around 10 seconds depending how many relays and sensors are operating. The most recent figures will be shown on screen until the unit receives all sensor updates. -
Page 46: Low Pressure Warning
Low Pressure Warning If a tyre’s pressure falls below the Low Pressure Warning value, the monitor will beep three times and the low pressure tyre icon will be shown. If the tyre pressure continues to drop, the monitor will repeat the warning for every 1psi drop in value. -
Page 47: High Pressure Warning
High Pressure Warning If a tyre’s pressure rises above the High Pressure Warning value, the monitor will beep three times and the high pressure tyre icon will be shown. If the tyre pressure continues to rise, the monitor will repeat the warning for every 1psi rise in value. -
Page 48: High Temperature Warning
High Temperature Warning If a tyre’s temperature rises above the High Temperature Warning value, the monitor will beep three times and the high temperature tyre icon will be shown. If the temperature continues to rise, the monitor will repeat the warning for every 1degree rise in value. -
Page 49: Battery Information
This should be enough time to purchase new batteries. Note: Batteries should be replaced as soon as possible to ensure safe and efficient functionality of the system. CR1632 batteries are available for purchase from your nearest Tyredog reseller, electronics or battery specialists. - Page 50 Notes on batteries Keep lithium batteries out of reach of children. Should a battery be swallowed, immediately consult a doctor. Wipe the battery with dry cloth to ensure a good contact. Always be sure of correct polarity when installing batteries. ...
-
Page 51: Troubleshooting
Troubleshooting If any sensors are failing to give a reading; o Turn the monitor off. o Remove batteries from all sensors. o Remove all sensors from valves. o Turn the monitor back on. o Insert batteries into sensors one by one. o Fit sensors to valves one by one. - Page 52 It is normal for the screen to turn dark after extended exposure to sunlight. Always be aware that heat and extended driving periods can greatly alter tyre pressure and drivability. If you feel your system has a fault which cannot be rectified by this procedure, please contact your Tyredog dealer.
-
Page 53: Specifications
Product specification Sensor Specification Frequency 315MHz Pressure range 0-180 PSI Accuracy Pressure: ±3 PSI – Temp: ±2 Degrees Celsius Operating voltage 3 Volts DC Operating temperature -40~125 Degrees Celsius Battery life Approx. 12 months (depending on daily operation time) Dimensions 20.5mm Diameter x 20mm Height Weight 10 g (±1) -
Page 55: Notes
Hotline: (03) 9482 2203 Website: www.zylux.com.au If the Authorised Supplier and / or Zylux (Tyredog) service centre concludes that while under normal use, a product failure or malfunction occurred during the warranty period and was caused by a defect in material or workmanship (see Exclusions), the Customer will be asked to ship to the nearest service point. - Page 56 Distributed by: ZYLUX DISTRIBUTION PTY. LTD. 166 Christmas Street, Fairfield, Vic, 3078 Website: www.zylux.com.au Email: info@zylux.com.au Tel: (03) 9482 2203...
Need help?
Do you have a question about the TD2000A-X and is the answer not in the manual?
Questions and answers