Table of Contents
Advertisement
Available languages
Available languages
Quick Links
Advertisement
Chapters
Table of Contents

Related Manuals for auna Arizona Sing


Summary of Contents for auna Arizona Sing
-
Page 3: Table Of Contents
Sehr geehrter Kunde, wir gratulieren Ihnen zum Erwerb Ihres Gerätes. Lesen Sie die folgenden Hinweise sorgfältig durch und befolgen Sie diese, um möglichen Schäden vorzubeugen. Für Schäden, die durch Missachtung der Hinweise und unsachgemäßen Gebrauch entstehen, übernehmen wir keine Haftung. Scannen Sie den folgenden QR-Code, um Zugriff auf die aktuellste Bedienungsanleitung und weitere Informationen rund um das Produkt zu erhalten:... -
Page 4: Technische Daten
TECHNISCHE DATEN Artikelnummer 10037817 Stromversorgung DC-Eingang: 9V 1A (AC-Adapter mitgeliefert für AC 100-240 V ~ 50/60 Hz) Betriebstemperatur 0 °C bis +35 °C Lautsprecher 1 x 4“ Lautsprecher Ausgangsleistung 1 x 8 W = 8 W RMS Mikrofon-Anschlüsse 2 x 6,3 mm Mikrofoneingang Line-In-Eingang 3,5 mm AUX-Buchse Kompatible Disks CD, CD+G, CD-R, CD-RW... -
Page 5: Sicherheitshinweise
SICHERHEITSHINWEISE Allgemeine Hinweise • Blitzschlag - Wenn Sie das Gerät länger nicht benutzen oder es gewittert, ziehen Sie den Stecker aus der Steckdose oder trennen Sie das Gerät vom Antennenanschluss. Dadurch werden Schäden am Produkt durch Blitzschlag und Überspannung vermieden. •... - Page 6 Besondere Hinweise • Dieses Gerät kann von Kindern ab 8 Jahren sowie von Personen mit verringerten physischen, sensorischen und geistigen Fähigkeiten oder Mangel an Erfahrung und/oder Wissen benutzt werden, wenn sie beaufsichtigt werden oder im sicheren Gebrauch des Gerätes unterwiesen wurden und die daraus resultierenden Gefahren verstanden haben.
-
Page 7: Geräteübersicht
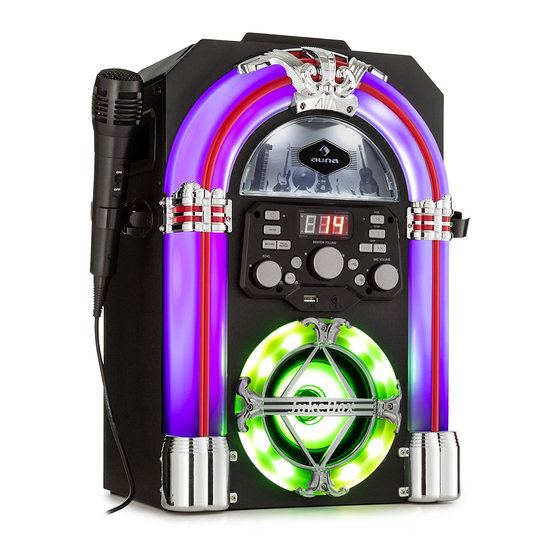
GERÄTEÜBERSICHT LED-Dekorationsleuchte CD-Fach Vorderseite Mikrofonhalterung Lautsprecher und Tragegriff Lautsprecherbeleuchtung Halterung für Smartpone oder Rückseite Tablet... -
Page 8: Bedienfeld
BEDIENFELD Ein/Aus-Taste STOP: Stopp-Taste MODE: Modus-Taste SKIP+ : Nächster Titel RECORD: Aufnahme-Taste SKIP- : Vorheriger Titel PROG/REPEAT: Speicher-/ MIC VOLUME: Mikrofon- Wiederholungstaste Lautstärkeregler ECHO: Regler für die -10: Vorherige 10 Titel Echoeinstellung überspringen A.V.C: Auto-Voice-Control +10: Nächste 10 Titel aktivieren/deaktivieren überspringen LINE IN: 3,5 mm Line-In- Licht-Modus-Taste... -
Page 9: Anschlüsse
ANSCHLÜSSE DC-IN-Anschluss Line-Out-Anschluss Audioausgang (L), Mikrofoneingang Mikrofonanschluss 1 Audioausgang (R) Mikrofonanschluss 2 Videoausgang Stromanschluss Stellen Sie das Gerät auf eine flache, stabile Oberfläche. 2. Verbinden Sie das eine Ende des Netzadapters (im Lieferumfang enthalten) mit dem DC-IN-Anschluss an der Rückseite des Geräts und stecken Sie das andere Ende in die Steckdose. - Page 10 Anschluss des Geräts an einen Fernseher Um Video, Songtext und Audio über Ihren Fernseher wiedergeben zu lassen, müssen die nachfolgenden Schritte befolgt werden: Verbinden Sie das RCA-Videokabel (gelb) mit dem Videoausgang VIDEO OUT (4) und die Audiokabel (weiß und rot) mit den Audioausgängen AUDIO OUT (2 &...
-
Page 11: Bedienung
BEDIENUNG Erste Schritte • Lesen Sie sich die Bedienungsanleitung aufmerksam durch. • Entnehmen Sie das Gerät aus der Verpackung. • Entfernen Sie das gesamte Verpackungsmaterial und bewahren Sie dieses für die zukünftige Verwendung auf (beispielweise für einen Umzug). Disko-Lichter Das Gerät verfügt über drei Lichtmodi: •... - Page 12 3. Drücken Sie mehrfach die Taste MODE (2) auf der Vorderseite des Geräts, um den CDG/CD-Modus auszuwählen. Auf dem LED-Bildschirm (18) blinkt „---“ auf, während nach einer CD gesucht wird. Anschließend wird die Gesamtzahl der Titel auf dem Bildschirm angezeigt. 4.
- Page 13 HINWEIS: Es wird empfohlen, das Gerät für die USB-Wiedergabe mit einem Fernseher zu verbinden. 4. Drücken Sie zum Starten der Wiedergabe auf der Vorderseite des Geräts die Taste PAIR (9). Wenn Sie eine MP3+G-Datei hören, werden das Bild und die Songtexte auf dem Fernsehbildschirm angezeigt (falls verbunden).
- Page 14 Geräte zu trennen und ein neues Gerät zu verbinden. 3. Aktivieren Sie bei Ihrem externen Gerät die BT-Funktion. Wählen Sie aus der Geräteliste des externen Geräts „Arizona Sing“ aus. Hinweis: Ziehen Sie für detailliertere Hinweise die Bedienungsanleitung des externen Geräts hinzu.
- Page 15 6. Durch Drücken der Tasten SKIP- (12) und SKIP+ (11) auf der Vorderseite des Geräts, können Sie den vorherigen/nächsten Titel überspringen. Aufnahmefunktion Um sowohl Ihren Gesang als auch die Musik aufzunehmen, drücken Sie die Taste RECORD (3) auf der Vorderseite des Geräts. Die Betriebsanzeige blinkt zunächst grün.
-
Page 16: Reinigung Und Pflege
REINIGUNG UND PFLEGE • Ziehen Sie vor der Reinigung den Netzstecker des Geräts aus der Steckdose. • Reiben Sie das Gerät, falls es staubig ist, mit einem weichen und trockenen Staubtuch ab. • Verwenden Sie zur Reinigung, ausschließlich, ein weiches Tuch. Verwenden Sie keinesfalls Wachs, Poliersprays oder aggressive Reinigungsmittel. - Page 17 Problem Mögliche Ursache/Lösung Kein Ton (wenn mit Die Fernseher ist stummgeschaltet oder die Fernseher verbunden) Lautstärke ist zu niedrig eingestellt. Stellen Sie die Lautstärke wie gewünscht ein. Im Fernsehmenü wurde nicht die richtige Quelle (normalerweise AV) ausgewählt. Der Songtext wird Wenn das Gerät mit einem Fernseher nicht auf dem verbunden ist, kann es sein, dass der Stecker...
- Page 18 Problem Mögliche Ursache/Lösung Ein externes BT-Gerät Die BT-Funktion Ihres externen Geräts wurde kann nicht mit dem nicht aktiviert. Lesen Sie sich hierfür die Gerät verbunden Bedienungsanleitung des externen Geräts werden. durch. Das Gerät befindet sich nicht im Kopplungsmodus. Drücken Sie zum Wiederholen des Koppelns die Taste PAIR.
-
Page 19: Hinweise Zur Entsorgung
HINWEISE ZUR ENTSORGUNG Wenn es in Ihrem Land eine gesetzliche Regelung zur Entsorgung von elektrischen und elektronischen Geräten gibt, weist dieses Symbol auf dem Produkt oder auf der Verpackung darauf hin, dass dieses Produkt nicht im Hausmüll entsorgt werden darf. Stattdessen muss es zu einer Sammelstelle für das Recycling von elektrischen und elektronischen Geräten gebracht werden. - Page 21 Dear Customer, Congratulations on purchasing this device. Please read the following instructions carefully and follow them to prevent possible damages. We assume no liability for damage caused by disregard of the instructions and improper use. Scan the QR code to get access to the latest user manual and more product information.
-
Page 22: Technical Data
TECHNICAL DATA Item number 10037817 Power supply DC input: 9V 1A (AC adaptor supplied for AC 100-240 V ~ 50/60 Hz) Operation temperature 0 °C bis +35 °C Speakers 1 x 4“ Speaker output 1 x 8 W = 8 W RMS Microphone connections 2 x 6.3 mm microphone jack Line-In 3.5 mm AUX jack... -
Page 23: Safety Instructions
SAFETY INSTRUCTIONS General information • Lightning - If you are not going to use the device for a long time or if there is a storm, disconnect the plug from the electrical outlet and disconnect the device from the antenna connector. This will avoid damage to the product that may be caused by lightning or overvoltage. - Page 24 Special Instructions • This device may only be used by children from the age of 8 and up and by persons with reduced physical, sensory and mental capabilities or a lack of experience and / or knowledge if they are supervised or have been instructed in the safe use of the device and have understood the resulting dangers.
-
Page 25: Device Overview
DEVICE OVERVIEW LED decoration light CD compartment Front panel Microphone holder Speaker and speaker light Carrying handle Slot for smartphone or tablet Back panel... -
Page 26: Control Panel
CONTROL PANEL Power on/off button STOP button SKIP+ button: MODE button (next track) SKIP- button RECORD button (previous track) MIC VOLUME knob PROG/REPEAT button (microphone volume) -10 button ECHO knob (skip previous 10 tracks) A.V.C on/of button +10 button (Auto Voice Control) (skip next 10 tracks) Light Mode button LINE IN jack (3.5 mm ) -
Page 27: Connections
CONNECTIONS DC in jack Line out jack Audio out (L) jack Microphone in jack 1 Audio out (R) jack Microphone in jack 2 Video out jack Connecting Power Source Place the unit on a flat, stable surface. 2. Connect AC adaptor (provided) into the DC IN jack (1) on the back panel of the unit and plug the the other end to the mains outlet. - Page 28 Connecting the Unit to a TV To output the video, lyrics and audio to your TV, perform the following steps: Connect the RCA video cable (Yellow) to the VIDEO OUT jack (4) and the audio cables (White and Red) to the AUDIO OUT jacks (2 & 3) located on the back of the jukebox.
-
Page 29: Operation
OPERATION First Steps • Read this instruction manual carefully. • Remove the appliance from the box. • Remove the packaging and save it for future use (for example when moving the unit). Disco Lights There are three light modes as follows: •... - Page 30 3. Repeatedly press the MODE button (2) on the front panel to select the CDG/CD mode; “---” will blink on the LED display (18) when searching the disc and then the total number of tracks will appear. 4. Press the PAIR button (9) on the front panel to start playback. If listening to a CD+G file, the image and lyrics will appear on the TV screen (if connected).
- Page 31 4. Press the PAIR button (9) on the front panel to start playback. If listening to an MP3+G file, the image and lyrics will appear on the TV screen (if connected). NOTES: • If connected to a TV you will see the selected song and folders on the TV screen.
- Page 32 3. Turn on your device’s BT option in settings to search for a discoverable device with a BT signal. Select “Arizona Sing” from the device results on the BT menu.
-
Page 33: Cleaning And Maintenance
4. To listen to the recorded song, press the MODE button (2) on the front panel to switch to USB mode, you can find the recorded song in the REC file. Press th SKIP- (12) and SKIP+ (11) buttons to choose the song that you want to play. -
Page 34: Troubleshooting
TROUBLESHOOTING Before taking the unit to be repaired, please check the following table when a problem occurs. Contact the manufacturer or the customer service if the problem cannot be solved with the following information. Problem Possible Cause/Solution No power Power is not on; press the POWER button (1) to turn power on. - Page 35 Problem Possible Cause/Solution No sound from the Make sure the microphone is firmly connected microphone to the MIC 1 or MIC 2 jack. Make sure the Mic’s ON/OFF switch on the Mic is set to the ON position Make sure the microphone’s volume is not set too low.
-
Page 36: Disposal Considerations
DISPOSAL CONSIDERATIONS If there is a legal regulation for the disposal of electrical and electronic devices in your country, this symbol on the product or on the packaging indicates that this product must not be disposed of with household waste. Instead, it must be taken to a collection point for the recycling of electrical and electronic equipment. - Page 37 Cher client, chère cliente, Toutes nos félicitations pour l’acquisition de ce nouvel appareil. Lisez attentivement les indications suivantes et suivez-les pour éviter d'éventuels dommages. Nous ne saurions être tenus pour responsables des dommages dus au non-respect des consignes et à la mauvaise utilisation de l’appareil.
-
Page 38: Fiche Technique
FICHE TECHNIQUE Numéro d'article 10037817 Alimentation Entrée DC : 9V 1A (Adaptateur AC fourni pour AC 100-240 V ~ 50/60 Hz) Température de fonctionnement 0 °C à +35 °C Enceinte 1 x 4“ Puissance de sortie de l'enceinte 1 x 8 W = 8 W RMS Prises micro 2 x entrées de 6,3 mm Entrée de ligne... -
Page 39: Consignes De Sécurité
CONSIGNES DE SÉCURITÉ Consignes générales • Foudre - Si vous prévoyez de ne pas utiliser l'appareil pendant une longue période ou en cas d'orage, retirez la fiche de la prise ou débranchez l'antenne de l'appareil. Cela empêchera la foudre et les surtensions d'endommager le produit. - Page 40 Consignes particulières • Les enfants à partir de 8 ans et les personnes souffrant de handicaps mentaux, sensoriels et physiques ne peuvent utiliser l'appareil que s'ils ont été parfaitement familiarisés avec les fonctions et les précautions de sécurité par une personne responsable et s'ils comprennent les risques associés.
-
Page 41: Aperçu De L'appareil
APERÇU DE L'APPAREIL Eclairage décoratif LED Compartiment CD Face avant Support de micro Enceinte et éclairage Poignée de transport d'enceinte Support pour smartphone et Dos de l'appareil tablette... -
Page 42: Panneau De Commande
PANNEAU DE COMMANDE Touche de marche/arrêt STOP : Touche stop MODE : Touche mode SKIP+ : titre suivant RECORD : Touche SKIP- : Titre précédent d'enregistrement PROG/REPEAT: Touche MIC VOLUME : (volume du mémorisation / répétition micro) ECHO : Réglage de l'effet -10 : saut arrière de 10 titres écho A.V.C : Auto-Voice-Control... -
Page 43: Connexions
CONNEXIONS Prise DC-IN Prise Line-Out Sortie audio (L), entrée de micro Prise micro 1 Sortie audio (R) Prise micro 2 Sortie vidéo Branchement au secteur Placez l'appareil sur une surface plane et solide. 2. Connectez une extrémité de l'adaptateur secteur (inclus) à la prise DC- IN à... - Page 44 Connexion de l'appareil à un téléviseur Pour lire la vidéo, les paroles et l'audio sur votre téléviseur, suivez les étapes suivantes ci-après : Connectez le câble vidéo RCA (jaune) à la sortie vidéo VIDEO OUT (4) et les câbles audio (blanc et rouge) aux sorties audio AUDIO OUT (2 & 3) à l'arrière de l'appareil.
-
Page 45: Utilisation
UTILISATION Premiers pas • Lisez attentivement le mode d'emploi. • Retirez l'appareil de son emballage. • Retirez tout le matériel d'emballage et conservez-le pour une utilisation future (par exemple pour un déménagement). Lumières disco L'appareil dispose de trois modes d'éclairage : •... - Page 46 3. Appuyez plusieurs fois sur la touche MODE (2) à l'avant de l'appareil pour choisir le mode CDG/CD. L'écran affiche "---" en clignotant pendant la recherche du CD. Puis l'écran affiche le nombre total de titres. 4. Appuyez sur la touche PAIR (9) à l'avant de l'appareil pour démarrer la lecture.
- Page 47 4. Pour démarrer la lecture, appuyez sur PAIR (9) à l'avant de l'appareil. Si vous utilisez un fichier MP3 + G, l'image et les paroles s'affichent sur l'écran du téléviseur (si connecté). REMARQUES : • Si l'appareil est connecté à un téléviseur, les morceaux et les dossiers sélectionnés s'affichent sur l'écran du téléviseur.
- Page 48 Utilisation d'un appareil BT Branchez l'appareil comme décrit plus haut. Pour allumer l'appareil, appuyez sur la touche de Marche/arrêt (1) à l'avant de l'appareil. 2. Appuyez plusieurs fois sur la touche MODE (2) pour choisir BT. L'écran LED affiche "bt" et le témoin de BT clignote en bleu à l'avant de l'appareil.
- Page 49 Fonction d'enregistrement Pour enregistrer à la fois votre chant et la musique, appuyez sur le bouton RECORD (3) à l'avant de l'appareil. Le témoin de marche clignote alors en vert. Lorsqu'il reste allumé en vert fixe, l'enregistrement commence. 2. Une fois l'enregistrement terminé, appuyez de nouveau sur la touche RECORD (3).
-
Page 50: Nettoyage Et Entretien
NETTOYAGE ET ENTRETIEN • Avant le nettoyage, débranchez la fiche d'alimentation de la prise. • Si l'appareil est poussiéreux, essuyez -le avec un plumeau doux et sec. • Pour le nettoyage, utilisez uniquement un chiffon doux. N'utilisez en aucun cas de la cire, un spray de polissage ou des produits agressifs. Remarque : Assurez-vous qu'aucun liquide ne pénètre à... - Page 51 Problème Cause possible / Solution Les paroles des Si l'appareil est connecté à un téléviseur, chansons ne le connecteur du câble vidéo peut ne pas s'affichent pas sur être correctement connecté. Vérifiez cela et l'écran du téléviseur. établissez la connexion. Lorsque l'appareil est connecté...
-
Page 52: Informations Sur Le Recyclage
INFORMATIONS SUR LE RECYCLAGE Si l'élimination des appareils électriques et électroniques est réglementée dans votre pays, ce symbole sur le produit ou sur l'emballage indique qu'il ne doit pas être jeté avec les ordures ménagères. Vous devez l'acheminer vers un point de collecte pour le recyclage des équipements électriques et électroniques. - Page 53 Estimado cliente: Le felicitamos por la adquisición de este producto. Lea atentamente el siguiente manual y siga cuidadosamente las instrucciones de uso con el fin de evitar posibles daños. La empresa no se responsabiliza de los daños ocasionados por un uso indebido del producto o por haber desatendido las indicaciones de seguridad.
-
Page 54: Datos Técnicos
DATOS TÉCNICOS Número de artículo 10037817 Alimentación Entrada CC: 9V 1A (Adaptador CA incluido para CA 100-240 V ~ 50/60 Hz) Temperatura de funcionamiento 0 °C a +35 °C Altavoz 1 x 4“ Potencia de salida altavoz 1 x 8 W = 8 W RMS Conexiones de micrófono 2 entradas de micrófono de 6,3 mm Entrada de línea... -
Page 55: Indicaciones De Seguridad
INDICACIONES DE SEGURIDAD Indicaciones generales • Rayos- Si no va a utilizar la unidad durante un período prolongado de tiempo, o si hay rayos, desenchufe la unidad de la toma de corriente y desconecte el conector de la antena. Esto evitará que el producto resulte dañado por los rayos y las subidas de tensión. - Page 56 Instrucciones especiales • Este aparato puede ser utilizado por niños a partir de 8 años y por personas con capacidades físicas, sensoriales o mentales reducidas o con falta de experiencia y/o conocimientos, siempre que se les supervise o instruya sobre cómo usar el aparato de forma segura y entiendan los peligros que conlleva.
-
Page 57: Descripción Del Aparato
DESCRIPCIÓN DEL APARATO Luces LED decorativas Compartimento de CD Parte delantera Soporte para el micrófono Altavoz e iluminación del Asa de transporte altavoz Soporte para smartphone o Parte trasera tablet... -
Page 58: Panel De Control
PANEL DE CONTROL Tecla de encendido/ STOP: tecla de parada apagado MODE: tecla de modo SKIP+ : pista siguiente RECORD: tecla de SKIP- : pista anterior grabación PROG/REPEAT: tecla de MIC VOLUME: regulador de memoria/repetición volumen del micrófono ECHO: regulador para el -10: saltar las 10 pistas ajuste del eco anteriores... -
Page 59: Conexiones
CONEXIONES Toma de entrada CC Toma de salida de línea Salida de audio (IZQ), entrada de Toma de micrófono 1 micrófono Salida de audio (DER) Toma de micrófono 2 Salida de vídeo Conexión a la red eléctrica Coloque el aparato en una superficie estable y plana. 2. - Page 60 Cómo conectar el aparato a un televisor Para poder reproducir vídeos, textos de canciones y audio a través de un televisor, debe seguir estos pasos: Conecte el cable de vídeo RCA (amarillo) a la salida de vídeo VIDEO OUT (4) y el cable de audio (blanco y rojo) a las salidas de audio AUDIO OUT (2 y 3) situadas en la parte trasera del aparato.
-
Page 61: Funcionamiento
FUNCIONAMIENTO Primeros pasos • Lea atentamente el manual de instrucciones. • Retire el aparato de su embalaje. • Retire todo el material de embalaje y consérvelo para un uso posterior (por ejemplo, en caso de mudanza). Luces de discoteca El aparato dispone de tres modos de iluminación: •... - Page 62 3. Pulse varias veces la tecla MODE (2) en la parte delantera del aparato para seleccionar el modo CDG/CD. En la pantalla LED (18) parpadea "---" mientras se detecta el CD. A continuación, se muestra el número total de pistas en pantalla. 4.
- Page 63 4. Para iniciar la reproducción, pulse la tecla PAIR (9) en la parte delantera del aparato. Si está escuchando un archivo MP3+G, en la pantalla del televisor aparecerán la imagen y los textos de la canción (si está conectado). NOTAS: •...
- Page 64 PAIR (9) en la parte delantera del aparato para desconectar todos los dispositivos sincronizados y conectar uno nuevo. 3. Active la función BT en su dispositivo BT. Seleccione en la lista del dispositivo externo "Arizona Sing". Nota: para más detalles, consulte el manual de instrucciones del dispositivo externo.
- Page 65 Función de grabación Para grabar tanto su canto como la música, pulse la tecla RECORD (3) en la parte delantera del aparato. El indicador de funcionamiento parpadea en verde. Si se ilumina en verde permanentemente, comienza la grabación. 2. Cuando termine con la grabación, pulse la tecla RECORD (3) de nuevo. El indicador de funcionamiento se apaga.
-
Page 66: Limpieza Y Cuidado
LIMPIEZA Y CUIDADO • Antes de limpiar el aparato, desconecte el enchufe de la toma de corriente. • Frote el aparato con una bayeta seca y suave si tiene polvo. • Utilice solo un paño suave para limpiar el aparato. Nunca utilice cera, sprays abrillantadores o limpiadores agresivos. - Page 67 Problema Posible causa/solución El texto de la canción Si el aparato está conectado a un televisor, no aparece en la puede ocurrir que el conector del cable de pantalla del televisor. vídeo no está bien conectado. Compruébelo y establezca la conexión. Si el aparato está...
-
Page 68: Indicaciones Sobre La Retirada Del Aparato
INDICACIONES SOBRE LA RETIRADA DEL APARATO Si en su país existe una disposición legal relativa a la eliminación de aparatos eléctricos y electrónicos, este símbolo estampado en el producto o en el embalaje advierte que no debe eliminarse como residuo doméstico. En lugar de ello, debe depositarse en un punto de recogida de reciclaje de aparatos eléctricos y electrónicos. - Page 69 Gentile cliente, La ringraziamo per aver acquistato il dispositivo. La preghiamo di leggere attentamente le seguenti istruzioni per l’uso e di seguirle per evitare possibili danni. Non ci assumiamo alcuna responsabilità per danni scaturiti da una mancata osservazione delle avvertenze di sicurezza e da un uso improprio del dispositivo.
-
Page 70: Dati Tecnici
DATI TECNICI Numero articolo 10037817 Alimentazione Ingresso DC: 9V 1A (adattatore AC in dotazione per AC 100-240 V ~ 50/60 Hz) Temperatura operativa 0 °C-+35 °C Altoparlanti 1 x 4“ Potenza di uscita altoparlanti 1 x 8 W = 8 W RMS Connessioni microfono 2 x ingressi microfono da 6,3 mm Ingresso Line-In Ingresso AUX da 3,5 mm... -
Page 71: Avvertenze Di Sicurezza
AVVERTENZE DI SICUREZZA Avvertenze generiche • Colpo di fulmine - Se non si usa più il dispositivo o se ci sono temporali, staccare la spina dalla presa elettrica o scollegare il dispositivo dall'antenna. In questo modo si evitano danni al prodotto dovuti a colpi di fulmine e sovratensione. - Page 72 Avvertenze particolari • Questo dispositivo può essere utilizzato da bambini a partire da 8 anni e da persone con limitate capacità fisiche, psichiche e sensoriali o con conoscenza e/o esperienza insufficienti, solo se sono tenuti sotto controllo o se sono stati istruiti sulle modalità di utilizzo sicuro del dispositivo e comprendono i rischi che ne risultano.
-
Page 73: Descrizione Del Dispositivo
DESCRIZIONE DEL DISPOSITIVO Luci LED decorative Vano CD Lato anteriore Supporto microfono Altoparlanti e illuminazione Impugnatura di trasporto altoparlanti Supporto per smartphone o Lato posteriore tablet... -
Page 74: Pannello Di Controllo
PANNELLO DI CONTROLLO Tasto ON/OFF STOP: tasto di arresto SKIP+: titolo MODE: tasto delle modalità successivo RECORD: tasto di SKIP-: titolo registrazione precedente PROG/REPEAT: tasto MIC VOLUME: regolazione memoria/ripetizione del volume del microfono ECHO: manopola per -10: saltare i 10 titoli impostare l'eco precedenti A.V.C: attivare/disattivare... -
Page 75: Connessioni
CONNESSIONI Connessione DC-IN Connessione Line-Out Connessione microfono Uscita audio (L), ingresso microfono Connessione microfono Uscita audio (R) Uscita video Connessione alla rete elettrica Posizionare il dispositivo su una superficie piana e stabile. 2. Collegare un'estremità dell'adattatore (incluso nel volume di consegna) con la connessione DC-IN sul retro del dispositivo e inserire l'altra estremità... - Page 76 Collegare il dispositivo a un televisore Per riprodurre video, testi delle canzoni e audio dal televisore, è necessario seguire questi passaggi: Collegare il cavo video RCA (giallo) con l'uscita video VIDEO OUT (4) e il cavo audio (bianco e rosso) con le uscite audio AUDIO OUT (2 & 3) sul retro del dispositivo.
-
Page 77: Utilizzo
UTILIZZO Primi passaggi • Leggere attentamente il manuale d'uso. • Togliere il dispositivo dall'imballaggio. • Rimuovere tutto il materiale d'imballaggio e conservarlo per futuri utilizzi (ad es. in caso di trasloco). Luci da discoteca Il dispositivo è dotato di tre modalità di illuminazione: •... - Page 78 3. Premere più volte MODE (2) sul lato anteriore del dispositivo per selezionare la modalità CDG/CD. Sullo schermo LED (18) lampeggia "---" mentre viene cercato un CD. In seguito viene mostrato sullo schermo il numero complessivo di titoli. 4. Premere PAIR (9) sul lato anteriore del dispositivo per avviare la riproduzione.
- Page 79 4. Premere PAIR (9) sul lato anteriore del dispositivo per avviare la riproduzione. Se si ascolta un file MP3+G, sullo schermo del televisore (se collegato) vengono mostrati immagine e testi delle canzoni. NOTE: • Se il dispositivo è collegato a un televisore, sul suo schermo vengono mostrate la canzone e la cartella selezionate.
- Page 80 Utilizzare un dispositivo BT Collegare il dispositivo come descritto in precedenza. Premere il tasto ON/OFF (1) sul lato anteriore per accendere il dispositivo. 2. Premere più volte MODE (2) sul lato anteriore per selezionare BT. "bt" compare sul display LED e l'indicazione BT sul lato anteriore del dispositivo si illumina di blu.
- Page 81 Funzione di registrazione Per registrare musica e canto, premere RECORD (3) sul lato anteriore del dispositivo. L'indicazione di funzionamento inizia a lampeggiare di verde. Quando rimane illuminata di verde, inizia la registrazione. 2. Quando la registrazione è terminata, premere di nuovo RECORD (3). L'indicazione di funzionamento si spegne.
-
Page 82: Pulizia E Manutenzione
PULIZIA E MANUTENZIONE • Staccare la spina dalla presa prima della pulizia. • Se il dispositivo è impolverato, strofinarlo con un panno morbido e asciutto. • Utilizzare solo un panno morbido per la pulizia. Non utilizzare assolutamente cera, lucidi spray o detergenti aggressivi. Nota: assicurarsi che non penetrino mai liquidi all'interno del dispositivo durante la pulizia. - Page 83 Problema Possibile causa/Soluzione Il testo della canzone Se il dispositivo è collegato a un televisore, può non viene mostrato essere che il connettore del cavo video non sia sullo schermo del collegato correttamente. Controllare e stabilire televisore. il collegamento. Quando il dispositivo è collegato a un televisore, selezionare la sorgente corretta (normalmente AV).
-
Page 84: Avviso Di Smaltimento
AVVISO DI SMALTIMENTO Se nel proprio paese si applicano le regolamentazioni inerenti lo smaltimento di dispositivi elettrici ed elettronici, questo simbolo sul prodotto o sulla confezione segnala che questi prodotti non possono essere smaltiti con i rifi uti normali e devono essere portati a un punto di raccolta di dispositivi elettrici ed elettronici.
Need help?
Do you have a question about the Arizona Sing and is the answer not in the manual?
Questions and answers