Advertisement
Quick Links
Advertisement

Related Manuals for Impact Acoustics Chatpod 350


Summary of Contents for Impact Acoustics Chatpod 350
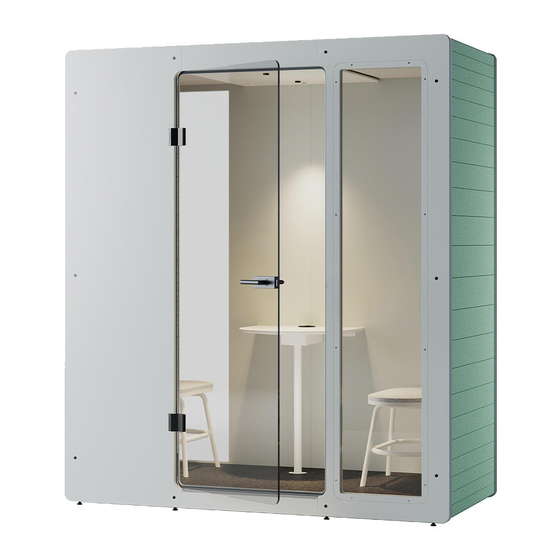
- Page 1 Assembly instructions Chatpod 350 45 min...
- Page 2 T15 1x Step 1 Place the honeycomb cardboard blocks (P) on the floor. Insert the power cord (V) and the cables from the sides (A) and (B). click click click Chatpod 350 IMPACT ACOUSTIC AG, Bodenhof 4, 6014 Luzern, Switzerland...
- Page 3 Press the sides (A) and (B) into the bottom. Sides (A) and (B) must be held so that they do not fall over. The power cord (V) can be guided away under the right (B) or left side (A). 90º 90º Chatpod 350 IMPACT ACOUSTIC AG, Bodenhof 4, 6014 Luzern, Switzerland...
- Page 4 Remove the upper part of the top (H) and press the lower part into the sides. Make sure that the cable, which protrudes at the top of side (B), is guided through the cut-out in the top. Chatpod 350 IMPACT ACOUSTIC AG, Bodenhof 4, 6014 Luzern, Switzerland...
- Page 5 Step 4 Insert the connecting rods (N) into the elements until they are approximately flush. Chatpod 350 IMPACT ACOUSTIC AG, Bodenhof 4, 6014 Luzern, Switzerland...
- Page 6 Join the rear wall on the right (C) and rear wall on the left (D). Press the connectors (Q) into the holes and tighten them with the 4 mm Allen key. Chatpod 350 IMPACT ACOUSTIC AG, Bodenhof 4, 6014 Luzern, Switzerland...
- Page 7 Join the rear wall (C) and (D) with the two sides (A) and (B), the bottom (G) and the top (H). Make sure that you mount the back panel on the rear side. Screw in the black screws (S) a few turns to secure the back panel. Chatpod 350 IMPACT ACOUSTIC AG, Bodenhof 4, 6014 Luzern, Switzerland...
- Page 8 Step 7 Join the front (E) and (F) with the four dowels (AC). Press the connectors (Q) into the holes and tighten them with the 4 mm Allen key (W). Chatpod 350 IMPACT ACOUSTIC AG, Bodenhof 4, 6014 Luzern, Switzerland...
- Page 9 Step 8 Place the door sill (AA) on the door frame (F and E) and tighten the four screws (AB) with a T15 screwdriver hand-tight. Chatpod 350 IMPACT ACOUSTIC AG, Bodenhof 4, 6014 Luzern, Switzerland...
- Page 10 Join the front (E) and (F) with the two sides (A) and (B), the bottom (G) and the top (H).Turn the black screws (S) a few turns to secure the front. In a second step tighten the screws (S) firmly by countering the screws on the backside. Chatpod 350 IMPACT ACOUSTIC AG, Bodenhof 4, 6014 Luzern, Switzerland...
- Page 11 Guide the cable which is coming from the side into the cut-out provided and insert it until it snaps in. motionsensor light light power in Note: Only the power cable has to be plugged in, the other cables are already plugged in. click Chatpod 350 IMPACT ACOUSTIC AG, Bodenhof 4, 6014 Luzern, Switzerland...
- Page 12 Step 11 Put the upper part of the top on the chatpod. Chatpod 350 IMPACT ACOUSTIC AG, Bodenhof 4, 6014 Luzern, Switzerland...
- Page 13 Check with a spirit level whether the chatpod is level. If not, turn the adjustable feet with the 13 mm open-ended spanner until it is the case. Plug in the cable. Remove the honeycomb cardboard blocks (P) and recycle them. Chatpod 350 IMPACT ACOUSTIC AG, Bodenhof 4, 6014 Luzern, Switzerland...
- Page 14 Step 13 Fix the two panels (J) in the recess with the Velcro fastener. Chatpod 350 IMPACT ACOUSTIC AG, Bodenhof 4, 6014 Luzern, Switzerland...
- Page 15 Attach the glass door (I) and secure it with the two pins. Make sure that the notch of the pin is on the bottom. Tighten the two small setscrews with the 2.5 mm hex key. Chatpod 350 IMPACT ACOUSTIC AG, Bodenhof 4, 6014 Luzern, Switzerland...
- Page 16 Mount the door handle (O) in the following order: lock, metal ring, plastic ring, door han- dle. Press the two door handles together while tightening the set screw with the 3 mm hex key. Well done! Chatpod 350 IMPACT ACOUSTIC AG, Bodenhof 4, 6014 Luzern, Switzerland...