CEM MARS 6 Synthesis Manual
Parallel & scale-up microwave synthesizer
Hide thumbs
Also See for MARS 6 Synthesis:
- Quick start manual (4 pages) ,
- Quick start manual (2 pages) ,
- Operation manual (101 pages)
Table of Contents
Advertisement
Quick Links
Advertisement
Table of Contents

Subscribe to Our Youtube Channel
Related Manuals for CEM MARS 6 Synthesis


Summary of Contents for CEM MARS 6 Synthesis
- Page 1 MARS 6 Synthesis Parallel & Scale-Up Microwave Synthesizer Manual...
- Page 2 THIS PAGE INTENTIONALLY LEFT BLANK...
-
Page 3: Table Of Contents
Contents Password Configuration Safety Safety Notations Data Management View, Print, and Export Data Introduction Activity Log About the Instrument Calibrations Important Safeguards Fiber Optic Probe Solvent Chart Pressure Control Microwave Safeguards Temperature Verification (IR Sensors) Instrument Safeguards Temperature Calibration (IR Sensors) Pressure Calibration Instrument Overview Front and Side View... - Page 4 New Liner and Cover Conditioning Perform a Reaction Vessel Cleaning Appendix C: Open Vessel Reactions Vessel Components Operating Parameters Perform a Reaction Glossary Glossary Technical Assistance Applications Support Technical Support Contact Information CEM Corporation Headquarters CEM International Subsidiaries CEM Distributors...
-
Page 5: Safety
Safety Safety Notations This manual uses three safety alert words at points in the documentation where the user should be aware of potential hazards. The safety alerts are shown in color-coded boxes. The three words – NOTE, CAUTION, and WARNING – indicate differing levels of observation or action as described below: NOTE A NOTE is intended to provide emphasis on procedures that may be misinterpreted or overlooked, or to clarify confusing situations. -
Page 6: Introduction
The MARS 6 Synthesis is designed to be operated in accordance with the guidelines outlined in this manual. The GlassChem, EasyPrep™, and EasyPrep Plus™ are the only approved sealed vessels designed for synthetic pressurized reactions performed in this system. -
Page 7: Important Safeguards
Important Safeguards General guidelines for safe operation of the MARS 6 Synthesis system are presented below and all specific safety messages are located throughout the manual. Proper precautions must be taken to avoid contact with reagents or reagent vapors. Protective gear should be worn as outlined in the user’s safety program for hazardous materials and the reagent manufacturer’s safety data sheet. -
Page 8: Instrument Safeguards
Instrument Safeguards • Service can only be performed by an authorized CEM service technician. This instrument utilizes high voltages and microwave radiation. • DO NOT tamper with the instrument. • DO NOT install the MARS 6 instrument inside of a fume hood. The exhaust hose must be connected and draw at least 125 CFM at the point of connection at all times as it is essential for removing harmful gases away from the instrument. -
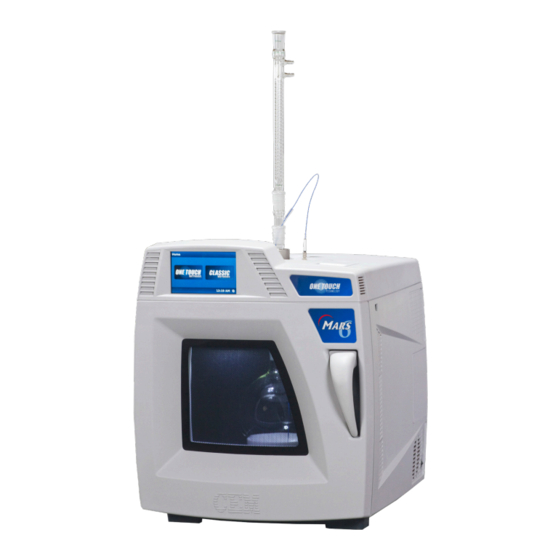
Page 9: Instrument Overview
Instrument Overview Front and Side View Item Description Touch Screen Display Shows menus, method parameters, etc. Includes 86 dB speakers Door Handle Permits ease of opening instrument door RTP-300 Connector Connects Fiber Optic probe I/O Port Access to install condenser for open vessel reactions Internal Printer (optional) Permits printing of method parameters, graphs and/or method data High Voltage Cooling Fan... -
Page 10: Back And Side View
Back and Side View Item Description Power Cord Receptacle Receives the female end of the power cord Cavity Exhaust Outlet Exhausts fumes from the microwave cavity Cavity Exhaust Blower Directs air from the microwave cavity to the exhaust outlet at the rate of 3.6 m /minute (125 /minute) External Sensor Port... -
Page 11: Cavity
Cavity Fluoropolymer-coated microwave cavity. Item Description Door Seal Ensures tight fit between door and interior cavity of the MARS 6 to prevent microwave leakage Waveguide Covers Evenly distribute microwaves into instrument cavity Turntable Drive Lug Allows the turntable drive shaft to pass through the cavity floor and engage the Turntable Floor Mat Protects the Teflon Coating on the Floor of the Mars 6 Cavity... -
Page 12: Software Overview
Software Overview Software Icons Icon Description Icon Description Icon Description Add Stage Filter Remove Stage Back Home Blower Import Save Delete Information System Menu Done Infrared System Settings DuoTemp™ Temperature Edit Power Turntable Export Pressure Fiber Optic Print Software Overview... -
Page 13: Home Screen
The Home screen is the first screen that appears when the system is turned on. Three areas are accessible from this screen: One Touch® Methods, Classic Methods, and System Menu. • One Touch Methods are methods created and optimized by CEM for digestion applications. These methods should NOT be used for synthetic chemistry applications •... -
Page 14: System Menu
System Menu The following is a basic review of each section of the System Menu to be used as a quick guide for locating software items and instrument functions. • Tools: Calibration and Diagnostic tools to ensure proper system functionality and software update when a new version is released •... - Page 15 Settings • General: Views system information, service records and CEM information • System: Instrument settings for the audio and visual selections for the individual user • Localization: Regional adjustments, including language and the preferred date and time format • Date/Time: Location for setting the correct date and time •...
- Page 16 Logout • Displays the Logout screen Software Overview...
-
Page 17: System Installation
2. Carefully inspect the shipping carton, the instrument and accessories for any damage that may have occurred during shipping. If the instrument or accessories have damage, contact the freight carrier to report the damage and file a damage report. Contact your CEM representative to request service information. WARNING If any damage to the instrument is noted, do not attempt instrument operation. - Page 18 6. Lay the sides of the box flat and remove the foam from the top of the system. 7. Lift the system, from the sides, onto bench top near exhaust service (two people required). Do not place the system in a fume hood. 8.
-
Page 19: System Setup
remove plastic & lifting device before using 9. Remove the box from inside of the system cavity. Write down the serial number located on the nameplate on the back left side of the system. 10. Retain all packing material for use if returning the instrument to the manufacturer for service. System Setup 1. - Page 20 4. Position the instrument so the door is facing forward and so there is open space to access the power switch. 5. Locate the power switch on the right side of the instrument, and position it in the ON position. 6.
- Page 21 8.4. Scroll to the “Power” section and select “Line Voltage.” • 60 Hz - select 208 V or 230 V • 50 Hz - select 200 V, 220 V, or 240 V 8.5. Select “Ok” and the “Save” icon in the upper right corner of the screen. 9.
- Page 22 NOTE Always ensure that the number on the probe and the number in the software are the same. If a new probe is installed, then a new GF number will need to be saved. 9.2.6. Once the number is properly entered, select “hide” to close the keyboard. 9.2.7.
-
Page 23: Vessels
Vessels Detailed instructions for each vessel set are outlined in the Appendices. Read and fully understand all documentation before operating the instrument. GlassChem 20 Appendix A Ideal for organic and inorganic teaching laboratories. EasyPrep & EasyPrep Plus Appendix B Ideal for inorganic and material research (EasyPrep Plus) and zeolite synthesis and other alkaline chemistry (EasyPrep). -
Page 24: Methods
Classic methods are created by the user and intended for use with synthetic chemistry applications. Create a Classic Method Creation of a method requires training and knowledge. Contact CEM Corporation before creating a method. See “Operating Parameters” section for details when selecting parameters. - Page 25 9. Select the Add Stage icon. 10. Enter the method parameters as follows: • Ramp time (mm:ss) • Hold time (mm:ss) • Temperature (ºC) • Pressure (psi) - only available for EasyPrep and EasyPrep Plus vessels • Power (0 - 1800) •...
-
Page 26: Create A One Touch Method
Create a One Touch Method Contact CEM Corporation before creating One Touch Methods. Edit Method When a method is edited and saved, the original method and run data are no longer available. 1. Select and hold (long touch) the method to be edited. -
Page 27: Export Method
3. Select “Yes” to delete the method(s) or “No” to return to the previous screen. Export Method Methods will be exported to a USB. 1. Install a USB on the right side of the MARS 6 instrument. 2. Select and hold (long touch) the method to be exported. 3. -
Page 28: Import Method
4.2. If “Single File” is selected, then an additional screen will appear and a bundle name will be required. Import Method 1. Install a USB containing the desired method(s) on the right side of the MARS 6 instrument. 2. From the Home Screen, select “Classic” or “One Touch.” 3. -
Page 29: Users
Users Only Administrators can create, edit, or delete users. A User or Basic (non-Administrator) user can only edit their password. Create User Only an administrator can create a new user. 1. Select the System Menu icon in the bottom right corner of the screen. 2. -
Page 30: Edit/Delete User
• Administrators: full system access. Create, edit, import, export, and delete methods, make system tools and settings changes, watch system videos and add,edit and delete all users. • Users: Create, import, and run methods, view system videos and change their password.. •... -
Page 31: Password Configuration
Password Configuration Determines password criteria for all users. Only an administrator can change the Auto Login to on/off. 1. Select the System Menu icon in the bottom right corner of the screen. 2. Select Settings. 3. Select Users. Scroll down to “Password Settings“ and toggle to “ON” or “OFF.” •... -
Page 32: Data Management
Data Management View, Print, and Export Data View data associated with a specific method. If a method is edited and saved, the original method and run data are no longer available. 1. Select the method with the data to view. 2. -
Page 33: Activity Log
Activity Log The Activity Log can be filtered by date range and user. The results can be exported to a “.pdf” file or printed using the internal printer. 1. Select the System Settings icon in the bottom right corner of the screen. 2. -
Page 34: Calibrations
Installation” section of this manual. Contact your CEM Representative for questions or concerns. Pressure Control Calibration is not required for pressure control. Contact your CEM Representative for questions or concerns. Temperature Verification (IR Sensors) The optional AutoCal calibration device is require for temperature verification. Read and fully understand the AutoCal manual (P/N 600835) before operation. -
Page 35: Temperature Calibration (Ir Sensors)
6. Wait for a stable reading. 7. The temperature should read within ±3 ºC of the AutoCal temperature. If it is outside this range, perform the Temperature Calibration for IR sensors. Temperature Calibration (IR Sensors) The Infrared temperature calibration procedure should only be performed if the verified temperature is ≥ ±4 ºC of the AutoCal temperature. -
Page 36: Pressure Calibration
11. Wait for a stable reading. Repeat the above steps to calibrate the second sensor. 12. Verify the IR temperatures as outlined in this section of the manual. Pressure Calibration Pressure calibration should be performed only by a CEM Certified Service Representative. Contact CEM Service (800-726-5551). Calibrations... -
Page 37: Power Test
• The power output from the secondary magnetron should be 800 W. If the measured power is below 712 W, the secondary magnetron is not producing adequate microwave power. • If one or both of the magnetrons is not producing sufficient wattage, contact CEM Corporation. NOTE In order to perform an IEC power test, specialized equipment is required. -
Page 38: Printer (Optional)
Printer (Optional) Internal Printer The optional internal thermal printer permits printing of method parameters, graphs and/or method data at any time that the Print icon is displayed on the screen during method performance or when viewing method information and previous method performance data. Replace Printer Paper 1. -
Page 39: Fiber Optic Temperature Control
Fiber Optic Temperature Control The Fiber Optic probe provides direct temperature measurement inside the control vessel or round bottom flask. Fiber Optic Installation If the vessel set requires fiber optic temperature control, install and enter the GF number as outlined below. 1. -
Page 40: Fiber Optic Temperature Verification
NOTE Always ensure that the number on the probe and the number in the software are the same. If a new probe is installed, then a new GF number will need to be saved. 2.6. Once the number is properly entered, select “hide” to close the keyboard. 2.7. -
Page 41: Fiber Optic Care
• If the fiber optic probe is new or the temperature is not reading correctly, enter the GF number. See the “Fiber Optic” section of the manual for details. • If “---” appears as the temperature, then the MARS 6 does not recognize the Fiber Optic Probe. The probe is either not installed or is not working properly. -
Page 42: Software Update
The MARS 6 software/firmware should be updated when a revised version is released. The software/firmware can be obtained from CEM’s website www.cem.com. One user should be responsible for updating the software. 1. Using a computer, create a folder titled “CEM” on the USB. -
Page 43: Routine Maintenance
Routine Maintenance CEM suggests that you perform the routine maintenance on your instrument as outlined below, along with having a CEM Certified Technician to come check out your system once a year. WARNING Proper precautions must be taken to avoid contact with reagents or reagent vapors. Protective gear should be worn as outlined in the user’s safety program for hazardous materials and the reagent manufacturer’s... -
Page 44: Troubleshooting
Infrared temperature sensor has Wipe sensors with a lint free damp cloth. debris Sensor needs calibration If AutoCal Calibration device is available, calibrate sensor as outlined in this manual. If AutoCal calibration device is not available, contact CEM Corporation. Troubleshooting... -
Page 45: System Specifications
System Specifications Location Requirements • A fume hood within 8' (2.5 m) of unit or adequate exhaust that pulls a minimum of 125 CFM at point of connection • Vent hose is 8 ft long with a 3 ∕ ” OD × 2 ∕... -
Page 46: Limited Warranty Information
Limited Warranty Information What Is Covered: CEM Corporation warrants that the instrument will be free of any defect in parts or workmanship and will, at its option, replace or repair any defective part (excluding consumables) or instrument. For How Long: This warranty remains in effect for 365 days from date of delivery to the original purchaser. - Page 47 CEM Corporation hereby excludes and disclaims any warranty of merchantability or fitness for any particular purpose. No warranty, express or implied, extends beyond the face hereof. CEM Corporation shall not be liable for loss of use of instrument or other incidental or consequential costs, expenses or damages incurred by the purchaser or any other user.
-
Page 48: Appendix A: Glasschem 20 Vessels
Appendix A: GlassChem 20 Vessels Vessel Components For a list of parts and part numbers, visit our website at www.cem.com. A list of parts can be found on the “Products” page under “MARS 6 Synthesis”. Item Description Vessel Contains sample... -
Page 49: Operating Parameters
Tetrahydrofuran (THF)* Toluene** Water * Does not reach temperature or pressure setpoint within 5 minute ramp. Contact CEM Corporation before using any low absorbing solvents. WARNING **The temperature and pressure of tetrahydrofuran rise rapidly as it reaches 180 °C therefore it is not recommended to take tetrahydrofuran above 150 °C. -
Page 50: New Cap And Vent Plug Conditioning
New Cap and Vent Plug Conditioning All new vessel tops and vent plugs should be conditioned as a set prior to being put into service. The break-in procedure is used to condition the Teflon® to ensure a proper seal. WARNING Proper precautions must be taken to avoid contact with solvents or solvent vapors. -
Page 51: Perform A Reaction
All vessels must contain the exact same amount of reaction components and the total volume must meet the minimum cavity load; 50 mL with medium microwave absorbing solvents and 10 mL with high microwave absorbing solvents. Contact CEM Corporation before using any low absorbing solvents. See “Microwave Solvent Chart” for details. - Page 52 7. Place the vent plugs on the vessels. 8. Place the caps onto the vessels and tighten until finger tight. Appendix A: GlassChem 20 Vessels...
- Page 53 CAUTION Keep the vent hole facing away from the user at all times. Never look directly at the vent hole once it has been placed on the vessel. 9. Using the preset torque tool, tighten the top until you hear an audible click. Ensure the vessel top is properly tightened.
- Page 54 3. The outside of the cap MUST be positioned below the top of the turntable as illustrated. 4. Place the turntable shield on the turntable and slide the four pins into place through the four pegs. 5. Verify the floor mat positioning, ensuring that the mat is not covering the sensors. Appendix A: GlassChem 20 Vessels...
- Page 55 If resistance is felt when trying to insert probe, ensure that the thermowell is not broken inside the Teflon cover. The sharp edges of any break can restrict the movement of the probe. 3. Select/load the method from the Classic directory. See “Methods” section of this manual or contact CEM Appendix A: GlassChem 20 Vessels...
- Page 56 Corporation if assistance is needed creating a new method. • “Vessel Type” = “Glass Chem” • See “Operating Parameters” in “Appendix A” before programming method parameters 4. With the door open, use the Turntable Icon to rotate the turntable. Observe the positioning and balance of the turntable.
-
Page 57: Vessel Cleaning
Vessel Cleaning Vessel and Vent Plugs 1. Inspect each vessel for any cracks or scratches. Vessels with cracks or scratches need to be discarded and replaced because the structural integrity of the vessel can be compromised. 2. Clean vessels and vent plugs with hot, soapy water and foam brush. 3. -
Page 58: Appendix B: Easyprep And Easyprep Plus Vessels
Appendix B: EasyPrep and EasyPrep Plus Vessels Vessel Components For a list of parts and part numbers, visit our website at www.cem.com. A list of parts can be found on the “Products” page under “MARS 6”. EasyPrep Control Vessel EasyPrep Plus Control Vessel... -
Page 59: Operating Parameters
All vessels must contain the exact same amount of reaction components and the total volume must meet the minimum cavity load; 50 mL with medium microwave absorbing solvents and 20 mL with high microwave absorbing solvents. Contact CEM Corporation before using any low absorbing solvents. See “Microwave Solvent Chart” for details. -
Page 60: Perform A Reaction
instructions. 6. Close the instrument door and run the preprogrammed “Easy Prep Clean” method. Verify that vessel count, type and position are correct. 7. After completion of the method, permit the vessels to cool in the automated sequence until the vessels cool for a minimum of 15 minutes. - Page 61 All vessels must contain the exact same amount of reaction components and the total volume must meet the minimum cavity load; 50 mL with medium microwave absorbing solvents and 20 mL with high microwave absorbing solvents. Contact CEM Corporation before using any low absorbing solvents. See “Microwave Solvent Chart” for details.
- Page 62 NOTE Invert the vessel sleeves after every test to help maintain uniformity of the liner and sleeves. 8. Place the load disc on the cover with the tab on the disc facing downward so that it fits into the center notch of the cover.
- Page 63 • The control vessel requires the taller frame (except EasyPrep with temperature control only) • The standard vessels and EasyPrep with temperature control only require the shorter frame. • If the cover has pressure control, select the “Easy Prep Plus” control frame module and position the pressure connector so it passes through the frame and aligns toward the outside of the frame.
- Page 64 Vessel torquing is critical to optimize controlled venting of the system and for the integrity of the vessel. Over or under torquing may lead to sealing issues. If any issue is noted, contact CEM Corporation 14. Verify the vent hole alignment. If a vessel vents, the solvent should not get on the frame or other vessels. If necessary, loosen the screw and realign the vent hole.
- Page 65 Turntable Setup 1. Load the control vessel in the “Control Vessel” or “1” position of the turntable. 2. Ensure that the notch in the bottom of the frame engages the locking ring on the turntable. 3. If the control vessel has pressure control, connect the ESP-1500+ pressure connector and tighten until finger tight.
- Page 66 4. Load the remaining vessel assemblies into the turntable one by one, ensuring that the notch in the bottom rear of the frame engages the locking ring on the turntable. Optimal vessel distribution is outlined below. 2 vessels 3 vessels 4 vessels 5 vessels 6 vessels...
- Page 67 The high temp fiber optic probe is required for applications running 250 ºC or greater in temperature. Contact CEM Corporation before running temperatures greater than 250 ºC. 9. Insert the fiber optic probe through the open I/O port on top of the microwave cavity and into the control...
- Page 68 1. Verify Max Power Monitor is enabled and the alarm time is programmed for 5 minutes (Settings > Run > Max Power Monitor). 2. Select/load the method from the Classic directory. See “Methods” section of this manual or contact CEM Corporation if assistance is needed creating a new method.
-
Page 69: Vessel Cleaning
CAUTION Observe the entire reaction sequence when establishing a procedure for the first time. 5. During the run, the user can select the applicable image on the left side of the screen. If the line graph is se- lected, the user can select the icons on the right side of the screen to display the desired parameter(s). 6. - Page 70 Sleeves 1. If water or solvent gets on a sleeve, wipe it off with a damp paper towel and allow to dry. Never soak sleeves. CAUTION Never soak sleeves in water or detergent. Remove composite sleeves before adding solvent to vessel liners or before pouring solutions out to prevent liquid from wicking into the composite material.
-
Page 71: Appendix C: Open Vessel Reactions
Appendix C: Open Vessel Reactions Vessel Components For a list of parts and part numbers, visit our website at www.cem.com. A list of parts can be found on the “Products” page under “MARS 6 Synthesis”. Operating Parameters Open Vessel Minimum Ramp Time... -
Page 72: Perform A Reaction
A thermowell may be used to protect the temperature probe from becoming damaged during the reac- tion. Contact CEM Corporation for information. • If the adapter with the temperature probe port is being used, insert the probe through the I/O port. - Page 73 Load and perform a Method 1. Select/load the method from the Classic directory. See “Methods” section of this manual or contact CEM Corporation if assistance is needed creating a new method. • “Vessel Type” = “Beaker” • See “Operating Parameters” in “Appendix C” before programming method parameters •...
- Page 74 5. After completion of the method, permit the vessels to cool in the microwave cavity to 50 °C. Flask Removal 1. Allow the flask to cool in the microwave to 50 °C. WARNING To prevent the possibility of severe burns, ensure that gloves and protective gear as outlined in your safety program are worn.
-
Page 75: Glossary
Contactless, volume-independent sensors accurately measure temperature of all sealed vessels during parallel runs. One Touch Methods created by CEM Applications Specialists. Determines all of the parameters, adjusts power output, and performs the digestion for all major sample types ReactiGuard Continuously monitors the cavity and disables the magnetron if disturbances occur inside the cavity. -
Page 76: Technical Assistance
Technical Support CEM is proud to provide technical support for the MARS 6 Synthesis from a team of specially trained Service Technicians. For technical support in the US and Canada, call (800) 726-5551 or (704) 821-7015 and ask for “MARS 6 Synthesis Service”... -
Page 77: Contact Information
Address: Via Dell Artigianato, 6/8 24055 Cologno Al Serio (BG) Italy Web Address: http://www.cemmicroonde Email: info.srl@cem.com Japan: CEM Japan K.K. Phone: +81-3-5793-8542 Fax: +81-3-5793-8543 Address: 2-18-10 Takanawa Minato-Ku Tokyo 108-0074 Japan Web Address: http://www.cemjapan.co.jp Email: info@cemjapan.co.jp UK: CEM Microwave Technology Ltd. Phone: +44-1-280-822873 Fax: +44-1-280-822342 Contact Information... -
Page 78: Cem Distributors
Email: info.ireland@cem.com CEM Distributors For a complete list of distributors of CEM products, including contact information, go to the CEM website (http:// www.cem.com), select Contact, and then select your region to see a list of distributors by country. Contact Information... - Page 79 THIS PAGE INTENTIONALLY LEFT BLANK...
- Page 80 Copyright 2019 by CEM Corporation CEM and One Touch are registered trademarks Part Number 600973 All Rights Reserved. This guide contains of CEM Corporation. November 18, 2019 proprietary information which shall not be MARS 6, EasyPrep, EasyPrep Plus, DuoTemp, Rev. 1...
Need help?
Do you have a question about the MARS 6 Synthesis and is the answer not in the manual?
Questions and answers