
Summary of Contents for AirTime ATX6
- Page 1 All manuals and user guides at all-guides.com Model ATX6 Wireless Wall Clock Transceiver Installation & User's Guide Copyright © 2009 Lathem Time Corporation. All rights reserved.
- Page 2 All manuals and user guides at all-guides.com AirTime, Lathem and the Lathem logo are registered trademarks of Lathem Time Corporation. Other product names mentioned in this manual may be trademarks of their respective companies and are hereby acknowledged. WARNING: Changes or modifications to this product not expressly approved by the party responsible for compliance could void the user’s authority to operate...
-
Page 3: Table Of Contents
Synchronizing a LTR0 or DWA-S to an ATX6........22 Synchronizing a DDC2/4-RS to an ATX6..........22 Synchronizing the ATX6 to a LTR-GPS ..........23 Synchronizing a LTRX-512 to ATX6 using Sync Relay closure ....24 Synchronizing the ATX6 to an External Relay Closure ......25 Specifications ................26... - Page 4 All manuals and user guides at all-guides.com...
-
Page 5: Introduction
AirTime Protocol, same as described above in “Master” mode. The ATX6 can be set to transmit its radio signal at any of several frequencies licensed to Lathem’s AirTime system by the FCC, at either a 4 Watt or 6 Watt output power level. With an optional external amplifier that can boost the signal to 20 Watts. -
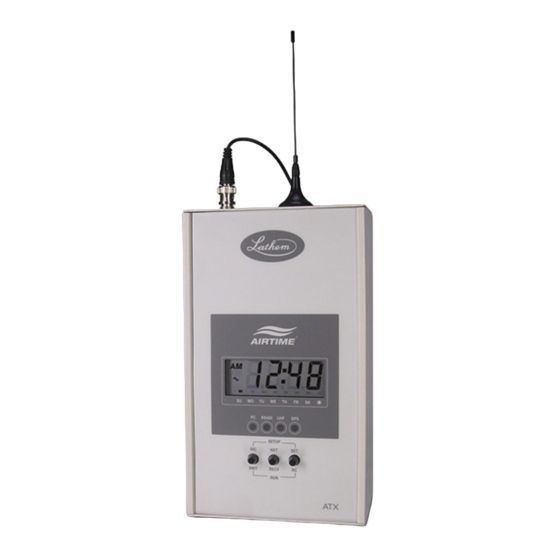
Page 6: Case Design
All manuals and user guides at all-guides.com ATX6 Installation and User Guide Case Design Metal Enclosure Function Buttons INC NXT SET TRNS RECV RC RS485 RS232 Bottom View Ext. Sync Installation: Page 2... - Page 7 If the ATX6 will be used in synchronizing a wide area / campus, then the site should, generally, be close to the center of the facility; rather than at the perimeter.
- Page 8 If mounting near a ceiling, make sure the top holes are at least 2” away from the ceiling. If an external amplifier will be used, mount the ATX6 within 6 feet of its location. » After deciding the location where the clock will be mounted, use the enclosed template to make the three marks for the mounting screws.
- Page 9 ATX6 Installation and User Guide 4. Attach the UHF Antenna to the ATX6’s BNC Connector and place it on top of the ATX6 or on a shelf within 12 feet. If an external amplifier is used, attach the amplifiers cable to the “RF IN”...
-
Page 10: Atx6 Quick Reference Guide
All manuals and user guides at all-guides.com ATX6 Installation and User Guide Apply a minimum of 3.5 to 4.5 lb-in torque for tightening field wires into the terminal blocks. Use Cat-3 or Cat-5 Twisted-Pair Wires Use only Copper Wire. ATX6 Quick Reference Guide Date/Time Settings (NXT &... -
Page 11: Date/Time Set-Up
All manuals and user guides at all-guides.com ATX6 Installation and User Guide Date/Time Set-Up: To enter the Date/Time Set-Up Mode, simultaneously press the Center (NXT) and Right (SET) buttons for 1 second. You will see the Password prompt: “P000”. For each of the following parameters to be set, the display will show the parameter number in the two left digit positions, and the parameter value in the two right digit positions. -
Page 12: Hours (00 ~ 12 Am/Pm)
All manuals and user guides at all-guides.com ATX6 Installation and User Guide Hours (00 ~ 12 AM/PM) Use the INC button to advance through the values. Advancing past ‘11’ will also toggle the AM and PM indicators. Press the SET button when the correct value is displayed. -
Page 13: Time Zone (-12 ~ +12)
Time Reference Source (rtc, GPS, Air, Syn, 485, PcL) Use the INC button to advance through the values. Select which Time Reference is to be used by the ATX6. Press the SET button when the correct value is displayed. Real-Time-Clock, set in parameters # 1 through 5... -
Page 14: Spring Dst Week: (1,2,3,4,L)
23:59). Press SET when the desired value shows. AirTime Radio UHF Channel (1~8) The ATX6 is pre-loaded with the multiple Frequency selections: Use the INC button to select the frequency channel for your installation; default is ‘1’. Do not change unless AirTime system components have been specifically ordered for a different frequency. -
Page 15: Time Slot: (A Or 0~9)
To support systems that include multiple Transceivers using the same Frequency Channel, AirTime Transceivers can automatically determine their position in a network of transceivers. In most cases, the ATX6 will determine its own position by listening to transmissions from other Transceivers in the area. -
Page 16: Uhf Power Level (Lo / Hi)
58 second of the previous minute syncing the device to the ATX6. Use the INC button to change the value of the first digit. Press NXT to move cursor to the next digit, and then press INC to change the selected digit. -
Page 17: P Password (000 ~ 999)
Password (000 ~ 999) For security purposes, you may set a unique password for your ATX6. To change the Password, use the INC, NXT and SET buttons. The INC button will increment the digit over the displayed cursor. The NXT button will move the cursor to the next digit. -
Page 18: Operating Modes
UHF LED flashing once) to other ATX-series devices during the last ten seconds of each minute, If RC Emulation is enabled (Set-Up parameter # 15), the ATX6 will transmit a radio signal to RC-series Wall Clocks at the top of each odd minute; except the minute designated to generate a relay closure (see below). -
Page 19: Airtime Transmit Mode
Automatic: When not in Receive Mode (automatically or manually initiated) the ATX6 will transmit the RC radio signal each odd minute (if RC Emulation has been enabled). The ATX6 will transmit the AirTime radio signal each minute, or each even minute (if RC Emulation has been enabled). -
Page 20: Receive Mode
‘~’ symbol appearing in the display solidly. The UHF LED will flash twice each time a signal is received. When Receive Mode is active, the ATX6 will listen for AirTime signals transmitted by other ATX-series devices for one hour, allowing it to configure itself as a member of the AirTime Network. -
Page 21: Rc Transmit
The ATX6 includes a #BR2325 Lithium Coin-Cell Battery that maintains the Real-Time-Clock during AC Power Failures. Typical battery life, when the ATX6 is normally powered from an AC outlet, is eight years. As battery life may be less, depending upon your circumstances, it is suggested that the battery be replaced every five years. -
Page 22: Installation Examples
All manuals and user guides at all-guides.com ATX6 Installation and User Guide Installation Examples ATX6 Stand Alone correcting Wireless Wall Clocks ATX-GPS to ATX6 correcting Wireless Wall Clocks and LTR Master Page 18... - Page 23 All manuals and user guides at all-guides.com ATX6 Installation and User Guide ATX Receiving WWVB signal synchronizing an ATX 6 correcting Wireless Wall Clocks and LTR Master ATX6 through an external amplifier correcting Wireless Wall Clocks Page 19...
-
Page 24: Wiring Diagrams
All manuals and user guides at all-guides.com ATX6 Installation and User Guide Wiring Diagrams Synchronizing the ATX6 to Lathem’s AirTime TimeSync Software via Ethernet to RS232 Converter (Program Synchronization “PcL”) Synchronizing the ATX6 to the ATX6-GPS Receiver (Program Synchronization “GPS”) -
Page 25: Synchronizing A Ltrx-512 To An Atx6 Using Rs485
All manuals and user guides at all-guides.com ATX6 Installation and User Guide When attaching wires to the terminal block the ATX6 should be in a vertical position. If the ATX6 is horizontal the terminal block will not lock down the wires. -
Page 26: Synchronizing A Ltr0 Or Dwa-S To An Atx6
All manuals and user guides at all-guides.com ATX6 Installation and User Guide Synchronizing a LTR0 or DWA-S to an ATX6 Synchronizing a DDC2/4-RS to an ATX6 Page 22... -
Page 27: Synchronizing The Atx6 To A Ltr-Gps
All manuals and user guides at all-guides.com ATX6 Installation and User Guide Synchronizing the ATX6 to a LTR-GPS Page 23... -
Page 28: Synchronizing A Ltrx-512 To Atx6 Using Sync Relay Closure
All manuals and user guides at all-guides.com ATX6 Installation and User Guide Synchronizing a LTRX-512 to ATX6 using Sync Relay closure (Program ATX6 Relay closure at 12:00AM) Verify Jumpers are “Open” as shown for Sync Output. To access jumpers see page 3. -
Page 29: Synchronizing The Atx6 To An External Relay Closure
All manuals and user guides at all-guides.com ATX6 Installation and User Guide Synchronizing the ATX6 to an External Relay Closure (Program Synchronization “SYN”, verify J7 & J8 are Closed) Verify Jumpers are “Closed” as shown for Sync Input. To access jumpers see page 3. -
Page 30: Specifications
All manuals and user guides at all-guides.com ATX6 Installation and User Guide Specifications Dimensions 9" H X 5 1/8" W X 3 1/8" D Weight 3.8 lbs (1.702 kg) Display LCD with Time / Status indicators and 4 LED indicators Housing All metal enclosure with grey textured paint. -
Page 31: Warranty
All manuals and user guides at all-guides.com ATX6 Installation and User Guide Warranty Limited One-Year Limited Warranty Lathem warrants the hardware products described in this guide against defects in material and workmanship for a period of one year from date of original purchase from Lathem or from an authorized Lathem reseller.
Need help?
Do you have a question about the ATX6 and is the answer not in the manual?
Questions and answers