Advertisement
Quick Links
INSTRUCTIONS FOR USE
INSTRUCTIONS FOR USE
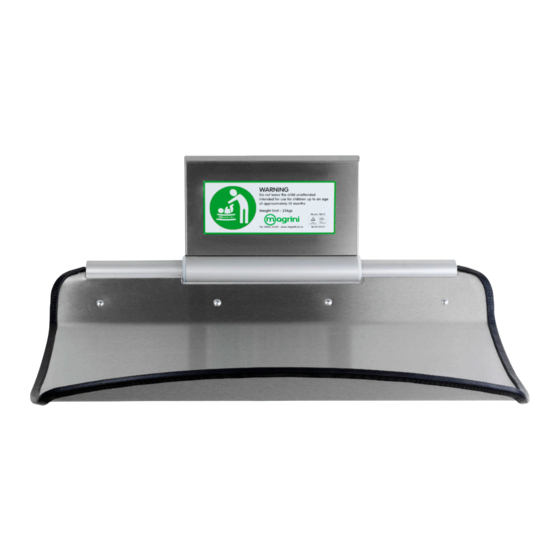
Magrini Baby Changing Unit - Model MC75
Magrini Baby Changing Unit - Model MC75
INSTRUCTIONS FOR USE
Magrini Baby Change Unit - Model MC75
For fixing into blockwork or brickwork:
For fixing into blockwork or brickwork:
For fixing into blockwork or brickwork:
1) Using the template supplied, mark the position of the holes to be drilled ensuring that the correct height of
1) Using the template supplied, mark the position of the holes to be drilled ensuring that the correct height of
79cm from the floor to the bottom of the template is correct. Check for correct level. Drill the 2 top holes and
1) Using the template supplied, mark the position of the holes to be drilled ensuring that the correct height of
79cm from the floor to the bottom of the template is correct. Check for correct level. Drill the 2 top holes and
2 middle holes, fit the plastic block fixings (supplied). Use four M8x70 turbo coach screws into the top four
79cm from the floor to the bottom of the template is correct. Check for correct level. Drill the 2 top holes
2 middle holes, fit the plastic block fixings (supplied). Use four M8x70 turbo coach screws into the top four
block fixings.
and 2 middle holes, fit the plastic block fixings (supplied). Use four M8x70 turbo coach screws into the top
block fixings.
four block fixings.
2) Screw into block fixings and allow 10mm protruding. Test fit unit for level and verify correct position of mark
2) Screw into block fixings and allow 10mm protruding. Test fit unit for level and verify correct position of mark
2) Screw into block fixings and allow 10mm protruding. Test fit unit for level and verify correct position of
for bottom two holes. Remove unit and drill bottom two holes and fit the plastic block fittings. Tighten top
for bottom two holes. Remove unit and drill bottom two holes and fit the plastic block fittings. Tighten top
mark for bottom two holes. Remove unit and drill bottom two holes and fit the plastic block fittings. Tighten
four screws until approximately 4mm protruding. Fit unit over screws and push down to lock into slots.
four screws until approximately 4mm protruding. Fit unit over screws and push down to lock into slots.
top four screws until approximately 4mm protruding. Fit unit over screws and push down to lock into slots.
3) Use the remaining two M8x70 turbo coach screws. Screw into the bottom two holes of the unit and into the
3) Use the remaining two M8x70 turbo coach screws. Screw into the bottom two holes of the unit and into the
3) Use the remaining two M8x70 turbo coach screws. Screw into the bottom two holes of the unit and into the
block fixings and tighten.
block fixings and tighten.
block fixings and tighten.
4) Pull unit open and close several times to check for correct movement.
4) Pull unit open and close several times to check for correct movement.
4) Pull unit open and close several times to check for correct movement.
Note: All assembly fittings shall always be correctly tightened and checked regularly. Screws shall not
Note: All assembly fittings shall always be correctly tightened and checked regularly. Screws shall not be
Note: All assembly fittings shall always be correctly tightened and checked regularly. Screws shall not be
loose because a child can squeeze parts of the body, or clothing (e.g. strings, necklaces, ribbons for
be loose because a child can squeeze parts of the body, or clothing (e.g. strings, necklaces,
loose because a child can squeeze parts of the body, or clothing (e.g. strings, necklaces, ribbons for
ribbons for babies, dummies, etc.) could get caught. There would be danger of strangulation.
babies, dummies, etc.) could get caught. There would be danger of strangulation.
babies, dummies, etc.) could get caught. There would be danger of strangulation.
Units should be fitted no less than 100mm from the corner of the room to enable access for
Units should be fitted no less than 100mm from the corner of the room to enable access for cleaning.
Units should be fitted no less than 100mm from the corner of the room to enable access for cleaning.
cleaning. Be aware of the risk of open fire and other sources of strong heat, such as electric bar
Be aware of the risk of open fire and other sources of strong heat, such as electric bar fires, gas fires etc.
fires, gas fires etc. in the near vicinity of the unit.
Be aware of the risk of open fire and other sources of strong heat, such as electric bar fires, gas fires etc.
in the near vicinity of the unit.
in the near vicinity of the unit.
Drill
Drill
(10mm Masonry Bit)
(10mm Masonry Bit)
79cm (31")
79cm (31")
Magrini Limited, Unit 5 Maybrook Industrial Estate, Brownhills, Walsall WS8 7DG
Magrini Limited
Magrini Limited
t: 01543 375311 • e: sales@magrini.co.uk • w: www.magrini.co.uk
Unit 5, Maybrook Industrial Estate, Brownhills, Walsall WS8 7DG
Unit 5, Maybrook Industrial Estate, Brownhills, Walsall WS8 7DG
Tel: 01543 375311 Fax: 01543 361172 Email: sales@magrini.co.uk Web: www.magrini.co.uk
Tel: 01543 375311 Fax: 01543 361172 Email: sales@magrini.co.uk Web: www.magrini.co.uk
(10mm Masonry Bit)
TEMPLATE
(10mm Masonry Bit)
TEMPLATE
SUPPLIED
SUPPLIED
79cm (31")
79cm (31")
Floor Level
Floor Level
Doc: MC7503 Date: February 2014
Doc: MC7504 Date: August 2017
Doc: MC7503 Date: February 2014
All manuals and user guides at all-guides.com
INSTRUCTIONS FOR USE
INSTRUCTIONS FOR USE
Magrini Baby Changing Unit - Model MC75
Magrini Baby Changing Unit - Model MC75
Magrini Baby Change Unit - Model MC75
IMPORTANT: RETAIN FOR FUTURE REFERENCE. READ CAREFULLY.
IMPORTANT: RETAIN FOR FUTURE REFERENCE. READ CAREFULLY.
This changing unit must be fixed to the wall for safe use of the product and the fastenings used
IMPORTANT: RETAIN FOR FUTURE REFERENCE. READ CAREFULLY.
This changing unit must be fixed to the wall for safe use of the product and the fastenings used
should be appropriate to the wall.
This changing unit must be fixed to the wall for safe use of the product and the fastenings used
should be appropriate to the wall.
To assure proper installation, we suggest that a qualified person install this unit.
should be appropriate to the wall.
To assure proper installation, we suggest that a qualified person install this unit.
Magrini Ltd., will not be responsible if the changing station is not installed correctly.
To assure proper installation, we suggest that a qualified person install this unit. Magrini Ltd., will
Magrini Ltd., will not be responsible if the changing station is not installed correctly.
All recommended fixings are supplied. Replacements are available free of charge from Magrini -
not be responsible if the changing station is not installed correctly.
All recommended fixings are supplied. Replacements are available free of charge from Magrini -
do not use less substantial fittings.
All recommended fixings are supplied. Replacements are available free of charge from Magrini -
do not use less substantial fittings.
We DO NOT recommend fixing onto toilet or changing room cavity walls, unless specific
do not use less substantial fittings.
We DO NOT recommend fixing onto toilet or changing room cavity walls, unless specific
studwork is in place. If in doubt contact the Magrini sales office.
We DO NOT recommend fixing onto toilet or changing room cavity walls, unless specific studwork
studwork is in place. If in doubt contact the Magrini sales office.
PLEASE NOTE: this unit does not require a changing pad and therefore, no pad is supplied with
is in place. If in doubt contact the Magrini sales office.
PLEASE NOTE: this unit does not require a changing pad and therefore, no pad is supplied with
this unit.
PLEASE NOTE: this unit does not require a changing pad and therefore, no pad is supplied with
this unit.
this unit.
Changing Unit Fixing Parts (supplied):
Changing Unit Fixing Parts (supplied):
6 No. Turbo Coach Screws M8 x 70
Changing Unit Fixing Parts (supplied):
6 No. Turbo Coach Screws M8 x 70
Hexagon Head, C-1022 Steel/Zinc Plated
6 No. Turbo Coach Screws M8 x 70 Hexagon Head,
Hexagon Head, C-1022 Steel/Zinc Plated
Yellow Passivated
C-1022 Steel/Zinc Plated Yellow Passivated
Yellow Passivated
Tools required:
Tools required:
Tools required:
•
Drill
• Drill
•
Drill
•
10mm Masonry Drill Bit
•10mm Masonry Drill Bit
•
10mm Masonry Drill Bit
Drill
Cleaning Instructions
Drill
Cleaning Instructions
Cleaning Instructions
The nappy changing unit may be washed and wiped with a damp soft cloth or sponge. Use of mild
The nappy changing unit may be washed and wiped with a damp soft cloth or sponge. Use of mild
The nappy changing unit may be washed and wiped with a damp soft cloth or sponge. Use of mild
detergent and warm water will remove the majority of dust and stains. For more obstinate stains a
detergent and warm water will remove the majority of dust and stains. For more obstinate stains a
detergent and warm water will remove the majority of dust and stains. For more obstinate stains adomestic
domestic cream cleaner can be used. Do not use any
domestic cream cleaner can be used. Do not use any
cream cleaner can be used. Do not use anyabrasive cloths,
abrasive cloths, caustic or solvent cleaners as these may
abrasive cloths, caustic or solvent cleaners as these may
caustic or solvent cleaners as these maydamage the unit.
damage the unit.
damage the unit.
Maintenance Instructions
Maintenance Instructions
Maintenance Instructions
Check that the unit is securely fixed to the wall.
Check that the unit is securely fixed to the wall.
Check that the unit is securely fixed to the wall.
Check that the changing bed does not
Check that the changing bed does not
Check that the changing bed does not rest
rest below the horizontal position.
rest below the horizontal position.
below the horizontal position. Ensure
Ensure warning label is in place on the
Ensure warning label is in place on the
warning label is in place on the inside
inside of the unit and general
inside of the unit and general
of the unit and general cleanliness is
cleanliness is within given guidelines.
cleanliness is within given guidelines.
within given guidelines. Ensure closing
Ensure closing mechanism returns the
Ensure closing mechanism returns the
mechanism returns the tray to the
tray to the upright position. Any
tray to the upright position. Any
upright position. Any replacement parts
replacement parts must be obtained
replacement parts must be obtained
must be obtained from Magrini only.
from Magrini only.
from Magrini only.
WARNING: DO NOT LEAVE THE CHILD UNATTENDED.
WARNING: DO NOT LEAVE THE CHILD UNATTENDED.
WARNING: DO NOT LEAVE THE CHILD UNATTENDED.
Intended for use for children up to a maximum weight of 15kg.
Intended for use for children up to a maximum weight of 15kg.
Intended for use for children up to a maximum weight of 15kg.
Do not use the changing unit when any part is broken, torn or missing.
Do not use the changing unit when any part is broken, torn or missing.
Do not use the changing unit when any part is broken, torn or missing.
INSTRUCTIONS FOR USE
6 No. Fixing Plugs
6 No. Fixing Plugs
10mm x 60mm
6 No. Fixing Plugs
10mm x 60mm
10mm x 60mm
•
10mm Hex Socket or Spanner
• 10mm Hex Socket or Spanner
•
10mm Hex Socket or Spanner
•
Spirit Level
• Spirit Level
•
Spirit Level
Magrini Limited, Unit 5 Maybrook Industrial Estate, Brownhills, Walsall WS8 7DG
Magrini Limited
Magrini Limited
t: 01543 375311 • e: sales@magrini.co.uk • w: www.magrini.co.uk
Unit 5, Maybrook Industrial Estate, Brownhills, Walsall WS8 7DG
Unit 5, Maybrook Industrial Estate, Brownhills, Walsall WS8 7DG
Tel: 01543 375311 Fax: 01543 361172 Email: sales@magrini.co.uk Web: www.magrini.co.uk
Tel: 01543 375311 Fax: 01543 361172 Email: sales@magrini.co.uk Web: www.magrini.co.uk
Advertisement

Related Manuals for Magrini MC75


Summary of Contents for Magrini MC75
- Page 1 Magrini Ltd., will not be responsible if the changing station is not installed correctly. block fixings. To assure proper installation, we suggest that a qualified person install this unit. Magrini Ltd., will four block fixings. Magrini Ltd., will not be responsible if the changing station is not installed correctly.
- Page 2 All manuals and user guides at all-guides.com Drill Points 240mm 70mm 100mm 70mm MC75 TEMPLATE 155mm...