Table of Contents
Advertisement
Available languages
Available languages
Quick Links
Advertisement
Chapters
Table of Contents

Related Manuals for Pelgrim IK5064F


Summary of Contents for Pelgrim IK5064F
- Page 1 IK5064F IK5084F IK5094F Gebruiksaanwijzing Inductiekookplaat Manual Induction hob...
-
Page 2: Table Of Contents
INHOUDSOPGAVE Uw inductiekookplaat Inleiding Beschrijving Bedieningspaneel Meldingen op het display Veiligheid Temperatuurbeveiliging Kookduurbegrenzer Gebruik Gebruik van de aanraaktoetsen en de schuifregelaar Inductiegeluiden Geschikte pannen Vermogen instellen Pandetectie Kookinstellingen Bediening Bereiding starten Boost Pandetectiesymbool De eierwekker gebruiken De timer gebruiken Kinderslot Vergrendelfunctie De warmhoudfunctie inschakelen De automatische opwarmfunctie inschakelen... - Page 3 INHOUDSOPGAVE Onderhoud Reiniging Problemen oplossen Algemeen Probleemoplossingstabel Technische specificaties Technische gegevens kookplaat Informatie volgens verordening (EU) 66/2014 Milieuaspecten Verpakking en apparaat afdanken Gebruikte pictogrammen Belangrijk om te weten NL 3...
-
Page 4: Uw Inductiekookplaat
UW INDUCTIEKOOKPLAAT Inleiding Gefeliciteerd met uw keuze voor dit toestel van Pelgrim. In het ontwerp van dit product heeft eenvoudige bediening en optimale gebruiksvriendelijkheid centraal gestaan. In deze handleiding leest u hoe u dit toestel het best kunt gebruiken. Naast informatie over de bediening, vindt u hier ook achtergrondinformatie die u tijdens het gebruik van het toestel van pas kan komen. -
Page 5: Beschrijving
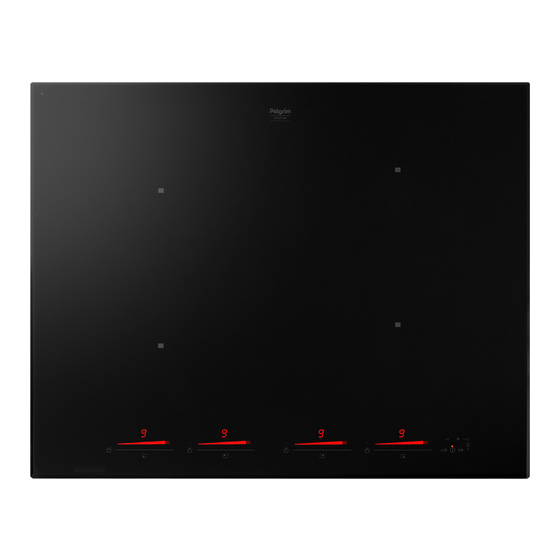
UW INDUCTIEKOOKPLAAT Beschrijving 1. Kookzone ø 215 mm / 2,3 kW - 3,0 kW (boost) 2. Kookzone ø 160 mm / 1,4 kW - 1,85 kW (boost) 3. Bedieningspaneel NL 5... -
Page 6: Bedieningspaneel
UW INDUCTIEKOOKPLAAT Bedieningspaneel 12 11 1. Warmhoudtoets 2. Warmhoudsymbool 3. Schuifregelaar 4. Kookzone-indicatie 5. Vergrendeltoets (met indicatielampje boven) 6. Aan-/uittoets (met indicatielampje boven) 7. Pauzetoets (met indicatielampje boven) 8. Chef Cook functie 9. Plustoets ‘+’ timer 10. Timerdisplay 11. Timersymbool (eierwekker) 12. -
Page 7: Meldingen Op Het Display
UW INDUCTIEKOOKPLAAT Meldingen op het display Display Beschrijving Vermogensniveau ‘0’ voor een kookzone. Vermogensniveau: 1 = lage stand / 9 = hoge stand. Boostniveau is actief. Actieve timer van een kookzone. Actieve kookwekker van de kookplaat. Timer ingesteld (1 uur en 25 minuten). Timer ingesteld (8 minuten en 56 seconden). -
Page 8: Veiligheid
VEILIGHEID Lees eerst de afzonderlijke veiligheidsinstructies voordat u het toestel in gebruik neemt. Temperatuurbeveiliging Een sensor controleert continu de temperatuur van bepaalde onderdelen van de kookplaat. Elke kookzone is voorzien van een sensor die continu de temperatuur van de bodem van de pan controleert om risico op oververhitting te voorkomen wanneer een pan droogkookt. -
Page 9: Gebruik
GEBRUIK Gebruik van de aanraaktoetsen en de schuifregelaar Plaats uw vingertop plat op een toets of op de schuifregelaar voor het beste resultaat. U hoeft geen druk uit te voeren. De aanraaktoetsen reageren alleen op lichte druk van een vingertop. Bedien de toetsen niet met andere objecten. -
Page 10: Vermogen Instellen
GEBRUIK Minimale pandiameter • De diameter van de bodem van de pan moet minimaal 11 cm zijn: Het beste resultaat wordt bereikt met een pan die dezelfde diameter heeft als de kookzone. De kookzone wordt niet ingeschakeld als een pan te klein is. Let op Zandkorreltjes kunnen krasjes veroorzaken die niet meer te verwijderen zijn. -
Page 11: Kookinstellingen
GEBRUIK Kookinstellingen Aangezien de instellingen afhankelijk zijn van de hoeveelheid en samenstelling van het gerecht in de pan, geldt de onderstaande tabel alleen als richtlijn. Gebruik de boost-instelling voor: • snel aan de kook brengen van voedsel of vloeistof; Gebruik instelling 9 voor: •... -
Page 12: Bediening
BEDIENING Lees het hoofdstuk ‘Voor het eerste gebruik’ zorgvuldig door voordat u begint met koken. Dit voorkomt onjuist gebruik van de kookplaat. Bereiding starten Zorg ervoor dat de onderzijde van de pan en het oppervlak van de kookzone schoon en droog zijn. -
Page 13: Boost
BEDIENING Boost U kunt de boostfunctie gebruiken om max. 5 minuten op de hoogste kookstand te koken. 1. Raak het einde van de schuifregelaar aan de rechterkant aan om de boostfunctie te selecteren. ‘P’ verschijnt op het display. ▷ ▷ Na het verstrijken van de maximale boosttijd wordt het vermogen verlaagd naar stand 9. -
Page 14: De Timer Gebruiken
BEDIENING De timer gebruiken De timer is gekoppeld aan een kookzone. Nadat de ingestelde tijd is verstreken schakelt de kookzone automatisch uit. 1. Schakel de kookplaat in en selecteer een kookzone en kookstand. 2. Raak gelijktijdig de mintoets (-) en de plustoets (+) aan om de timer in te schakelen. Op het display van de timer wordt “0.00”... -
Page 15: Kinderslot
BEDIENING Kinderslot U kunt de kookplaat vergrendelen om onbedoeld gebruik te voorkomen (bijvoorbeeld kinderen die de kookplaat per ongeluk inschakelen). De kookplaat is ingeschakeld, maar er zijn geen kookzones actief. 1. Raak de vergrendeltoets aan totdat u een geluidssignaal hoort. Het indicatielampje boven de vergrendeltoets gaat aan. -
Page 16: De Warmhoudfunctie Inschakelen
BEDIENING De warmhoudfunctie inschakelen De warmhoudfunctie is bedoeld om voedsel na het koken warm te houden. Het kan ook gebruikt worden als smelt- of sudderfunctie. 1. Raak de warmhoudtoets van een kookzone aan om de warmhoudfunctie te activeren. Het warmhoudsymbool wordt boven de warmhoudtoets weergegeven. ▷... -
Page 17: Herstelfunctie
BEDIENING Minimaal één kookzone is actief. 1. Raak de pauzetoets aan totdat u een geluidssignaal hoort. Het indicatielampje boven de pauzetoets gaat aan. ▷ ▷ Alle displays tonen het pauzesymbool. De pauzefunctie is geactiveerd. ▷ 2. Om de functie te deactiveren, raakt u nogmaals de pauzetoets aan. ▷... - Page 18 BEDIENING 1. Raak de pauzetoets en de plustoets (+) tegelijkertijd aan. De Chef Cook functie is actief; op elk kookzonedisplay wordt het vooraf ingestelde ▷ vermogensniveau weergegeven. 2. Om de functie te deactiveren, raakt u nogmaals de pauzetoets en de plustoets (+) tegelijkertijd aan.
-
Page 19: Vermogensbegrenzer
VERMOGENSBEGRENZER Vermogensbegrenzer Het instellen van de vermogensbegrenzer mag alleen worden uitgevoerd door een erkende en gekwalificeerde installateur. Lees de veiligheidsvoorschriften en de installatie-instructies zorgvuldig door. De kookplaat is voorzien van een vermogensbegrenzer. Als het totale vermogen van de actieve kookzones het maximaal beschikbare vermogen overschrijdt, wordt het vermogen automatisch verlaagd. - Page 20 ONDERHOUD Reiniging Activeer het kinderslot voordat u begint met het reinigen van de kookplaat. Wij raden u aan het apparaat na elk gebruik te reinigen. Zo voorkomt u dat overgekookt eten de glasplaat kan beschadigen. Dagelijkse reiniging 1. Gebruik een vochtige doek en een mild reinigingsmiddel (afwasmiddel) om het toestel te reinigen.
- Page 21 Als het apparaat niet naar behoren werkt, betekent dit niet altijd dat het defect is. Probeer het probleem eerst zelf op te lossen door de onderstaande punten na te lopen. U kunt voor meer informatie ook terecht op de website ‘www.pelgrim.nl’. Symptoom...
- Page 22 PROBLEMEN OPLOSSEN Symptoom Mogelijke oorzaak Oplossing Bij het inschakelen van Foutieve elektrische Neem contact op met een de kookplaat slaat er een aansluiting. installateur. zekering door. Het bedieningspaneel is vuil Reinig het bedieningspaneel. of er ligt water op. Foutcode E2. Overmatige oververhitting van Verwarm geen lege pannen.
- Page 23 TECHNISCHE SPECIFICATIES Technische gegevens kookplaat Kookplaat IK5064F IK5084F IK5094F Unit Waarde Producttype Ingebouwd Breedte Afmetingen Diepte Hoogte Spanning/frequentie V / Hz ~380-415V 50/60Hz ~220-240V 50/60Hz Maximale aansluitvermogen 7400 7400 7400 Informatie volgens verordening (EU) 66/2014 Metingen volgens EN60350-2 IK5084F IK5064F...
- Page 24 MILIEUASPECTEN Verpakking en apparaat afdanken Bij de productie van dit apparaat is gebruik gemaakt van duurzame materialen. Dit apparaat moet aan het einde van zijn levenscyclus op verantwoorde wijze worden afgedankt. De overheid kan u hierover informatie verstrekken. De verpakking van het apparaat is recyclebaar. Mogelijk zijn de volgende materialen gebruikt: •...
- Page 25 NL 25...
- Page 26 CONTENTS Your induction hob Introduction Description Control panel Indications in the display Safety Temperature safety Cooking-time limiter Before first use Use of the touch keys and slide control Induction noises Appropriate pans Power level setting Pan detection Cooking guidelines Operation Start cooking Boost Pan detection symbol...
- Page 27 CONTENTS Maintenance Cleaning Troubleshooting General Troubleshooting table Technical specifications Hob technical data Information according regulation (EU) 66/2014 Environmental aspects Disposal of packaging and appliance Pictograms used Important to know EN 3...
-
Page 28: Your Induction Hob
YOUR INDUCTION HOB Introduction Congratulations on your choice of this Pelgrim appliance. This product was designed with simple operation and optimum comfort in mind. This manual describes the best way to use this appliance. In addition to information on operation, you will also find background information that may come in handy when using the appliance. -
Page 29: Description
YOUR INDUCTION HOB Description 1. Cooking zone ø 215 mm / 2.3 kW - 3.0 kW (boost) 2. Cooking zone ø 160 mm / 1.4 kW - 1.85 kW (boost) 3. Control panel EN 5... -
Page 30: Control Panel
YOUR INDUCTION HOB Control panel 12 11 1. Keep warm key 2. Keep warm symbol 3. Slide control 4. Cooking zone indication 5. Lock key (with indicator light above) 6. On/off key (with indicator light above) 7. Pause key (with indicator light above) 8. -
Page 31: Indications In The Display
YOUR INDUCTION HOB Indications in the display Display Description Power level ‘0’ for a cooking zone. Power level; 1 = low level / 9 = high level. Boost level is active. Timer of a cooking zone is active. The minute minder of the hob is active. Timer has been set (1 hour and 25 minutes). -
Page 32: Safety
SAFETY Before use, read the separate safety instructions. Temperature safety A sensor continuously measures the temperature of certain parts of the hob. Every cooking zone is equipped with a sensor that measures the temperature of the bottom of the pan to avoid any risk of overheating when a pan boils dry. -
Page 33: Before First Use
BEFORE FIRST USE Use of the touch keys and slide control Place the tip of your finger flat on a key or the slide control to achieve the best results. You do not have to apply any pressure. The touch keys only react to the light pressure of a fingertip. Do not operate the controls with any other objects. -
Page 34: Power Level Setting
BEFORE FIRST USE Minimum pan diameter • The diameter of the bottom of the pan must be at least 11 cm. You will achieve the best results by using a pan with the same diameter as the zone. If a pan is too small, the zone will not work. -
Page 35: Cooking Guidelines
BEFORE FIRST USE Cooking guidelines Because the settings depend on the quantity and composition of the contents of the pan, the table below is intended as a guideline only. Use setting ‘boost’ to: • bring the food or liquid to the boil quickly; Use setting 9 to: •... -
Page 36: Operation
OPERATION Please read the chapter ‘Before first use’ very carefully before you start cooking. This prevents incorrect use of the hob. Start cooking Make sure the bottom of the pan and the surface of the cooking zone are clean and dry. Use of the touch keys and slide control Place the tip of your finger flat on a key or the slide control to achieve the best results. -
Page 37: Boost
OPERATION Boost You can use the boost function to cook for max. 5 minutes at the highest cooking level. 1. Touch the end of the slide control on the right to select the Boost function. ‘P’ shows on the display. ▷... -
Page 38: Using The Cooking Timer
OPERATION Using the cooking timer The cooking timer is connected to a cooking zone. After the set time has elapsed, the cooking zone will switch off automatically. 1. Start the hob and select a cooking zone and cooking level. 2. Simultaneously touch the minus (-) and plus (+) key to switch on the timer. The timer’s display shows “0.00”, and the timer symbol of the first active cooking zone ▷... -
Page 39: Child Safety Lock
OPERATION Child safety lock You can lock the hob to prevent unintended use (for example children accidentally switching on the hob). The hob is switched on but no cooking zone is active. 1. Simultaneously touch the lock key and pause key for approximately 3 seconds until you hear an audio signal. -
Page 40: Switching On The Keep Warm Function
OPERATION Switching on the keep warm function The keep warm function is for keeping food warm directly after cooking. It can also be used as a melting or simmer function. 1. Touch the keep warm key of a cooking zone to activate the keep warm function. The keep warm symbol appears above the warming key. -
Page 41: Recall Function
OPERATION At least one cooking zone must be active. 1. Touch and hold the pause key until you hear an audio signal. The indicator light is shown above the pause key. ▷ ▷ All displays show the pause symbol. The pause function is activated. ▷... - Page 42 OPERATION 1. Simultaneously touch the pause key and plus (+) key. The chef cook function is active; each cooking zone display shows the preset power ▷ level. 2. To deactivate the Chef Cook function, simultaneously touch the pause key and plus (+) key again.
-
Page 43: Power Limiter
POWER LIMITER Power limiter Setting the power limiter should only be carried out by a registered and qualified installer. Please read the safety regulations and the installation instructions carefully. The hob is equipped with a power limiter. If the total power of operating cooking zones exceeds the maximum available amount of power, the power is automatically reduced. - Page 44 MAINTENANCE Cleaning Set the child lock before you start cleaning the hob. We recommend that you clean the appliance after each use. This prevents that over cooked food can damage the glass surface. Daily cleaning 1. Use a damp cloth and a mild cleaning agent (washing-up liquid) to clean the appliance. 2.
- Page 45 If the appliance does not work properly, this does not always mean that it is defective. Try to deal with the problem yourself first by checking the points mentioned below or check for more information the website ‘www.pelgrim.nl’. Symptom Possible cause...
- Page 46 TROUBLESHOOTING Symptom Possible cause Solution The control panel is dirty or Clean the control panel. has water lying on it. Error code E2. Excessive overheating of the Do not heat empty pans. hob. Use appropriate pans for induction. Let the hob cool down. If the problem persists, contact the service department.
- Page 47 TECHNICAL SPECIFICATIONS Hob technical data IK5064F IK5084F IK5094F Unit Value Pruduct type Built-in Width Dimensions Depth Height Power supply voltage/frequency V / Hz ~380-415V 50/60Hz ~220-240V 50/60Hz Maximum connected load 7400 7400 7400 Information according regulation (EU) 66/2014 Measurements according EN60350-2...
- Page 48 ENVIRONMENTAL ASPECTS Disposal of packaging and appliance In the manufacturing of this appliance durable materials were used. Make sure to dispose of this equipment responsibly at the end of its lifecycle. Ask the authorities for more information regarding this. The appliance packaging is recyclable. The following may have been used: •...
- Page 49 EN 25...
- Page 50 EN 26...
- Page 51 EN 27...
- Page 52 When contacting the service department, have the complete type number to hand. U vindt de adressen en telefoonnummers van de serviceorganisatie op de garantiekaart. You will find the addresses and phone numbers of the service organisation on the guarantee card. www.pelgrim.nl www.pelgrim.be 867667...
- Page 53 IK5064F IK5084F IK5094F Mode d’emploi Table de cuisson à induction Bedienungsanleitung Induktionskochfeld...
- Page 54 SOMMAIRE Votre table de cuisson à induction Introduction Description Panneau de commande Indications dans l'affichage Sécurité Sécurité antisurchauffe Limiteur de temps de cuisson Avant la première utilisation Utilisation des touches tactiles et du curseur Bruits de l'induction Casseroles appropriées Réglage de la cuisson Détection de casserole Conseils de cuisson Fonctionnement de la table de cuisson...
- Page 55 SOMMAIRE Entretien Nettoyage Diagnostic des pannes Généralités Tableau de dépannage Spécifications techniques Données techniques de la table de cuisson Informations conformément à la réglementation (UE) 66/2014 Aspects environnementaux Mise au rebut de l’appareil et de l’emballage Pictogrammes utilisés Important à savoir Bon à...
-
Page 56: Votre Table De Cuisson À Induction
VOTRE TABLE DE CUISSON À INDUCTION Introduction Nous vous félicitons d'avoir choisi cet appareil Pelgrim. La souplesse et la simplicité de l’utilisation sont les principes qui ont guidé son développement. Ce manuel vous explique comment utiliser cet appareil de manière optimale. En plus des informations relatives au fonctionnement de l'appareil, vous y trouverez des renseignements de base susceptibles d’en faciliter l’utilisation. -
Page 57: Description
VOTRE TABLE DE CUISSON À INDUCTION Description 1. Zone de cuisson ø 215 mm / 2,3 kW - 3,0 kW (boost) 2. Zone de cuisson ø 160 mm / 1,4 kW - 1,85 kW (boost) 3. Panneau de commande FR 5... -
Page 58: Panneau De Commande
VOTRE TABLE DE CUISSON À INDUCTION Panneau de commande 12 11 1. Touche de maintien au chaud 2. Symbole de maintien au chaud 3. Curseur 4. Indication de la zone de cuisson 5. Touche de verrouillage (avec voyant au-dessus) 6. Touche Marche/Arrêt (avec voyant au-dessus) 7. -
Page 59: Indications Dans L'affichage
VOTRE TABLE DE CUISSON À INDUCTION Indications dans l'affichage Affichage Description Niveau de puissance « 0 » pour une zone de cuisson. Niveau de puissance : 1 = niveau bas / 9 = niveau haut. Niveau Boost activé. Minuterie active d’une zone de cuisson. Minuterie de cuisson active depuis la table de cuisson. -
Page 60: Sécurité
SÉCURITÉ Avant toute utilisation, lisez les instructions de sécurité séparées. Sécurité antisurchauffe Chaque zone de cuisson est dotée d’un capteur thermique. Ce capteur contrôle en permanence la température du fond de la casserole et des éléments de la table de cuisson, prévenant tout risque de surchauffe, par exemple par une casserole chauffée à... -
Page 61: Avant La Première Utilisation
AVANT LA PREMIÈRE UTILISATION Utilisation des touches tactiles et du curseur Placez le bout du doigt à plat sur une touche ou sur le curseur pour obtenir les meilleurs résultats. Il est inutile d'exercer une quelconque pression. Les touches tactiles ne réagissent qu'à une légère pression du bout du doigt. -
Page 62: Réglage De La Cuisson
AVANT LA PREMIÈRE UTILISATION Diamètre minimal de la casserole • Le diamètre de la base de la casserole doit être au moins de 11 cm. Vous obtiendrez les meilleurs résultats en utilisant une casserole avec le même diamètre que la zone. Si le diamètre de la casserole est trop petit, la zone de cuisson ne fonctionnera pas. -
Page 63: Conseils De Cuisson
AVANT LA PREMIÈRE UTILISATION • Si vous enlevez une casserole de la zone de cuisson pendant la cuisson, le symbole de détection de casserole s’affiche. La zone de cuisson s’éteint. Le symbole disparaît lorsque vous remettez la casserole en place. La zone de cuisson se rallume à la puissance réglée précédemment. -
Page 64: Fonctionnement De La Table De Cuisson
FONCTIONNEMENT DE LA TABLE DE CUISSON Veuillez lire attentivement le chapitre « Avant la première utilisation » avant de commencer la cuisson. Cela permet d'éviter une utilisation erronée de la table de cuisson. Lancer la cuisson Assurez-vous que le fond de la casserole et la surface de la zone de cuisson sont propres et secs. -
Page 65: Boost
FONCTIONNEMENT DE LA TABLE DE CUISSON Éteindre simultanément toutes les zones de cuisson Une ou plusieurs zones de cuisson sont utilisées. 1. Appuyez et maintenez votre doigt sur la touche Marche/Arrêt jusqu’à ce que vous entendiez un bip. Tous les affichages disparaissent et la plaque s’éteint. ▷... -
Page 66: Utilisation Du Minuteur De Cuisson
FONCTIONNEMENT DE LA TABLE DE CUISSON 3. Appuyez sur la touche moins (-) ou plus (+) dans les 10 secondes pour sélectionner un temps (de 1 minute à 1 heure et 59 minutes). Appuyez sur la touche plus (+) pour augmenter la durée du minuteur. ▷... -
Page 67: Sécurité Enfants
FONCTIONNEMENT DE LA TABLE DE CUISSON 2. Appuyez sur la touche plus (+) ou moins (-) pour modifier le temps. Si le temps de cuisson n’est pas modifié dans les 5 secondes à compter du moment où ▷ vous avez appuyé sur la touche « + » ou « - », le minuteur conserve le décompte selon le temps de cuisson défini avant la modification. -
Page 68: Fonction De Verrouillage
FONCTIONNEMENT DE LA TABLE DE CUISSON Fonction de verrouillage En activant la fonction de verrouillage, vous pouvez verrouiller les touches pendant l’utilisation de la table de cuisson. Seules la touche marche/arrêt et la touche de verrouillage sont actives. La table de cuisson est allumée. 1. -
Page 69: Pause De La Cuisson
FONCTIONNEMENT DE LA TABLE DE CUISSON Niveau de puissance Temps de préchauffage (minutes : secondes) 0:48 2:24 3:50 5:12 6:48 2:00 2:48 3:36 1. Allumez la table de cuisson. 2. Appuyez sur le curseur pendant au moins 3 secondes au niveau souhaité (de 1 à 8). Un « A »... -
Page 70: Fonction Rappel
FONCTIONNEMENT DE LA TABLE DE CUISSON Fonction rappel En cas de coupure accidentelle de la table de cuisson par la touche marche/arrêt, il est possible de restaurer tous les réglages à l’aide de la fonction rappel. 1. Dans les 6 secondes, touchez et maintenez la touche marche/arrêt pendant 2 secondes. La touche pause clignote. -
Page 71: Limiteur De Puissance
LIMITEUR DE PUISSANCE Limiteur de puissance Le réglage du limiteur de puissance doit uniquement être effectué par un installateur agréé et qualifié. Veuillez lire attentivement les règles de sécurité et les instructions d’installation. La table de cuisson est équipée d’un limiteur de puissance. Si la puissance totale des zones de cuisson en fonctionnement dépasse la quantité... - Page 72 ENTRETIEN Nettoyage Activez la sécurité enfants avant de nettoyer la table de cuisson. Nous vous recommandons de nettoyer l’appareil après chaque utilisation. Vous éviterez alors que les aliments trop cuits qui ont débordé endommagent la surface en verre. Nettoyage quotidien 1.
- Page 73 DIAGNOSTIC DES PANNES Généralités Si vous remarquez une fissure dans la surface en verre (aussi petite soit-elle), éteignez et débranchez immédiatement la plaque de cuisson. Contactez ensuite le service après-vente. Tableau de dépannage Si l’appareil ne fonctionne pas correctement, cela ne veut pas nécessairement dire qu’il est défectueux.
- Page 74 DIAGNOSTIC DES PANNES Symptôme Cause possible Solution Un fusible fond dès la mise La plaque de cuisson n'est Contactez un installateur en marche de la plaque de pas raccordée correctement. agréé. cuisson. Le panneau de commande Nettoyez le panneau de est sale ou mouillé.
- Page 75 7400 Informations conformément à la réglementation (UE) 66/2014 Mesures conformes à la norme EN60350-2 IK5084F Identification du modèle IK5064F IK5044F Type de plaque de cuisson Plaque de cuisson à induction Nombre de zones et/ou espaces de cuisson électriques Technologie de chauffe Zones de cuisson à...
- Page 76 ASPECTS ENVIRONNEMENTAUX Mise au rebut de l’appareil et de l’emballage Des matériaux durables ont été utilisés pour fabriquer cet appareil. Veillez à éliminer cet équipement de manière responsable à la fin de son cycle de vie. Pour toute information à ce sujet, contactez les autorités compétentes.
- Page 77 FR 25...
- Page 78 INHALT Ihr Induktionskochfeld Einführung Beschreibung Bedienfeld Anzeigen auf dem Display Sicherheit Überhitzungsschutz Gardauerbegrenzung Vor der ersten Verwendung Verwendung der Touch-Tasten und des Schiebereglers Induktionsgeräusche Geeignetes Kochgeschirr Leistungsstufen Kochgeschirrerkennung Hinweise zur Wahl der richtigen Leistungsstufe Bedienung des Kochfelds Kochvorgang starten Boost Kochgeschirrerkennungssymbol Einstellen der Kurzzeituhr Abschalttimer benutzen...
- Page 79 INHALT Pflege Reinigung Fehlerbehebung Allgemein Störungstabelle Technische daten Technische Daten Kochfeld Informationen zur Verordnung (EU) 66/2014 Umweltschutz Entsorgung von Gerät und Verpackung Verwendete Piktogramme Wichtiger Hinweis Tipp DE 3...
-
Page 80: Ihr Induktionskochfeld
IHR INDUKTIONSKOCHFELD Einführung Herzlichen Glückwunsch zum Kauf Ihres neuen Pelgrim-Geräts! Bei der Entwicklung dieses Produkts stand optimale Benutzerfreundlichkeit im Mittelpunkt. In diesem Handbuch erfahren Sie, wie Sie Ihr Gerät optimal verwenden. Neben Informationen zur Bedienung finden Sie hier auch Hintergrundinformationen, die bei der Verwendung dieses Geräts nützlich sein können. -
Page 81: Beschreibung
IHR INDUKTIONSKOCHFELD Beschreibung 1. Kochzone ø 215 mm / 2,3 kW - 3,0 kW (boost) 2. Kochzone ø 160 mm / 1,4 kW - 1,85 kW (boost) 3. Bedienfeld DE 5... -
Page 82: Bedienfeld
IHR INDUKTIONSKOCHFELD Bedienfeld 12 11 1. Warmhalten-Taste 2. Warmhaltensymbol 3. Schieberegler-Linie 4. Kochzone-Indikation 5. Sperrtaste (mit Kontrollleuchte oben) 6. EIN/AUS-Taste (mit Kontrollleuchte oben) 7. Pausentaste (mit Kontrollleuchte oben) 8. Chef Cook Funktion 9. Plustaste „+“ Timer 10. Timerdisplay 11. Timersymbol (Kurzzeituhr) 12. -
Page 83: Anzeigen Auf Dem Display
IHR INDUKTIONSKOCHFELD Anzeigen auf dem Display Beschreibung Display Leistungsstufe „0“ für eine Kochzone. Leistungsstufe: 1 = niedrige Leistung / 9 = hohe Leistung. Boost-Funktion aktiv. Timer einer Kochzone aktiviert. Kurzzeituhr des Kochfelds aktiviert. Timer ist programmiert (1 Stunde und 25 Minuten). Timer ist programmiert (8 Minuten und 56 Sekunden). -
Page 84: Sicherheit
SICHERHEIT Lesen Sie vor der Verwendung des Geräts die separaten Sicherheitshinweise! Überhitzungsschutz Ein Sensor kontrolliert laufend die Temperatur bestimmter Teile des Kochfelds. Jede Kochzone ist mit einem Sensor ausgestattet, der die Temperatur des Topfbodens kontrolliert, um das Risiko einer Überhitzung oder des Trockenkochens zu vermeiden. Bei einer zu hohen Temperatur wird die Leistungsstufe automatisch gesenkt oder das Kochfeld schaltet sich ganz aus. -
Page 85: Vor Der Ersten Verwendung
VOR DER ERSTEN VERWENDUNG Verwendung der Touch-Tasten und des Schiebereglers Das beste Ergebnis erzielen Sie, wenn Sie Ihre Fingerspitzen flach auf die Tasten bzw. den Schieberegler legen. Sie brauchen nicht fest zu drücken. Die Sensortasten sind so eingestellt, dass sie auf die leichte Berührung einer Fingerspitze reagieren. Versuchen Sie nicht, die Sensoren mit anderen Objekten zu bedienen. -
Page 86: Leistungsstufen
VOR DER ERSTEN VERWENDUNG Mindestdurchmesser von Töpfen und Pfannen • Der Durchmesser des Topf-/Pfannenbodens muss mindestens 11 cm betragen. Das beste Ergebnis wird mit einem Topf erzielt, der genauso groß ist wie die Kochzone. Bei einem zu kleinen Topf wird die Kochzone nicht eingeschaltet. Achtung Sandkörner können Kratzer verursachen, die nicht mehr zu entfernen sind. -
Page 87: Hinweise Zur Wahl Der Richtigen Leistungsstufe
VOR DER ERSTEN VERWENDUNG Hinweise zur Wahl der richtigen Leistungsstufe Die Werte in der folgenden Tabelle dienen lediglich einer groben Orientierung, weil die richtige Leistungsstufe von der Menge und Zusammensetzung des Garguts abhängt. Boost-Funktion: • Speisen oder Flüssigkeiten schnell zum Kochen bringen Stufe 9: •... -
Page 88: Bedienung Des Kochfelds
BEDIENUNG DES KOCHFELDS Bitte lesen Sie das Kapitel „Vor der ersten Verwendung“ sorgfältig durch, bevor Sie das Kochfeld zum ersten Mal benutzen, um Fehlbedienungen vorzubeugen. Kochvorgang starten Achten Sie darauf, dass die Topfunterseite sowie die Oberfläche der Kochzone sauber sind. Bedienung der Touch-Tasten und der Schieberegler-Linie Das beste Ergebnis erzielen Sie, wenn Sie Ihre Fingerspitzen flach auf die Tasten oder Schieberegler-Linien legen. -
Page 89: Boost
BEDIENUNG DES KOCHFELDS Boost Mit der Boost-Funktion können Sie maximal 5 Minuten mit höchster Leistungsstufe kochen. 1. Berühren Sie das Ende des Schiebereglers rechts, um die Boost-Funktion zu aktivieren. ▷ Auf der Anzeige erscheint „P“. Nach Ablauf der maximalen Boost-Zeit wird die Leistung auf Stufe 9 gesenkt. ▷... -
Page 90: Abschalttimer Benutzen
BEDIENUNG DES KOCHFELDS Abschalttimer benutzen Der Abschalttimer ist mit einer Kochzone verbunden. Nach Ablauf der eingestellten Zeit wird die Kochzone automatisch ausgeschaltet. 1. Schalten Sie das Kochfeld ein. Wählen Sie Kochzone und Leistungsstufe aus. 2. Berühren Sie gleichzeitig die Tasten Minus (-) und Plus (+), um die Kurzzeituhr zu aktivieren. Auf dem Display des Timers wird „0.00“... -
Page 91: Kindersicherung
BEDIENUNG DES KOCHFELDS Kindersicherung Sie können das Kochfeld sperren, um eine versehentliche Verwendung zu verhindern (z. B. versehentliches Einschalten des Kochfelds durch Kinder). 1. Das Kochfeld ist eingeschaltet, aber es sind keine Kochzonen aktif. 2. Halten Sie die Sperrtaste gedrückt, bis ein Tonsignal wiedergegeben wird. Die Kontrollleuchte oberhalb der Sperrtaste leuchtet auf. -
Page 92: Warmhaltefunktion Einschalten
BEDIENUNG DES KOCHFELDS Warmhaltefunktion einschalten Die Warmhalten-Funktion dient zum Warmhalten gegarter Speisen. Sie kann daher auch zum Schmelzen oder Köcheln verwendet werden. 1. Berühren Sie die Warmhaltetaste einer Kochzone um die Warmhaltefunktion zu aktivieren. Das Warmhaltesymbol „u“ wird oberhalb der Warmhaltetaste angezeigt. ▷... -
Page 93: Wiederherstellungsfunktion
BEDIENUNG DES KOCHFELDS Mindestens eine Kochzone ist aktiv. 1. Halten Sie die Pausentaste gedrückt, bis ein Tonsignal wiedergegeben wird. Die Kontrollleuchte oberhalb der Pausentaste leuchtet auf. ▷ Auf allen Displays wird das Pausensymbol angezeigt. ▷ Die Pausenfunktion ist aktiviert. ▷ 2. - Page 94 BEDIENUNG DES KOCHFELDS 1. Berühren Sie gleichzeitig die Pausentaste und die Plustaste (+). Die Chef Cook Function ist aktiv; die voreingestellte Leistungsstufe wird auf jedem ▷ Kochzonendisplay angezeigt. 2. Um die Funktion zu deaktivieren, berühren Sie erneut die Pausentaste und die Plustaste (+). Wenn während der Chefkochfunktion alle Zonen auf Position 0 gestellt sind, schaltet sich das Kochfeld nach 10 Sekunden aus.
-
Page 95: Leistungsbegrenzung
LEISTUNGSBEGRENZUNG Die Einstellung der Leistungsbegrenzung sollte nur von einem zugelassen und qualifizierten Installateur vorgenommen werden. Bitte lesen Sie die Sicherheitsvorschriften und die Installationsanleitung sorgfältig. Das Kochfeld ist mit einer Funktion zur Leistungsbegrenzung ausgestattet. Wenn die Gesamtleistung aller eingeschalteten Kochzonen die maximal verfügbare Leistung des Kochfelds überschreitet, wird die Leistung automatisch reduziert. - Page 96 PFLEGE Reinigung Aktivieren Sie vor jeder Reinigung des Kochfelds die Kindersicherung. Wir empfehlen, das Gerät nach jedem Gebrauch zu reinigen. So verhindern Sie, dass übergekochte Speisen die Glasoberfläche beschädigen. Tägliche Reinigung 1. Verwenden Sie ein mildes Reinigungsmittel (Spülmittel) und ein feuchtes Tuch. 2.
- Page 97 FEHLERBEHEBUNG Allgemeines Wenn Sie in der Glasplatte einen Bruch oder Riss bemerken (und sei er noch so klein), schalten Sie das Kochfeld sofort aus und trennen Sie es vom Netz. Wenden Sie sich an den Kundendienst. Störungstabelle Wenn das Gerät nicht korrekt funktioniert, bedeutet dies nicht automatisch, dass es defekt ist. Überprüfen Sie stets zuerst die Punkte in der nachfolgenden Tabelle.
- Page 98 FEHLERBEHEBUNG Symptom Mögliche Ursache Lösung Das Kochfeld funktioniert Keine Stromzufuhr Überprüfen Sie die nicht. Die Anzeigen leuchten aufgrund eines defekten Sicherungen bzw. den nicht. Stromanschlusses oder einer Hauptschalter (bei einem fehlerhaften Verbindung. Gerät ohne Stecker). Gleich nach dem Einschalten Das Kochfeld ist falsch Wenden Sie sich an einen des Kochfelds brennt eine angeschlossen.
- Page 99 Maximale Anschlussleistung 7400 7400 7400 Informationen zur Verordnung (EU) 66/2014 Messungen gemäß EN60350-2 IK5084F Modellbezeichnung IK5064F IK5044F Typ des Kochfelds Induktionskochfeld Anzahl der elektrischen Kochzonen und/oder -bereiche Heiztechnologie Induktionskochzonen Bei kreisförmigen Kochzonen: Durchmesser der nutzbaren Oberfläche für jede elektrisch beheizte Kochzone in mm...
- Page 100 UMWELTSCHUTZ Entsorgung von Gerät und Verpackung Bei der Herstellung dieses Geräts wurden langlebige Materialien verwendet. Am Ende seines Lebenszyklus muss es vorschriftsmäßig entsorgt werden. Weitere Informationen erhalten Sie bei den zuständigen Behörden. Die Verpackung des Geräts ist wiederverwertbar. Folgende Materialien können verwendet worden sein: •...
- Page 101 DE 25...
- Page 102 DE 26...
- Page 103 DE 27...
- Page 104 La plaque signalétique se trouve sur le dessous de l’appareil. Das Typenschild befindet sich an der Unterseite des Geräts. Collez la plaque signalétique de l’appareil ici. Kleben Sie hier das Typenschild ein. Lorsque vous contactez le service après-vente, assurez-vous de disposer du numéro de type complet.
Need help?
Do you have a question about the IK5064F and is the answer not in the manual?
Questions and answers