Advertisement
Quick Links
Contents
Part 1: General................................................................................. 2
1.1.
1.2.
Part 2: Installation and Wire Connection.......................................... 3
Part 3: Connect the WiFi Dimmer Switch to Wi-Fi ............................ 5
Part 3: Connect the Dimmer Switch to Alexa.................................. 15
Part 4: Connect the Dimmer Switch to Google Home ..................... 18
User Manual
3Way Smart Dimmer Switch
Specification ........................................................ 2
Main Features ..................................................... 2
1
Advertisement

Related Manuals for Martin Jerry US-STD-TC01


Summary of Contents for Martin Jerry US-STD-TC01
-
Page 1: Table Of Contents
User Manual 3Way Smart Dimmer Switch Contents Part 1: General................. 2 1.1. Specification ............2 1.2. Main Features ............. 2 Part 2: Installation and Wire Connection.......... 3 Part 3: Connect the WiFi Dimmer Switch to Wi-Fi ......5 Part 3: Connect the Dimmer Switch to Alexa........15 Part 4: Connect the Dimmer Switch to Google Home ..... -
Page 2: Part 1: General
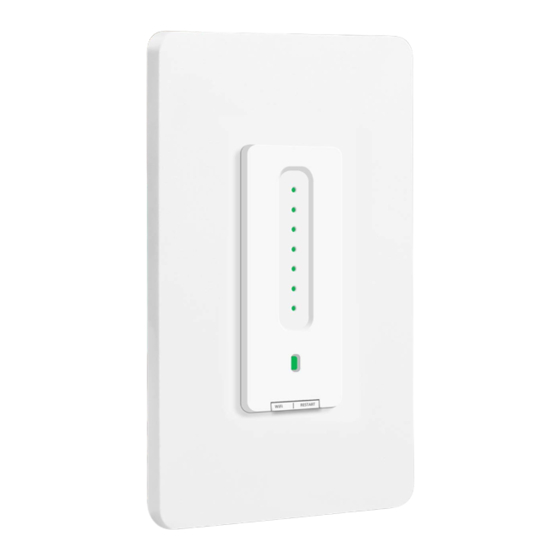
Part 1: General 1.1. Specification Item Description Product Name 3Way Smart Dimmer Switch Model US-STD-TC01 Color White Voltage 100V-240VAC Frequency 50-60Hz Wattage 150W (LED) 1.2. Main Features Dimmer Indicator Dim Pad Power Button Wi-Fi Indicator Restart Wi-Fi Button Button Works with Alexa & Google Assistant for voice control ... -
Page 3: Part 2: Installation And Wire Connection
Part 2: Installation and Wire Connection Notice: 1. As the switch needs power for itself, three lines must be connected (Live Line, Load Line and Neutral Line); 2. Please use the wire nuts to make the copper conductors fully concealed; 3. - Page 4 Step 1: Turn off power at the circuit breaker that controls the light switch. Use voltage tester to confirm no voltage is present. Step 2: Remove existing faceplate and light switch, then identify Live/Load, Neutral and Ground lines. Step 3: Connect the Smart Switch wiring with the provided wire connectors as follows: ...
-
Page 5: Part 3: Connect The Wifi Dimmer Switch To Wi-Fi
Part 3: Connect the 3Way Smart Dimmer Switch to Wi-Fi Step 1: Download the App Scan the QR code or search “Smart Life” in the App Store or Google Play... - Page 6 Step 2: Register a New Account Password must contain Register with phone number 6-20 letters and numbers or email address...
- Page 7 Step 3: Turn on the power at the circuit breaker. Press the Wi-Fi Button and then the Wi-Fi Indicator light flashes quickly in Red. Flash Quickly in Red: Paring Mode (EZ mode) Constant Green Dimmer Indicator & Wi-Fi Indicator: Power ON, Wi-Fi Connected Constant Red Wi-Fi Indicator: Lost Wi-Fi Connection...
- Page 8 Step 6: Select 2.4 GHz Wi-Fi Step 7: Select Confirm and network and enter your tap Next. password. (Your phone should have connected to the same Wi-Fi first)
- Page 9 Step 8: It will be added in Simple Names will be easier around 20 seconds. to be identified by Echo or -----If it fails, Google Home. try to reconnect and contact the seller for help. After the device is added, Input a proper name and click “Done”.
- Page 10 Step 9: The switch is Congratulations! Now you can turn on/off the smart connected dimmer switch via App on control it by this App. If you your smartphone. need voice control, please refer to Part 3 for Alexa, Part 4 for Google Assistant. If the above pairing method mode) fails...
- Page 11 Step 10: Set the switch to Step 11: After “Step 6: AP mode Select 2.4 GHz Wi-Fi network and enter your password,” 1. Press the Wi-Fi button once Tap “EZ Mode” on the top right and you will see the indicator and select “AP Mode”.
- Page 12 Step 12: Select Confirm and Step 13: Connect your phone tap Next. to the device’s hotspot like "Smart Life_xxxx".
- Page 13 Step After selecting Step 14: It will be added in hotspot like "Smart Life_xxxx" around 20 seconds. in Wi-Fi setting page, go back After the device is added, to the App and it will connect Input a proper name and click automatically.
- Page 14 FQA: 1. Cannot download 2. Cannot discover right App. smart switch by App. A: Please come back to step A: Make sure that your Wi-Fi 1 and download by scanning router is 2.4GHz; the QR code. Please use a DHPC is enabled in the smartphone rather than tablet.
-
Page 15: Part 3: Connect The Dimmer Switch To Alexa
Part 3: Connect the Dimmer Switch to Alexa Part 2 must be completed before doing this part 3 Step 1: Log in your Alexa Step 2: Search “Smart Life” and account on a smartphone select the right one according the blue logo (same with App) or a computer, then tap Home ... - Page 16 Step 4: Login the account you Step 3: Enable the skill registered on the App in Part 2, then click “Link Now” The account and password should be the same as you registered in the Smart Life App. DO NOT input your Alexa account or use another account.
- Page 17 Step 5: The Account is linked Congratulations! successfully, and then tap Alexa Devices (Echo) can Authorize to Complete. control the Switch now. To add or delete switches, please delete or add them in the Smart Life App (see Part 2), and then the Alexa will synchronize automatically.
- Page 18 NOTE: If you want to control your smart devices through Amazon Alexa. you should assign a name to switch. After naming to your switch, Which name you assigned to your switch that name should use in the command. For example, if you set the switch name as “Bedroom light”, the supported voice commands are as below: "Echo, turn ON Bedroom light".
-
Page 19: Part 4: Connect The Dimmer Switch To Google Home
Part 4: Connect the Dimmer Switch to Google Home Part 2 must be completed before doing this part 4 Step 1: Find "Home Control" in the hamburger menu on the Google Home app’s home page ->Home Control -> tap "+". - Page 20 Step 2: Find "Smart Life" in Step 3: Input your Smart the list. Life account and password you registered in Part 2, then tap "Link Now".
- Page 21 Step 4: After you assign rooms for the switch, your switch will be listed in the Home Control page. Step 5: Control your smart switch through Google Home Now you can control your smart switch through Google Home. If you set the name as “bedroom light”, the supported voice commands are as below: Ok Google, turn on bedroom light.
- Page 22 Warning: Please install it by a professional electrician If there is radio frequency interference, it might affect the operation Indoor use only Do not use in bathroom and other damp locations Please ensure that the light bulb is within the capacity of this switch.
- Page 23 FCC Warning: This device complies with Part 15 of the FCC Rules. Operation is subject to the following two conditions: (1) this device may not cause harmful interference, and (2) this device must accept any interference received, including interference that may cause undesired operation.
- Page 24 --Connect the equipment into an outlet on a circuit different. from that to which the receiver is connected. --Consult the dealer or an experienced radio/TV technician for help. NOTE: This device and its antenna(s) must not be co-located or operation in conjunction with any other antenna or transmitter RF Exposure Statement To maintain compliance with FCC’s RF Exposure guidelines,...
Need help?
Do you have a question about the US-STD-TC01 and is the answer not in the manual?
Questions and answers