Sony CMT-CP100 Operating Instructions Manual
Hide thumbs
Also See for CMT-CP100:
- Service manual (50 pages) ,
- Operating instructions manual (26 pages) ,
- Service manual (2 pages)
Table of Contents
Advertisement
4-233-754-12 (2)
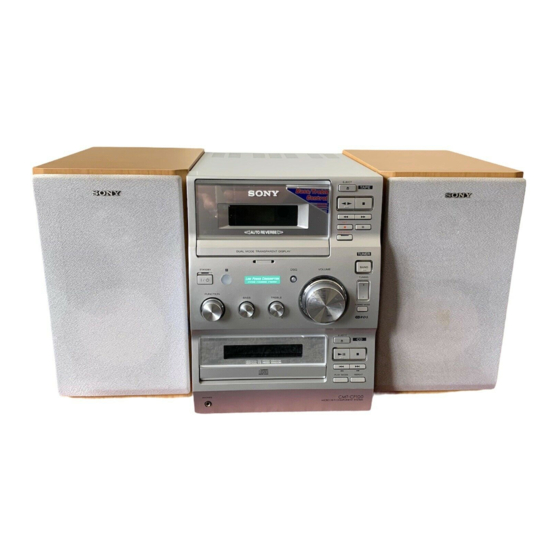
Micro Hi-Fi
Component
System
Operating Instructions
Owner's Record
The model and serial numbers are located at the rear. Record the serial number in the
space provided below. Refer to them whenever you call upon your Sony dealer
regarding this product.
Model No.
Serial No.
CMT-CP100
© 2001 Sony Corporation
Advertisement
Table of Contents

Related Manuals for Sony CMT-CP100


Summary of Contents for Sony CMT-CP100
-
Page 1: Operating Instructions
Operating Instructions Owner’s Record The model and serial numbers are located at the rear. Record the serial number in the space provided below. Refer to them whenever you call upon your Sony dealer regarding this product. Model No. Serial No. - Page 2 OUTLET UNLESS THE BLADES CAN BE FULLY INSERTED TO PREVENT BLADE EXPOSURE. For the customers in North America NERGY registered mark. As an NERGY Sony Corporation has determined that this product meets the NERGY energy efficiency. ® is a U.S. ®...
-
Page 3: Table Of Contents
Table of Contents Parts Identification Main unit ... 4 Remote Control ... 5 Getting Started Hooking up the system ... 6 Inserting two size-AA (R6) batteries into the remote control ... 7 Setting the time ... 7 Loading the CD ... 8 Playing the CD ––... -
Page 4: Parts Identification
Parts Identification The items are arranged in alphabetical order. Refer to the pages indicated in parentheses () for details. Main unit BASS 3 (16) CD EJECT Z qj (8) CD SYNC qs (13, 14) CD u ws (8, 9) CD x qk (8, 9, 21) CD ./>... -
Page 5: Remote Control
Remote Control CD REPEAT qk (8) CD N ws (8, 9) DIR MODE ql (12~14) DISPLAY 2 (9, 11) DSG 1 (16) ENTER qd (7, 10, 14, 17) MEMORY qh (10) PLAY MODE 9 (8, 9, 14) 1 2 3 SLEEP qf (16) STEREO/MONO qj (11) TAPE Y w;... -
Page 6: Getting Started
Getting Started Hooking up the system Follow steps 1 through 4 of the procedure below to hook up your system using the supplied cords and accessories. AM loop antenna Right speaker 1 Connect the speakers. Connect the right and left speaker cords to the SPEAKER terminals as shown below. -
Page 7: Inserting Two Size-Aa (R6) Batteries Into The Remote Control
3 For models with a voltage selector, set VOLTAGE SELECTOR to the local power line voltage. 110V-120V 220V-240V VOLTAGE SELECTOR 4 Connect the power cord to a wall outlet. If the plug does not fit the wall socket, detach the supplied plug adaptor (only for models equipped with an adaptor). -
Page 8: Loading The Cd
Loading the CD Press CD EJECT Z. The disc tray slides out. Load a CD onto the disc tray. ?/ 1 Load with the label side up. When you play a CD single (8 cm CD), load it onto the inner circle of the tray. -
Page 9: Programming The Cd Tracks
Programming the CD tracks –– Program Play You can make a program of up to 24 tracks on a CD in any order that you want. Turn FUNCTION until “CD” appears in the display. Press PLAY MODE repeatedly until “PGM” appears in the display. Press CD ./>... -
Page 10: Tuner
Tuner Presetting radio stations The system can store a total of 30 preset stations (20 for FM and 10 for AM). Turn FUNCTION until “TUNER” appears in the display. The indicator surrounding the TUNER BAND button lights up. Press TUNER BAND to select FM or Press TUNING MODE repeatedly until “AUTO”... -
Page 11: Using The Radio Data System (Rds)
To tune in a non-preset radio station In step 3, press TUNING MODE repeatedly until “AUTO” and “PRESET” disappear from the display, then press TUNING +/– (or m/M on the remote) repeatedly to tune in the desired station (Manual Tuning). Tips •... -
Page 12: Tape
Tape Loading a tape Press TAPE EJECT Z. Load a recorded/recordable tape into the cassette holder. With the side you want to play/ record on facing towards you Playing a tape You can use Type I (normal) tape. Load a recorded tape into the cassette holder. -
Page 13: Recording To A Tape
Recording to a tape –– CD Synchro Recording/Recording Manually/Program Edit You can record from a CD, radio or any of the connected components. You can use Type I (normal) tape. Recording from a CD Steps (CD Synchro Recording) Load a recordable tape into the cassette holder. Load a CD onto the disc tray. -
Page 14: Timer-Recording Radio Programs
Recording to a tape (continued) Recording CD tracks in your favorite order –– Program Edit Load a recordable tape into the cassette holder. Load a CD onto the disc tray. Do steps 1 through 5 in Program Play (see page 9). Press CD SYNC. - Page 15 Do this Check the settings Press TIMER SELECT on the remote repeatedly until “c REC” appears in the display. The preset items appear in turn. Turn off the timer Press TIMER SELECT on the remote repeatedly until “c REC” disappears from the display.
-
Page 16: Sound Adjustment
Sound Adjustment Adjusting the sound Generating a more dynamic sound (Dynamic Sound Generator) Press DSG. To cancel the DSG, press DSG again. Adjusting the bass Turn BASS. You can adjust the bass in 7 steps. Adjusting the treble Turn TREBLE. You can adjust the treble in 7 steps. - Page 17 Prepare the music source you want to listen to when the system turns on. • CD: Load a CD. To start playing from a specific track, make a program (see “Programming the CD tracks” on page 9). • Tape: Load a tape with the side you want to play facing towards you.
-
Page 18: Optional Components
Optional Components Hooking up the optional components You can connect a variety of components to your system in order to enhance it. Make sure that the color of the plugs matches that of the connectors. To the audio output jacks on your MD deck/VCR To the digital input connector on your MD deck*... -
Page 19: Additional Information
• When moving the unit, remove any disc that may be on the disc tray. If you have any questions or problems concerning your system, please consult your nearest Sony dealer. Notes on CDs • Before playing a CD, clean the CD surface with a cleaning cloth. -
Page 20: Troubleshooting
2 Find your problem in the troubleshooting checklist below and take the indicated corrective action. If the problem persists after doing all of the above, consult your nearest Sony dealer. General There is no sound from the speakers. • Adjust the volume. -
Page 21: Specifications
Tuner There is a severe hum or noise (“TUNED” or “STEREO” flashes). • Adjust the antenna. • The signal strength is too weak. Connect an external antenna. • Make sure that the antenna is connected properly. • Do not bend or roll up the antenna. •... - Page 22 2 Hz - 20 kHz (±0.5 dB) Tape player section Recording system 4-track 2-channel stereo Frequency response 50 - 13,000 Hz (±3 dB), using a Sony TYPE I cassette Wow and flutter ±0.15% W. Peak (IEC) 0.1% W. RMS (NAB) ±0.2% W. Peak (DIN)
- Page 24 Sony Corporation Printed in Korea...
Need help?
Do you have a question about the CMT-CP100 and is the answer not in the manual?
Questions and answers