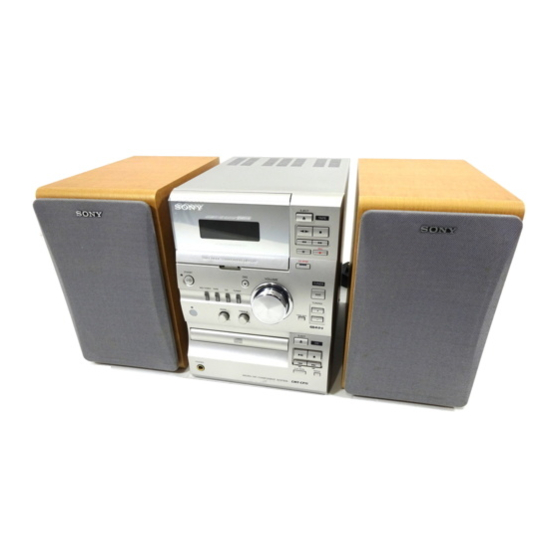
Sony CMT-CP11 Operating Instructions Manual
Micro hifi component system
Hide thumbs
Also See for CMT-CP11:
- Operating instructions manual (36 pages) ,
- Service manual (45 pages)
Table of Contents
Advertisement
4-227-681-11(1)
Micro HiFi
Component
System
Operating Instructions
Owner's Record
The model and serial numbers are located at the rear. Record the serial number in the space
provided below. Refer to them whenever you call upon your Sony dealer regarding this
product.
Model No. CMT-CP11
Serial No.
CMT-CP11
Downloaded From Disc-Player.com Sony Manuals
©2000 Sony Corporation
Advertisement
Table of Contents

Related Manuals for Sony CMT-CP11


Summary of Contents for Sony CMT-CP11
-
Page 1: Operating Instructions
Operating Instructions Owner’s Record The model and serial numbers are located at the rear. Record the serial number in the space provided below. Refer to them whenever you call upon your Sony dealer regarding this product. Model No. CMT-CP11 Serial No. - Page 2 * Dolby noise reduction manufactured under license from Dolby Laboratories Licensing Corporation. The use of optical instruments with this product will “DOLBY” and the double-D symbol ; are increase eye hazard. trademarks of Dolby Laboratories Licensing Corporation. Downloaded From Disc-Player.com Sony Manuals...
-
Page 3: Table Of Contents
Playing CD tracks in a favorite order –– Program Play ....... 20 The Tape Deck Recording to a tape manually ....21 Recording your favorite CD tracks to a tape — Program Edit ........ 22 Downloaded From Disc-Player.com Sony Manuals... -
Page 4: Getting Started
Extend the FM wire antenna AM loop horizontally antenna Stripe (#) E N N A N T 7 5 Ω Solid (3) Note Keep the speaker cords away from the antennas to prevent noise. Downloaded From Disc-Player.com Sony Manuals... - Page 5 Doing so may cause a malfunction. Connect the power cord to a wall outlet. If the plug does not fit the wall socket, detach the supplied plug adaptor (only for models equipped with an adaptor). Downloaded From Disc-Player.com Sony Manuals...
-
Page 6: Step 2: Setting The Time
3 Repeat step 2 to 5 in “Step 2: Setting the time”. Press TIMER SET. The hour indication flashes. If you make a mistake, start over from step 1. Press l/L repeatedly to set the hour. 1300 Downloaded From Disc-Player.com Sony Manuals... -
Page 7: Step 3: Presetting Radio Stations
PRESET STEREO 3FM1005 TUNED Press ENTER on the remote. The station is stored to the selected preset number. Repeat steps 2 through 7 to preset other stations. continued Downloaded From Disc-Player.com Sony Manuals... -
Page 8: Connecting Optional Components
AM preset stations are erased. To change back to the original interval, tune in any AM station first, then turn off the system. Pressing TUNING – down, turn the system back on. To the audio output jacks on the MD deck Downloaded From Disc-Player.com Sony Manuals... -
Page 9: Connecting Headphones
To listen to the VCR after connecting it, press MD/VIDEO until “VIDEO” appears. IEC standard socket connector (not supplied) E N N A N T 7 5 Ω continued To the audio output jacks on the Downloaded From Disc-Player.com Sony Manuals... - Page 10 Leave the supplied AM loop antenna connected. Jack type A Insulated wire (not supplied) E N N A N T 7 5 Ω Jack type B Insulated wire (not supplied) E N N A N T Downloaded From Disc-Player.com Sony Manuals...
-
Page 11: Basic Operations
RE PE AT PLA Y MO play a CD single (8 cm CD), place it on the inner circle of the tray. Press CD EJECT Z again to close the disc tray. Press CD. “CD” appears. Downloaded From Disc-Player.com Sony Manuals... -
Page 12: Recording From A Cd To A Tape
Press CD. “CD” appears. Press CD SYNC. The tape stands by for recording and the CD stands by for playback. “ ” and “B” (or “b”) appear, and the CD SYNC indicator lights up. DOLBY NR Downloaded From Disc-Player.com Sony Manuals... -
Page 13: Listening To The Radio - Preset Tuning
• To start recording on the side facing away from you, after doing step 5, press TAPE nN until “ ” changes to “ .” Note – You cannot listen to another source during CD Synchro Recording. > VOLUME STEREO/ MONO continued Downloaded From Disc-Player.com Sony Manuals... - Page 14 Adjust the volume Turn VOLUME. To tune in a non-preset radio station In step 3, press TUNING MODE repeatedly until “AUTO” and “PRESET” disappear, then press TUNING +/– repeatedly to tune in the desired station (Manual Tuning). Downloaded From Disc-Player.com Sony Manuals...
-
Page 15: Recording From The Radio
Press DIR MODE on the remote repeatedly to select “ ” to record on DOLBY NR one side of the tape, or “ ”or “ ” to record on both sides. continued Press TUNER. “TUNER” appears. Downloaded From Disc-Player.com Sony Manuals... -
Page 16: Playing A Tape
6, press TAPE nN until “ ” changes to “ .” • If you hear static while you are recording an AM radio program, adjust the AM antenna to improve > the reception. VOLUME TAPE m/M DOLBY NR Downloaded From Disc-Player.com Sony Manuals... - Page 17 Press TAPE X. Press again to resume playback. Fast-forward or With the tape stopped‚ press TAPE M or TAPE m. rewind Press TAPE EJECT Z. Remove or replace the tape Adjust the volume Turn VOLUME. Downloaded From Disc-Player.com Sony Manuals...
-
Page 18: The Cd Player
Current source display Note If the CD contains 25 tracks or more, the remaining playing time of the current track will appear as “- - - . - -” for each track starting with the 25th. Downloaded From Disc-Player.com Sony Manuals... -
Page 19: Playing Cd Tracks In Random Order
CD > Press CD. “CD” appears. Press PLAY MODE repeatedly until “SHUFFLE” appears. Press CD u. Shuffle Play starts. “;” appears while the next track is being selected, and all the tracks play in random order. Downloaded From Disc-Player.com Sony Manuals... -
Page 20: Playing Cd Tracks In A Favorite Order
Press CD. “PGM FULL” appears in the display. “CD” appears. Press PLAY MODE repeatedly until “PGM” appears. Press CD . or CD > repeatedly until the desired track number appears. Selected track Total playing time number Downloaded From Disc-Player.com Sony Manuals... -
Page 21: The Tape Deck
DOLBY NR on the remote before step 5. “;” appears. • To start recording on the side facing away from you, after doing step 3, press TAPE nN until “ ” changes to “ ”. Downloaded From Disc-Player.com Sony Manuals... -
Page 22: Recording Your Favorite Cd Tracks To A Tape
When the system detects this command, the CD pauses, the tape reverses direction, and then the system resumes recording with the next CD track on the tape side facing away from you. DOLBY NR Downloaded From Disc-Player.com Sony Manuals... -
Page 23: Other Features
, Turn BASS. You can adjust the bass in 7 steps (+3 ~ 0 ~ –3). Adjusting the treble , Turn TREBLE. You can adjust the treble in 7 steps (+3 ~ 0 ~ –3). Downloaded From Disc-Player.com Sony Manuals... -
Page 24: Using The Radio Data System (Rds)
Press SLEEP repeatedly until the time you want Frequency appears. Clock display To cancel the Sleep Timer function * If the RDS broadcast is not properly received, Press SLEEP repeatedly until “OFF” appears. the station name may not appear in the display. Downloaded From Disc-Player.com Sony Manuals... -
Page 25: Waking Up To Music - Daily Timer
• Radio: Tune in the preset radio station t TUNER Tt CD T that you want (see “Listening to the radio” on page 13). t TAPE T Press VOL +/– repeatedly to adjust the continued volume. Press TIMER SET. Downloaded From Disc-Player.com Sony Manuals... -
Page 26: Timer-Activated Recording Of Radio
Insert a recordable tape with the side • You cannot operate the Daily Timer and the REC you want to record on facing towards Timer (see this page) at the same time. you. Press TIMER SET. Downloaded From Disc-Player.com Sony Manuals... - Page 27 The starting time, the stopping time, “TUNER”, and the preset station appear in turn, then the original display returns. Press ?/1 to turn off the system. When recording starts, the volume level is automatically set to the minimum. Downloaded From Disc-Player.com Sony Manuals...
-
Page 28: Additional Information
• When moving the unit, remove any disc that may be on the disc tray. If you have any questions or problems concerning Detector slots your system, please consult your nearest Sony dealer. Downloaded From Disc-Player.com Sony Manuals... -
Page 29: Troubleshooting
If the problem persists after doing all of the above, Cleaning the tape heads consult your nearest Sony dealer. Clean the tape heads after every 10 hours of use. When the tape heads become dirty General —... -
Page 30: Tape Deck
Play does not start from the first track. • The player is in Program or Shuffle Play. Press PLAY MODE repeatedly until “PGM” and “SHUFFLE” disappear. Downloaded From Disc-Player.com Sony Manuals... -
Page 31: Specifications
LINE OUT (phono jacks): Sensitivity 250 mV, impedance 1 kilohm OPTICAL DIGITAL OUT (CD): Optical PHONES (stereo phone jack): Accepts headphones with an impedance of 8 ohms or more SPEAKER: Active speaker system, 6 ohms continued Downloaded From Disc-Player.com Sony Manuals... -
Page 32: Cd Player Section
50 - 13,000 Hz (±3 dB), using a Sony TYPE I cassette Mass Approx. 5.6 kg 50 - 14,000 Hz (±3 dB), using a Sony TYPE II cassette Supplied accessories Remote commander (1) Wow and flutter ±0.15% W. Peak (IEC) AM loop antenna (1) 0.1% W. -
Page 33: Parts Identification For The Remote
Generates a more dynamic Selects a track (AMS: Automatic sound. Music Sensor). Locates a desired point in a track. CD REPEAT Repeats playback. PLAY MODE Selects Shuffle, Program or Normal Play. DISPLAY* Changes the front panel display. Downloaded From Disc-Player.com Sony Manuals... -
Page 34: Index
Resetting the system 31 the antenna 4, 9, 10 the power cord 5 the system 4 Setting the time 6 Shuffle Play 19 Sleep Timer 24 Normal Play 11 Speakers 4 One Touch Play 11, 14, 17 Downloaded From Disc-Player.com Sony Manuals... - Page 35 Downloaded From Disc-Player.com Sony Manuals...
- Page 36 Downloaded From Disc-Player.com Sony Manuals Sony Corporation Printed in Korea...
Need help?
Do you have a question about the CMT-CP11 and is the answer not in the manual?
Questions and answers