Subscribe to Our Youtube Channel
Summary of Contents for Sune Technology QPI-LVTX-NCC5
- Page 1 SUNE TECHNOLOGY CO.,LTD No.9,Lane 606,Anping Rd,Tainan City 70849,TAIWAN TEL:+88662292246 FAX:+88662288104 Http://www.sune-tech.com Shop http://www.carnavi-tech.com SKYPE:sune_tech or hsin_han99...
- Page 2 •Specification Car Compatibility : 2015 Polo 5inch monitor Components : Interface* 1ea, Sub-board*1ea Multimedia interface Input/output spec Input : Analog RGB*2 (Navigation, SMI), A/V*3, CVBS(Rear Camera)*1 Output : To LCD*1 Power spec Input power : 8VDC ~ 18VDC Consumption : 5WATT Switch input mode ...
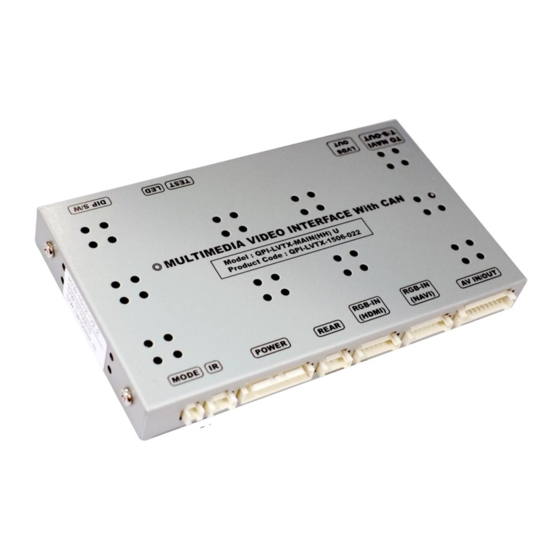
- Page 3 •Product exterior Length-90mm Height-18mm Width-140mm MODE(Button cable connection) | IR(IR cable connection) | POWER(Power cable connection) | REAR(Rear cable connection) |RGB-IN-HDMI(Mirroring device connection) | RGB-IN-NAVI(RGB Navigation connection) |AV IN/OUT(AV cable connection) | TO NAVI T/S OUT(NAVI touch cable connection) | LVDS-OUT(Sub board connection) TEST(No use) | LED | DIP S/W(Dip switch setting) •Components Bracket * 1ea...
- Page 4 •DIP SWITCH ※ ON : DOWN / OFF : UP FUNCTION Dip S/W SETTING OFF : RGB DISPLAY RGB INPUT MUTE ON : Skipping RGB Mode OFF : HDMI1 DISPALY HDMI1 MODE MUTE ON : Skipping HDMI1 Mode OFF : AV DISPLAY AV MODE MUTE ON : Skipping AV Mode OFF : Front camera function on...
- Page 5 •Factory setting Adjust a current screen position and size. Menu of FACTORY IMAGE H-POSITION H-POSITION : Move display horizontally PARK V-POSITION UTIL1 H-SIZE(NAVI) V-POSITION : Move display vertically UTIL2 H-SIZE(NAVI) : Adjust the horizontal size of INFO Navigation MENU to Return SEL to Select/Save Menu of FACTORY Adjust rear view camera setting.
- Page 6 •Factory setting Navigation & Car model setting up Menu of FACTORY IMAGE NAVI MODEL NAVI MODEL : Setting up RGB Navigation. PARK CAR MODEL UTIL1 AVOUT SELECT (Default, QWGA, Q-ROI) UTIL2 HDMI SKIP INFO FACTORY RESET CAR MODEL : Selecting the model of car. (POLO) AVOUT SELECT : Selecting background sound MENU to Return...
- Page 7 •Installation Diagram LVDS Cable Touch Cable Audio R Audio L AV/OUT Video CAN-H-HS REAR C CAN-L-HS F-CAM-DET SAFE REAR Cable CAN-H-LS CAN-L-LS NAVI BOX...
- Page 8 •CAN cable connection CAN2-H CAN1-L Original Power Cable CAN2-L CAN1-H ※ Find the original 12 pins cable as above at the back side of command. - Provided CAN1-H wire (Yellow+White) → Original CAN-H wire #1 pin (Orange+Black) - Provided CAN1-L wire (White) → Original CAN-L wire #7 pin (Orange+Brown) - Provided CAN2-H wire (Black+White) →...
- Page 9 •Connect S/B to Monitor Remove monitor from car Remove LCD part from the head unit and disassemble the bracket as picture above. Disconnect the original Connect the provided Tape it well so it FPC cable and connect it FFC cable #1 to the other wouldn't disconnect to Touch sub-board.
-
Page 10: Troubleshooting
•Trouble shooting Q. I cannot change mode A. Check connection of Ground cable and IR Cable. Check LED lamp is on, if not check connection of POWER cable. Q. All I got on the screen is black. A. Check second LED lamp of the interface is on, if not, check A/V sources connected are working well.


Need help?
Do you have a question about the QPI-LVTX-NCC5 and is the answer not in the manual?
Questions and answers