GESTRA ORGS 11-1 Installation Instructions Manual

GESTRA ORGS 11-1 Installation Instructions Manual

Oil detector & alarm

Advertisement

Quick Links

E N
E n g l i s h
Oil Detector & Alarm
ORGS 111
ORGS 112
Original Installation Instructions
81080106
1

Advertisement

Table of Contents
loading
Need help?

Need help?

Do you have a question about the ORGS 11-1 and is the answer not in the manual?

Questions and answers

Subscribe to Our Youtube Channel

Summary of Contents for GESTRA ORGS 11-1

  • Page 1 Oil Detector & Alarm ORGS 111 ORGS 112 Original Installation Instructions 81080106 E n g l i s h...
  • Page 2: Table Of Contents

    Key ...............................15 Tools ..............................15 Wiring diagram for oil detector & alarm ORGS 11-1 ................16 Connecting oil detector & alarm ORGS 11-1 with supply voltage 24 / 115 / 230 V AC ......16 Basic settings Factory setting ............................17 Selecting the measuring range ......................17...
  • Page 3 Operating valves ...........................18 Operation Normal operation, oil alarm ........................18 Troubleshooting Safety note ............................19 Indication, diagnosis and remedy ......................19 Exchanging the electronic module ......................20 Removing and disposing of measuring electrode ORGS 111 Safety note ............................21 Removing and disposing of measuring electrode ORGS 11-1..............21...
  • Page 4: Important Notes

    When loosening the measuring electrodes hot cooling water may escape. This presents the risk of severe scalding all over the body! Do not remove the measuring electrode ORGS 11-1 unless the boiler pressure is verified to be zero. The terminal strip of the measuring electrode ORGS 11-1 is live during operation!
  • Page 5: Directives And Standards

    For details on the conformity of our equipment according to the European Directives see our Declaration of Conformity or our Declaration of Manufacturer. The current Declaration of Conformity / Declaration of Manufacturer are available in the Internet under www.gestra.de documents or can be requested from us. Attention...
  • Page 6: Technical Data

    Technical data ORGS 112 Oil detector & alarm ORGS 112 (equipment unit) Service pressure 6 bar Service temperature 110 °C Flow velocity 100 l/h to 300 l/h, recommended 200 l/h Pressure drop ∆p 0.06 bar (under test conditions) Alarm Raised when approx. 50 ml oil has accumulated Water inlet, drain Ball valve with EO-connection 15 L Water outlet...
  • Page 7 Marine applications Det Norske Veritas / Germanischer Lloyd Bureau Veritas Lloyds Register Scope of supply ORGS 112 1 Oil detector & alarm ORGS 11-2, PN 6 1 Measuring electrode ORGS 11-1 (mounted) 2 Sealing plugs for cable entry 1 Installation manual...
  • Page 8: Name Plate/Marking

    28215 Bremen Disposal note Germany Mat-Nr.: Spare part specification Manufacturer ORGS 11-2 Oil Detector ORGS 11-2 with Electrode ORGS 11-1 6 bar ( 87 psi ) Pmax DNV·GL 110 °C ( 230 °F ) Tmax Flow Rate 100 - 300 l/h MADE BY GESTRA Fig.
  • Page 9: Installation

    Installation Installation requirements The water sample taken from the cooling water system must flow continuously through the oil detector & alarm ORGS 11-2. We recommend a flowrate of 200 l/h. The sampling of the cooling water should take place downstream of a potential oil leak at the highest point and, if possible, in a horizontal line.
  • Page 10: Examples Of Installation

    Installation  continued  Examples of installation Cooling water cycle Fig. 2 Cooling water cycle Fig. 3...
  • Page 11: Dimensions Orgs 11-1

    Installation  continued  Dimensions ORGS 111 GESTRA Steam Systems GESTRA b = 70 ∅ 42 G1 A ISO 228 Fig. 4 Oil detector & alarm ORGS 11-2 (equipment unit) Cooling water inlet DN 15 (outside ∅ 20 mm) Automatic rapid-action deaerator...
  • Page 12: Dimensions Orgs 11-2

    Installation  continued  Dimensions ORGS 112 Fig. 5 ~ 160...
  • Page 13: Orgs 11-2

    Tools Open-end spanner A. F. 22, DIN 3110, ISO 3318 Open-end spanner A. F. 27, DIN 3110, ISO 3318 Measuring electrode ORGS 11-1 Cooling water inlet (ball valve DN 15 L, PN 500) Support flange Cooling water outlet (ball valve DN 12 L, PN 500)
  • Page 14: Electrical Connection
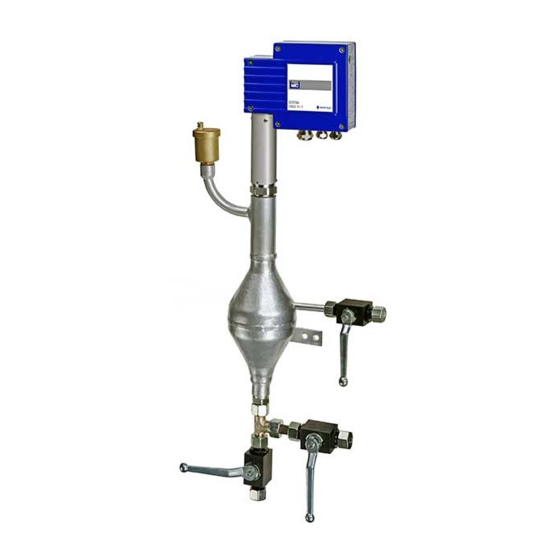
    Electrical connection ORGS 111 GESTRA Steam Systems GESTRA Fig. 6 10µS/cm 0,5µS/cm 1 2 3 4 5 6 7 8 9 10 11 12 13 14 15 Fig. 7...
  • Page 15: Connection Of Measuring Electrode Orgs 11-1

    Electrical connection  continued  Connection of measuring electrode ORGS 111 A self-locking fixing nut j connects the terminal box to the electrode part. Before establishing the electrical connection you can turn the terminal box through max. +/– 180° into the desired direction (cable gland).
  • Page 16: Wiring Diagram For Oil Detector & Alarm Orgs 11-1

    Electrical connection  continued  Wiring diagram for oil detector & alarm ORGS 111 Alarm 10µS/cm 0,5µS/cm 1 2 3 4 115V 230(24)V Netz Main Secteur Alarm Fig. 8 Relays shown in power-off (alarm) position, LEDs 1 and 2 not illuminated! Connecting oil detector &...
  • Page 17: Basic Settings

    Basic settings Factory setting The oil detector & alarm features the following factory set default values: Measuring range ≥ 10 µS/cm Selecting the measuring range The measuring range can be switch-selected between ≥ 0.5 µS/cm and ≥ 10 µS/cm by means of a code switch (toggle switch white): .
  • Page 18: Commissioning Procedure

    Commissioning procedure Danger The terminal strip of the oil detector & alarm is live during operation. This presents the danger of electric shock! Cut off power supply before mounting or removing the housing cover! Use only a completely insulated screwdriver according to VDE 0680 for setting the measuring points.
  • Page 19: Troubleshooting

    - have achieved a recognised level of competence. Danger The terminal strip of the measuring electrode ORGS 11-1 is live during operation! This presents the danger of electric shock! Cut off power supply before mounting or removing the housing cover!
  • Page 20: Exchanging The Electronic Module

    Troubleshooting  continued  Exchanging the electronic module 1. Unscrew cover screws g and remove cover h. Fig. 6 2. Pull electrode wires from terminal lugs on circuit board. Remove the terminal strip n. 3. Unscrew the fixing screws t for the electronic module u and remove the module. The module is available as spare part..
  • Page 21: Removing And Disposing Of Measuring Electrode Orgs 111

    When loosening the measuring electrodes hot cooling water may escape. This presents the risk of severe scalding all over the body! Do not remove the measuring electrode ORGS 11-1 unless the boiler pressure is verified to be zero. The terminal strip of the measuring electrode ORGS 11-1 is live during operation! This...
  • Page 22 For your Notes...
  • Page 23 For your Notes...
  • Page 24 Agencies all over the world: www.gestra.com GESTRA AG Münchener Straße 77 28215 Bremen Germany Telefon +49 421 3503-0 Telefax +49 421 3503-393 E-mail info@de.gestra.com www.gestra.com 810801-06/06-2021cm (808507-08) · GESTRA AG · Bremen · Printed in Germany...

This manual is also suitable for:

Orgs 11-2

Table of Contents