
Related Manuals for usha CD503


Summary of Contents for usha CD503
- Page 1 INSTRUCTION MANUAL MAXX AIR DESERT COOLER Portable Evaporative Air Cooler OWNER’S MANUAL Read and save these instructions before use Model - CD503 Power rating: 190 Watts Voltage rating: 230 Volt, 50Hz...
- Page 2 QUICK START GUIDE Fill the tank with water and plug the cooler in standard power outlet socket. Note: Please make sure the household power voltage matches the product specifications. Place near an open door or window. Note: Evaporative air cooler requires cross ventilation.
-
Page 3: Table Of Contents
INDEX Read all instructions carefully before setting up and operating the cooler, and please keep this instruction manual for future reference. This manual is designed to provide you with important information needed to setup, operate, maintain, and troubleshoot your cooler. Failure to follow these instructions may damage and/or impair its operation and void the warranty SECTION PAGE... -
Page 4: Thank You
THANK YOU Congratulations on your purchase of this versatile USHA Evaporative Air Cooler. For optimum cooling from your cooler, fill the water tank to maximum level before you turn on your air cooler. Cooler Location (Important - Please Read!) Place the cooler in front of an open door or window. Ensure that there is adequate cross -ventilation in the room by leaving a door or window open opposite the cooler. -
Page 5: User Tips
USER TIPS Energy efficient, No compressor USHA Evaporative Air Coolers are built to maximize energy efficiency and keep costs low. Warm air is drawn into the cooler through the Honeycomb Cooling Media. Water pumped from the tank pours over the honeycomb media. As the warm air passes through the media, the water absorbs the heat, naturally cooling and humidifying the air. - Page 6 USER TIPS The recommended maximum relative humidity level is 60% or less, which allows a noticeable temperature decrease. The temperature decrease will be greater in drier climates because higher evaporation occurs when the humidity is low. The evaporative air cooler should not be used Room with open windows &...
-
Page 7: Safety
SAFETY READ AND SAVE THESE INSTRUCTIONS: When using electrical appliances, basic safety precautions should always be followed: STOCK HAZARD • Your cooler runs on 230 Volt AC, 50 Hz. Check the household voltage to ensure it matches the appliance’s rated specification. • Before operating the product remove it from its packaging and check that it is in good condition. • DO NOT operate any product with a damaged cord 230 Volt AC 50 Hz or plug. - Page 8 SAFETY • DO NOT cover the air inlet or outlet on the FIRE TOUCH appliance as this may cause motor damage. • DO NOT insert or allow objects to enter any ventilation or exhaust opening as this may damage the product and could cause an electrical shock or fire. • DO NOT operate with the Honeycomb media removed as this will overload and damage the COOLER FLOOR SETTING motor.
-
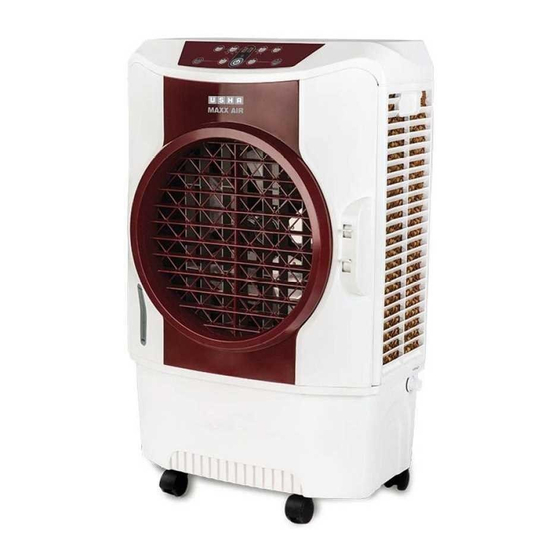
Page 9: Parts Description
PARTS DESCRIPTION 1 Handle 8 Mechanical Control Panel 2 Left Honeycomb Panel 9 Back Honeycomb Panel 3 Lever for Horizontal Louvers 10 Water Drain Plug 4 Water Tank 11 Continuous Water Inlet 5 Castors 12 Rear Grill Removal Screws 6 Horizontal Louvers 13 Manual water filling through mug 7 Water Level Indicator 14 Manual water filling through pipe... -
Page 10: Control Panel
USE & OPERATION CONTROL PANEL PUMP SWING CONTROL KNOBS Speed/ ON- OFF Connect to the power supply and turn the SPEED knob. The fan will start. Change the speed from “Low” for Low speed, to “Medium” for Medium speed and to “High” for High speed. To switch the unit OFF, turn the SPEED knob to “0”. COOL Turn the COOL knob to ON to start the cooling. It takes a few minutes to obtain the full effect from this PUMP mode. SWING Vertical Louvers Turn the SWING knob to ‘ON’. The louvers will begin... -
Page 11: Filling Water
USE & OPERATION CAUTION Unplug from power when refilling. FILLING WATER Water can be filled into the air cooler by: Continuous water supply (Auto Refill) Connect a garden hose to the continuous water supply inlet (Reference product picture on page 9). FILLING WATER ( MANUAL) Do not fill water above the max water level mark. - Page 12 USE & OPERATION FILLING WATER (CONTINUOUS WATER SUPPLY CONNECTION) Connect water pipe to the continuous water supply connector located on the lower right side panel. Secure the connector with the pipe so that there is no leakage and turn on the water supply. With the help of the water auto-refill mechanism, water inside the tank will refill automatically.
-
Page 13: Cleaning & Maintenance
CLEANING & MAINTENANCE IMPORTANT • The cooler is supplied with Honeycomb Cooling Media. • The cleaning frequency for the Honeycomb media depends on local air and water conditions. In areas where the mineral content of water is high, mineral deposits may build up on the Honeycomb Cooling Media and restrict air flow. Draining the water reservoir and refilling with fresh water at least once a week will help reduce mineral deposits. - Page 14 CLEANING & MAINTENANCE DRAINING AND CLEANING THE WATER TANK • Turn the power “off” and disconnect the air cooler from the power supply. • Move the unit to a location where it can be drained. Remove the cap from the water drain plug and allow the tank to empty (see parts description on page 9). • After you have drained the water tank, please connect the water drain plug to its original position. • Now refill the water tank up to Max level, wait for 5 min. and then drain the entire water once again. Use clean water for this procedure, so that maximum dust particles and remains are completely removed.
-
Page 15: Troubleshooting Guide
TROUBLESHOOTING GUIDE No discharge of air Cord is not plugged in Make sure power cord is plugged in and the supply switch is on. Power is not on Turn the unit ON by changing the mechanical knob position of the control panel Motor Faulty Contact Service centre On control Panel. Turn COOL... -
Page 16: Technical Specifications
TECHNICAL SPECIFICATIONS Technical Specifications Model No. CD 503 Voltage 230V Frequency 50Hz Wattage 190 Watts 50 L Water Tank Capacity Cooling Media Honeycomb 685 (L) x 460(W) x 1080(H) Product Dimension Net Weight 17.5 Kg ELECTRICAL WIRING DIAGRAM... -
Page 17: Service And Warranty
SERVICE AND WARRANTY This appliance is warranted for 1 year against all manufacturing defects from the date of sale. In the event of any complaint, please contact USHA Care at Toll Free No. 1800 1033 111. The warranty is valid only when: The appliance has been installed, used and maintained in accordance with the instruction manual. - Page 18 NOTE ........................................................................................................................................................................................................................................................................................................................................................................................................................................................................................................................................................
Need help?
Do you have a question about the CD503 and is the answer not in the manual?
Questions and answers