Table of Contents
Advertisement
Available languages
Available languages
Quick Links
Cat. No. / No de cat.
2509-20
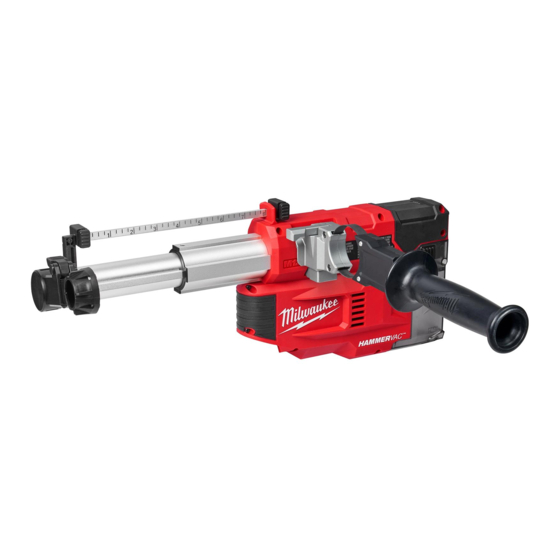
M12™ HAMMERVAC™ UNIVERSAL DUST EXTRACTOR
M12™ HAMMERVAC™ DÉPOUSSIÉREUR UNIVERSEL
EXTRACTOR UNIVERSAL DE POLVO M12™ HAMMERVAC™
WARNING
AVERTISSEMENT
comprendre le manuel.
ADVERTENCIA
To reduce the risk of injury, user must read and understand operator's manual.
Afin de réduire le risque de blessures, l'utilisateur doit lire et bien
Para reducir el riesgo de lesiones, el usuario debe leer y entender el manual.
OPERATOR'S MANUAL
MANUEL de L'UTILISATEUR
MANUAL del OPERADOR
Advertisement
Table of Contents

Related Manuals for Milwaukee M12 HAMMERVAC 2509-20


Summary of Contents for Milwaukee M12 HAMMERVAC 2509-20
- Page 1 OPERATOR'S MANUAL MANUEL de L'UTILISATEUR MANUAL del OPERADOR Cat. No. / No de cat. 2509-20 M12™ HAMMERVAC™ UNIVERSAL DUST EXTRACTOR M12™ HAMMERVAC™ DÉPOUSSIÉREUR UNIVERSEL EXTRACTOR UNIVERSAL DE POLVO M12™ HAMMERVAC™ WARNING To reduce the risk of injury, user must read and understand operator's manual. AVERTISSEMENT Afin de réduire le risque de blessures, l'utilisateur doit lire et bien comprendre le manuel.
-
Page 2: Important Safety Instructions
• Maintain labels and nameplates. These carry im- Inserting battery pack in dust extractor that has the portant information. If unreadable or missing, contact switch on invites accidents. a MILWAUKEE service facility for a free replacement. -
Page 3: Specific Safety Rules For Dust Extractors
Do not use this tool if you do not understand these operating instructions or you feel the work is beyond your capability; contact Milwaukee Tool or a trained professional for additional information or training. -
Page 4: Functional Description
FUNCTIONAL DESCRIPTION ASSEMBLY WARNING Recharge only with the charger specified for the battery. For specific charging instructions, read the operator’s manual supplied with your charger and battery. Removing/Inserting the Battery To remove the battery, push in the release buttons and pull the battery pack away from the tool. WARNING Always lock the trigger or remove the battery... - Page 5 Installing/Removing Nozzle Assembly Installing/Removing the Bit To install the nozzle assembly Slide the bit through the nozzle and then install supplied with the tool, or acces- into the tool according to the tool manufacturer's sory nozzles: instructions. For best results, use a bit 10" in length 1.
-
Page 6: Operation
Return the tool, battery pack, and charger NOTE: When the HAMMERVAC™ has come to a to a MILWAUKEE service facility for repair. After six stop, the AUTOPULSE™ Filter Cleaning Mechanism months to one year, depending on use, return the... -
Page 7: Wireless Communication
DE L'OUTIL, DE LA BATTERIE ET DE part on an electric power tool which, after examination, is determined by MILWAUKEE to be defective in material or workmanship for a period of SON CHARGEUR, AINSI QUE TOUTES five (5) years** after the date of purchase unless otherwise noted. Return of the power tool to a MILWAUKEE factory Service Center location or LES ÉTIQUETTES SUR LE DÉPOUS-... -
Page 8: Sécurité Électrique
Ces dernières comportent des informations impor- outil électrique lorsque la gâchette est en position de tantes. Si elles sont illisibles ou manquantes, veuillez marche favorise les accidents. contacter un centre de service MILWAUKEE pour leur remplacement. UTILISATION ET ENTRETIEN UTILISATION ET ENTRETIEN DE L’OUTIL ÉLECTRIQUE... -
Page 9: Entretien
• Éviter tout contact avec le liquide pouvant être veuillez contacter Milwaukee Tool ou un professionnel formé pour recevoir plus d’information ou formation. éjecté de la pile en cas de manutention abusive. En cas de contact accidentel, rincer immédiatement les... -
Page 10: Description Fonctionnelle
DESCRIPTION FONCTIONNELLE MONTAGE DE L'OUTIL AVERTISSEMENT Ne recharger la batterie qu’avec le chargeur spécifié. Pour les instructions de charge spéci- fiques, lire le manuel d’utilisation fourni avec le chargeur et les batteries. Insertion/Retrait de la batterie Pour retirer la batterie, enfoncer les boutons de déverrouillage et la tirer hors de l’outil. - Page 11 Fixer le HAMMERVAC™ à une perceuse Pour installer la boite à poussière: rotative/à percussion 1. Insérer la boite à poussière dans le corps du HAMMERVAC™. L’appareil HAMMERVAC™ est muni d’un ensemble 2. Les loquets du bac à poussière devront encli- de collier de serrage et une prise de poignée laté- queter en place.
- Page 12 Utilisation du bouton d'alimentation Régler la profondeur de perçage AUTO Pour régler le HAMMERVAC™ afin qu'il 1. Ajuster le HAMMERVAC™ à l'outil et à la mèche. démarre automatiquement lorsqu'un 2. Appuyer et tenir enfoncé le bouton de limiteur trou est percé, déplacer le bouton de profondeur et glisser la jauge de profondeur d'alimentation sur la position AUTO.
-
Page 13: Communication Sans Fil
à compter de la date d’achat, sauf indication contraire. Retourner l’outil l’outil, le chargeur et la batterie à un centre de service électrique à un centre de réparation en usine MILWAUKEE ou à un poste MILWAUKEE accrédité. d’entretien agréé MILWAUKEE, en port prépayé et assuré. Une copie de la preuve d’achat doit être présentée lors du retour du produit. -
Page 14: Reglas De Seguridad Generales
Cette garantie s’applique aux produits vendus aux États-Unis et au Canada uniquement. polvo si está cansado, distraído o bajo influencia de Veuillez consulter la rubrique Centre SAV Milwaukee, dans la section Pièces et drogas, alcohol o medicamentos que puedan causarle Services du site Web de MILWAUKEE, à l’adresse www.milwaukeetool.com, ou composer le 1-800-SAWDUST (1-800-729-3878) afin de trouver le centre una disminución del control. -
Page 15: Mantenimiento
Milwaukee Tool o con objetos metálicos pequeños que puedan formar un profesional capacitado para recibir capacitación o una conexión de una terminal a otra. -
Page 16: Descripcion Funcional
LEA Y CONSERVE DESCRIPCION FUNCIONAL TODAS LAS INSTRUCCIONES PARA CONSULTARLAS EN EL FUTURO PARA USO PARTICULAR O COMERCIAL SIMBOLOGÍA Volts 10 11 Corriente continua UL Listing Mark para Canadá y Estados Unidos ESPECIFICACIONES Cat. No............2509-20 Volts.............. 12 CD Tipo de batería ..........M12™... - Page 17 ENSAMBLAJE Para instalar el recipiente para el polvo, haga lo ADVERTENCIA siguiente: Recargue la 1. Deslice el recipiente para el polvo en el cuerpo de b a t e r í a la herramienta HAMMERVAC™. sólo con el cargador especificado para ella. Para 2.
- Page 18 Cómo adosar la herramienta Cómo configurar la profundidad de HAMMERVAC™ a un rotomartillo/taladro perforación de percusión 1. Encaje la herramienta HAMMERVAC™ en la her- La HAMMERVAC™ incluye un ensamblado de collar ramienta y la broca. de abrazadera y una agarradera de la empuñadura 2.
- Page 19 NOTA: Para un uso óptimo al retirar los desechos no trabaja correctamente, regrésela, con el cargador en la caja antipolvo, conecte una manguera a la y la batería, a un centro de servicio MILWAUKEE. aspiradora y retire los desechos. ADVERTENCIA Para reducir 2.
-
Page 20: Comunicación Inalámbrica
Esta garantía no aplica a daños que MILWAUKEE determine que son oca- Procedimiento para hacer válida esta garantía sionados por reparaciones o intentos de reparaciones realizados por una Lleve el producto a ASC, junto con la tarjeta de garantía cerrada/sellada...
Need help?
Do you have a question about the M12 HAMMERVAC 2509-20 and is the answer not in the manual?
Questions and answers