Advertisement
ROCAM
R
Emergency Radio
CR1015
with AM/FM/SW/NOAA weather
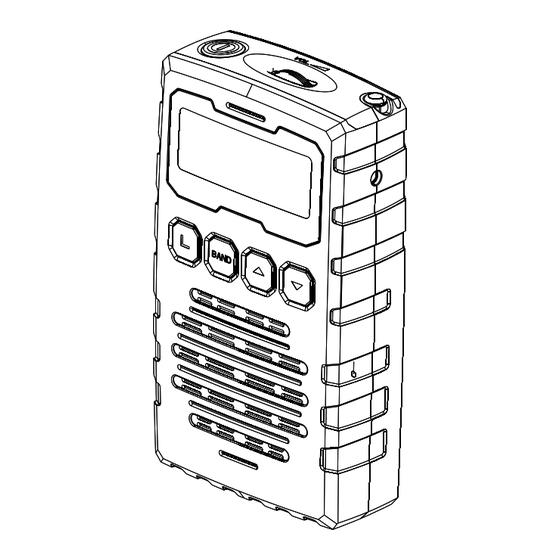
Chapter 1 LOCATION OF CONTROLS
1
2
8
5
WX
SOS
6
9
10
7
1
Power Button
Press this button to turn on radio, press it again to turn off radio.
2
Volume Control Knob
3
Telescopic Antenna
To enchance boardcast signal, you may need to plug the telescopic antenna.
4
Alert Flash Indicator
5
WX/SOS Button
Press this button to enable WX function, hold press it for more than 3 seconds to
enable SOS alert function.
6
Lock Switch
The lock switch prevents accidental changes of any of the radio settings. Slide
the lock switch to the
position, the
display. The power and all other buttons will be disabled.
7
Battery Compartment
3
4
VOL
11
BAND
12
13
symbol will appear in the
- 01 -
Http://www.yelaw.net
8
LCD Display
Timer/Clock Set Button
9
10
Band Selection Button
11
Tune- Button
12
Tune+ Button
Speaker
13
14
Headphone Jack
15
Belt Clip
14
A removable belt clip is provided on the back of the unit.
Removal:
It can be removed by gently pushing on the center tab of the clip where
15
indicated, and sliding the clip down towards the bottom of the radio.
Replacement:
You can easily connect the belt clip by inserting the top of the clip into the
designated receiver slots and gently pushing the clip in an upwards motion
towards the top of the radio.
16
Band Indicator
17
Battery Life Indicator
18
Timer Indicator
19
Alert Indicator
20
Headphone Indicator
21
Lock Switch Activated
22
Frequence Indicator
Contact our experts
support@yelaw.net
Made in China
18
19
17
ALERT
AM
16
FM
SW
WX
- 02 -
Version 1.1
20
21
KHz
22
MHz
Advertisement
Table of Contents

Subscribe to Our Youtube Channel
Related Manuals for ROCAM CR1015

Summary of Contents for ROCAM CR1015
- Page 1 ROCAM Contact our experts support@yelaw.net Http://www.yelaw.net Emergency Radio CR1015 with AM/FM/SW/NOAA weather Version 1.1 Made in China Chapter 1 LOCATION OF CONTROLS LCD Display Timer/Clock Set Button Band Selection Button Tune- Button Tune+ Button Speaker Headphone Jack Belt Clip A removable belt clip is provided on the back of the unit.
- Page 2 Chapter 2 BATTERY INSTALLATION 4. Manual Tuning Channel Repeatedly press button to tune into the desired channel. 1. Gently press down the battery compartment and slide it to the right side Each press button, FM frequency will tune up by 0.1. to open the battery compartment.
Need help?
Do you have a question about the CR1015 and is the answer not in the manual?
Questions and answers