
Related Manuals for Assmann Digitus DN-13024

Summary of Contents for Assmann Digitus DN-13024
- Page 1 2-PORT USB 2.0 WIRELESS MULTI- FUNCTIONAL NETWORK SERVER, 300 Mbps Manual DN-13024...
-
Page 2: Table Of Contents
CONTENTS GETTING STARTED ..................2 Check package contents for: ................2 System Requirements: ..................3 PRODUCT OVERVIEW..................3 LEDs ........................3 Ports and Buttons ....................4 HARDWARE INSTALLATION ................5 Connecting your server to a network ..............5 SOFTWARE INSTALLATION ................5 Installing Software Utility ................... -
Page 3: System Requirements
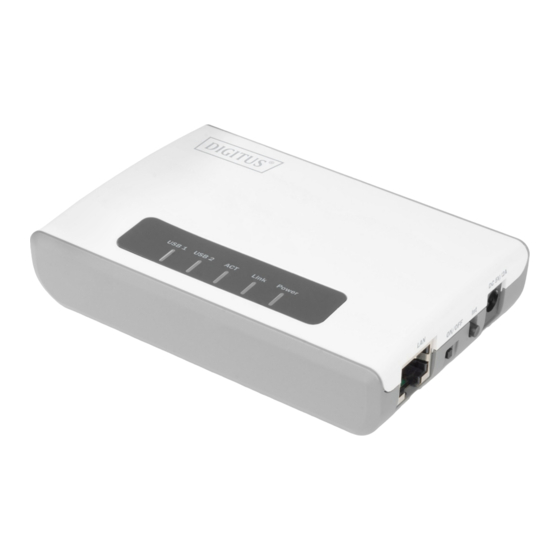
System Requirements: Windows 7/ 10 What you will need to get started: • One Storage Device along with manufacturer's driver/software CD • A Computer with a CD-ROM drive that is connected to your home network • One Ethernet cable • One USB cable PRODUCT OVERVIEW LEDs Power... -
Page 4: Ports And Buttons
Ports and Buttons 1) USB1 & USB2 Port The USB 2.0 port allows you to connect USB printers and storage devices to your network and share access to these devices to computers on your network through the use of the included USB software utility. 2) LAN Port This port allowes you to connect to the local network. -
Page 5: Hardware Installation
HARDWARE INSTALLATION Connecting your server to a network 1) Use the Ethernet cable and connect one end to the “LAN” port of the Device Server. Connect the other end to an available LAN Port on your network router. 2) Connect the Server to your All-in- One/Multifunction device using a USB cable (not included). -
Page 6: Server Confiuration
SERVER CONFIURATION Configuring your Device Server 1) Open the Device Server Control Center from the desktop icon. While the program is running, an icon should also be displayed in your system Tray if software installation was successful. Once open, it will automatically search for the existing server and display its status. -
Page 7: Using The Usb Device Server
Using the USB Device Server 1) In the Control Center, click the USB device server that has the desired USB device attached. 2) Click the desired USB device. 3) Click the “Connect” button. Then the message “Manually Connect by your_computer_name” will be shown. 4) Now, PC will detect the plug-in of the USB device. -
Page 8: How To: Print
6) After you finish using the USB device, click the USB device in the Control Center and then click the “Disconnect” button to disconnect the USB device. Other PCs can not “Connect” the USB device until you “Disconnect” that USB device. That is to say, only one PC is allowed to connect the USB device at the same time. - Page 9 Then, the printer will be marked as an “Auto-Connected Printer” in red. If you choose “Auto-Connected Printer List” in the “Tools” menu, you can see a newly created item that describes the association between the Windows printer and the physical printer on the server.
-
Page 10: How To: Scan
HOW TO: SCAN Network Scanner 1) In the Control Center, click the USB device server that has the desired MFP (or scanner) attached. Click the desired MFP (or scanner). 2) Click the “Network Scanner” button. Then you can see that the Control Center will automatically do a “connect”... -
Page 11: Usb Storage
Then, in the Control Center, click the USB storage device and click the “Disconnect” button to disconnect the USB storage device. Hereby Assmann Electronic GmbH, declares that the Declaration of Conformity is part of the shipping content. If the Declaration of Conformity is missing, you can request it by post under the below mentioned manufacturer address.
Need help?
Do you have a question about the Digitus DN-13024 and is the answer not in the manual?
Questions and answers