
Related Manuals for Assmann Digitus DN-13024

Summary of Contents for Assmann Digitus DN-13024
- Page 1 2-PORT USB 2.0 WIRELESS MULTI- FUNCTIONAL NETWORK SERVER, 300 Mbps Manual DN-13024...
-
Page 2: Table Of Contents
CONTENTS Safety Precautions ..................4 PRODUCT OVERVIEW..................4 Package Contents ....................4 Features ......................5 Product Hardware Features ................6 Front view ......................6 Side view ......................7 Application Diagram ................... 8 UTILITY INSTALLATION ..................9 Windows Installation ..................9 CONNECTING THE DEVICE ................ - Page 3 USING THE USB DEVICE SERVER ..............19 Introduction ...................... 19 Connect & Disconnect ..................19 Subnet Issue ...................... 20 Installation of USB Device Driver ..............20 Using the USB Device Server ................22 Auto-Connect Printer ..................23 Network Scanner ....................26 USB Storage ......................
-
Page 4: Safety Precautions
Safety Precautions • Only use the device within the specified temperature range for: 0 ~ 40°C • When not in use, store the product in a clean and dry place in temperatures between 0°C and 40°C • Do not let the indoor devices come into contact with liquids •... -
Page 5: Features
Features 2-Port USB 2.0 Wireless Multi-Functional Network Server, 300 Mbps, model 2-Port USB 2.0 Wireless Multi-Functional Network Server, transforms most stand-alone multi- function and standard USB printers into a shared network resource. Install your multifunction printer in the most ergonomic location and then connect the compact 2- Port USB 2.0 Wireless Multi-Functional Network Server to a high speed Wireless N network. -
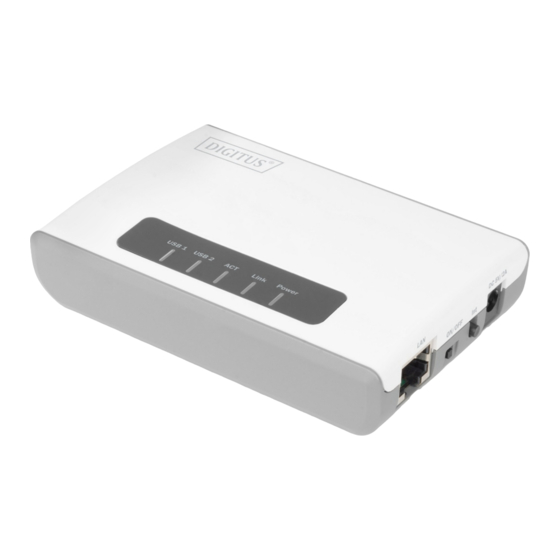
Page 6: Product Hardware Features
Product Hardware Features Front view Power This LED indicator is solid green when your router is powered on. Otherwise if this LED indicator is off, there is no power to your router. Link This LED indicators will be light on green while data is transmitted or received through your router LAN port. -
Page 7: Side View
Side view 1) USB1 & USB2 Port The USB 2.0 port allows you to connect USB printers and storage devices to your network and share access to these devices to computers on your network through the use of the included USB software utility. 2) LAN Port This port allowes you to connect to the local network. -
Page 8: Application Diagram
Application Diagram 1 USB hub 5 USB stick 2 Scanner 6 Printer 3 IP camera 7 Power adapter 4 External HDD 8 Router The device server allows you to share your regular printer or multi-function printer through a network. It is typically placed in the same location of your printer or multi- function printer. -
Page 9: Utility Installation
UTILITY INSTALLATION Windows Installation 1) Install USB Device Server Control Center. It is available in the DN-13024 USB Device Server Product CD. 2) Click Install Utility 3) Follow the Install Shield Wizard instructions. Then click Finish. 4) Start USB Device Server Control Center and Auto-searching USB device server window will appear. -
Page 10: Connecting The Device
CONNECTING THE DEVICE 1) Make sure that your USB devices are switched off and that the Server’s Power Adapter is disconnected. 2) Connect the Server to the network with a twisted-pair category 5 cable, 10baseT, 100baseTX and /1000Base-T RJ-45. a) If you have a DHCP server on your network, your Server will receive an IP address automatically. -
Page 11: Setting The Ip Address Using The Control Center
Setting the IP Address Using the Control Center 1) Double click the highlighted server (or click the “Configure Server” button) to get the server’s web pages. Click CONFIG icon. -
Page 12: Server Names And Server Name Rules
2) Login with administrator ID (default: admin) and its password (default: admin). Methods for Setting the IP Address Server Names and Server Name Rules The default server name of the Server is “DN-13024”. If you put two or more Servers in your local area network, to avoid using the same server names you have to change the server names by using the Control Center or the Server’s web pages. -
Page 13: Wireless Connection
WIRELESS CONNECTION Preliminary • Before you can access the wireless networks, wireless parameters should be set correctly. You have to set up the first wireless parameter set through the LAN (wired) connection. • Wireless access can be set as infrastructure (station) mode, which access needs point to route network messages with the same SSID. - Page 14 2) Click CONFIG icon. And Login with administrator ID (default: admin) and its password (default: admin).
-
Page 15: Scan Ap Setting
Scan AP setting 1) Click Wireless icon, click scan AP 2) In order to join an existing wireless network, you have to set the correct SSID, and the correct security method with the correct key information. If the wireless network is secured by WEP64 or WEP128, key index and WEP key must be set correctly. - Page 16 3) Type the Key then click Connect 4) If the wireless network is secured by WPA-PSK or WPA2-PSK, the key formats, shared key and encryption must be set correctly.
-
Page 17: Wps Mode Setting
5) The Setting is completed then reboot the system WPS Mode setting Wi-Fi Protected Setup or WPS is a feature that allows the device to authenticate to your wireless network, the USB Device Server supports WPS Push Button and PIN Configuration. -
Page 18: Wps Mode Setting
3) Connect your printer to the USB port on the print server. 4) Power on the printer. 5) Press and hold for 5 seconds the WPS button of your wireless router or access point. Verify that the WPS feature is enabled and functioning. Please refer to your wireless router or access point’s manual or contact their technical support for instructions. -
Page 19: Using The Usb Device Server
b) PIN Mode: Select PIN Click Trigger to initialize WPS Enter the device’s PIN key on your wireless router or access point USING THE USB DEVICE SERVER Introduction The goal of this produce is to provide the USB device server in a single product. We developed a new technology called “NetUSB”... -
Page 20: Subnet Issue
If a USB device is “connected” by a PC, we say that PC has the ownership of the USB device. Only one PC can get the ownership of a USB device at the same time. Therefore, if a USB device is connected by one PC, no other PC can connect this USB device until this USB device is disconnected. - Page 21 • Click the desired USB device as the following figure. • Click the “Connect” button. Then the message “Manually Connect by your_computer_name” will be shown, as the following figure. • Now, the installation program will detect the USB device and continue to install driver.
-
Page 22: Using The Usb Device Server
Using the USB Device Server 1) In the Control Center, click the USB device server that has the desired USB device attached. 2) Click the desired USB device. 3) Click the “Connect” button. Then the message “Manually Connect by your_computer_name” will be shown. 4) Now, PC will detect the plug-in of the USB device. -
Page 23: Auto-Connect Printer
6) After you finish using the USB device, click the USB device in the Control Center and then click the “Disconnect” button to disconnect the USB device. Other PCs can not “Connect” the USB device until you “Disconnect” that USB device. That is to say, only one PC is allowed to connect the USB device at the same time. - Page 24 3) Click the “Auto Connect Printer” button and choose “Set Auto-Connect Printer”. 4) Choose the desired printer. The desired printer must be the Windows printer (this is a logical printer) that matches the printer attached on the USB device server (this is a physical printer).
- Page 25 • Then try to issue a print job to the desired printer. You will see the Control Center will automatically do a connect operation. Then, the print job will be issued to that printer. • Even you already properly setup an auto-connected printer, the Control Center must be running (in the background) while a print job is issued.
-
Page 26: Network Scanner
Network Scanner For NetUSB scanning, we recommend you use Network Scanner as the following steps. • In the Control Center, click the USB device server that has the desired MFP (or scanner) attached. • Click the desired MFP (or scanner). •... -
Page 27: Usb Storage
USB Storage You must use “manually connect” for USB storage. After you connect a USB storage, like the following picture, your PC will have a new disk. If the USB storage is a flash drive, the new disk is a “removable disk”. You can see the storage icon in the system tray. -
Page 28: Quitting The Control Center
At this moment, the user on the TEST computer will see the following window, indicating that another computer – TESTES is requesting to use the HP printer. The user will choose to accept or reject. If accepted, the Control Center on TEST will automatically disconnect the device and the Control Center on TESTES will automatically connect that device. -
Page 29: Restore Factory Defaults
RESTORE FACTORY DEFAULTS You may restore the Server’s default parameters by one of the following methods. Using the Server’s Web Pages Click on the “STATUS” icon to see system status, network status and Wireless Status 1) Go to the Server’s web page and click SYSTEM 2) Enter administrator (default: admin) and password (default: admin). -
Page 30: Using Init /Wps Button
5) Click Upgrade Firmware. 6) Click Browse button to choose the file of new firmware. 7) Click Upload button to start firmware upgrade. 8) Wait for 35 seconds for system reboot. Using Init /WPS Button 1) Turn on server and wait until you can see it on control center, press the initial button over 10 sec. -
Page 31: Default Parameters List
Default Parameters List General Information • Server Name: DN-1302 TCP/IP User Accounts • Automatically get IP by DHCP: Enabled • Administrator: admin • Static IP: Disabled • Password: admin • IP Address: 192.168.1.100 • Subnet Mask: 255.255.255.0 THE SERVER’S WEB PAGES Introduction The Server runs the http server, http on TCP port: 80. -
Page 32: Technical Description
• Hardware Version: 1.0 • Software Version: 0.08 Hereby Assmann Electronic GmbH, declares that the Declaration of Conformity is part of the shipping content. If the Declaration of Conformity is missing, you can request it by post under the below mentioned manufacturer address.
Need help?
Do you have a question about the Digitus DN-13024 and is the answer not in the manual?
Questions and answers