Table of Contents
Advertisement
Quick Links
Advertisement
Table of Contents

Related Manuals for Gerber Instruments Micro 3

Summary of Contents for Gerber Instruments Micro 3
- Page 1 Centrifuge Micro III OPERATING INSTRUCTIONS...
-
Page 2: Table Of Contents
Daily work Cleaning and maintenance General notes for cleaning and maintenance Notes for cleaning with glass breakage Checking the unbalance switch-off Disturbances 10.1 Error table 10.2 Emergency release of the lid on power interruption Gerber Instruments AG Version 1.2 (03/2021) - Page 3 Operating Instructions Centrifuge Micro III Packaging Disposal Technical service Warranty Order numbers centrifuge Micro III Order numbers accessories Micro III Technical data Micro III Gerber Instruments AG Version 1.2 (03/2021)
-
Page 4: Introduction
Permissible ambient temperature +10 °C to +40 °C Max. humidity 80 % Lowest storage and transport temperature -20 °C Safety instructions Symbols of the operating instructions Warning symbol: Attention, possible dangerous situation Warning symbol: Dangerous electrical voltage Gerber Instruments AG Version 1.2 (03/2021) -
Page 5: General Safety
Do not use the device with a damaged cable or plug. The use of accessories which are not original spare parts from Gerber Instruments results in loss of warranty. Switch off / disconnect the device from the mains, if it is not being used, if parts are replaced and if the device is being cleaned. -
Page 6: Safety Instructions For Centrifugation
If an unbalance switch-off took place, the centrifuge is stopped immediately and a message appears on the display. Open the cover and remove the causes of the unbalance. Close the cover and press START/STOP again. Gerber Instruments AG Version 1.2 (03/2021) -
Page 7: Description Of Centrifuge Micro
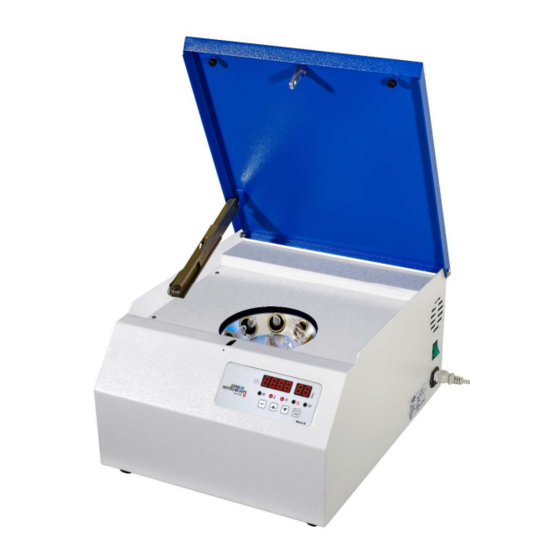
Operating Instructions Centrifuge Micro III Description of centrifuge Micro III Cover Housing Main switch and mains plug connection Rotor with inserts Operating unit Gerber Instruments AG Version 1.2 (03/2021) -
Page 8: Unpacking/Device Control
The centrifuge must always be placed on a firm and dry substructure. During transport from cold to warmer places, condensation water will collect inside the centrifuge. It is important to allow sufficient time for drying before the centrifuge can be used again. Gerber Instruments AG Version 1.2 (03/2021) -
Page 9: Description Of Operating Unit
This LED is dual. In standby mode it lights up red. In the operating mode (centrifugation) it lights up green. LED Heating This LED is single and flashes red in operating mode (centrifugation). LED Alarm This LED is single and flashes red when a failure occurs. Gerber Instruments AG Version 1.2 (03/2021) -
Page 10: Button Functions
Setting temperature and time (Setup mode) Button Increase of temperature and time Button Reduction of temperature and time Button START/STOP Start the centrifuge, stops the centrifuge before the set time has elapsed. Pre-heating function Gerber Instruments AG Version 1.2 (03/2021) -
Page 11: Commissioning
The centrifuge starts preheating at reduced speed (approx. 400 rpm) to the factory set temperature (55°C). To exit, press the START/STOP button. If preheating is required, the function must always be reactivated after termination. Gerber Instruments AG Version 1.2 (03/2021) -
Page 12: Setting Time And Temperature
The standstill of the rotor is indicated by a 3 fold tone, in the time segment display END appears. The centrifuge unlocks with a short "click". The LED Time and Rotor light up red. Gerber Instruments AG Version 1.2 (03/2021) -
Page 13: Cleaning And Maintenance
If the centrifuge does not switch off, press the START/STOP button immediately. In this case, the centrifuge may no longer be used. If you are unable to determine and remedy the causes of the shutdown yourself, contact Gerber Instruments AG Technical Service (see point 13). -
Page 14: 10. Disturbances
S/N. Contact the service of Gerber Instruments AG. 10.2 Emergency release of the lid on power interruption Disconnect the centrifuge from the mains (main switch out, mains cable from mains socket). - Page 15 Phone: +41 (0)52 343 37 37 Fax: +41 (0)52 343 30 70 13. Technical service Address: Gerber Instruments AG Im Langhag 12 CH-8307 Effretikon Phone: +41 52 343 37 37 Fax: +41 52 343 30 70 Email: info@gerber-instruments.ch Gerber Instruments AG...
- Page 16 Gerber Instruments AG will arrange the replacement free of charge. The device has to be returned during the period of guarantee. The product needs to be returned by the customer to the company Gerber Instruments AG carriage forward.
- Page 17 03.16216 Gerber-rotor for 8 samples 03.16217 Gerber-rotor for 12 samples 03.16219 Wire for emergency unlocking 03.16269-8 Butyrometer sleeves qty.=8 pieces 03.16269-12 Butyrometer sleeves qty.=12 pieces 03.41001 Universal-rotor for Babcock 03.17278 Babcock sleeves qty=1 piece. Gerber Instruments AG Version 1.2 (03/2021)
- Page 18 Thermostatically controlled 5 °C above ambient to 65 °C, factory set at 55 °C Dimensions (WxDxH) 430x530 x 288 mm Weight netto 23.5 kg without sleeves Weight total up to 28.5 kg incl. accessories and packaging Warranty 2 years Test certificate Gerber Instruments AG Version 1.2 (03/2021)
Need help?
Do you have a question about the Micro 3 and is the answer not in the manual?
Questions and answers