Table of Contents
Advertisement
Quick Links
Advertisement
Table of Contents

Related Manuals for M1-Sporttechnik M1-ERZBERG Pedelec

Summary of Contents for M1-Sporttechnik M1-ERZBERG Pedelec
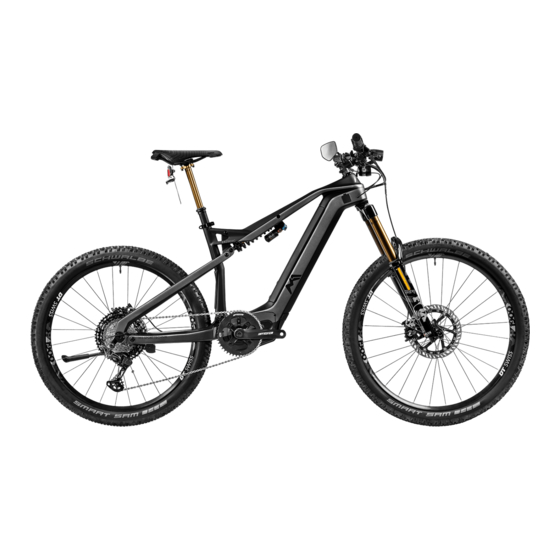
- Page 1 User-Manual M1-Bikes with - drives Powered by Fritzmeier...
-
Page 2: Table Of Contents
CONTENTS CONTENTS PEDELEC ..........................5 S-PEDELEC ..........................5 THE FIRST RIDE ........................7 BEFORE EVERY RIDE ......................8 OPERATING & USING THE ALLROUND DISPLAY ..............9 STANDARD SCREEN DISPLAY (design can be changed) ..........10 MENU AND DISPLAY SETTINGS ................11 BLUETOOTH FUNKTION OF THE DISPLAY ............. - Page 3 CONTENTS TIRE PRESSURE ........................23 WEAR ..........................23 CARBON COMPONENTS ....................23 MANUFACTURER'S WARRANTY OF M1-SPORTTECHNIK GMBH & CO. KG ......24 CRASH REPLACEMENT......................25 OVERVIEW OF THE TORQUE SETTINGS ................26 WEIGHT AND PERMISSIBLE TOTAL WEIGHT ..............27 LUGGAGE CARRIER MOUNTING ..................27 ENVIRONMENTALLY FRIENDLY DISPOSAL ...............
- Page 4 We thank you for your trust and wish you much pleasure and a good ride on your M1 bike. Your M1-Sporttechnik Team It is imperative that you pay attention to all instructions...
-
Page 5: Pedelec
E-BIKES CATEGORISATION PEDELEC An electric bicycle with limited pedal assistance up to 25 km/h. On an electric bike with limited pedal assistance, the motor only works if you apply a certain amount of force to the pedal. The motor therefore only supports your own pedaling. Pedelecs are exempt from the EU Motor Vehicle Directive if they are limited to an average motor output of 250 W and the motor assistance is limited to 25 km/h or higher. - Page 6 SAFETY INFORMATION ROAD TRAFFIC LICENSING REGULATIONS (STVZO) The general regulations of the Road Traffic Licensing Regulations (StVZO) apply to the use of electric bicycles on public roads and in traffic. These regulations must be observed when using your M1 Pedelec or S-Pedelec on public roads and in traffic. Please take into account the current conditions for the use of forest paths or trails in the individual municipalities and countries, as many regions have their own regula- tions in this regard.
-
Page 7: The First Ride
SAFETY INFORMATION THE FIRST RIDE Familiarise yourself with your new M1 bike before your first ride. Pay attention to the position of the brake levers and their assignment to the front or rear wheel. The factory setting is for the rear brake to be operated with the right brake lever, while the left lever brakes the front wheel. -
Page 8: Before Every Ride
SAFETY INFORMATION BEFORE EVERY RIDE Please check that your bike is in good working order before each ride. Make sure that the wheels are correctly aligned and securely fastened, and check the tire pressure. Test the brakes, gears and suspension. Check all components for faults or damage, ensure that all quick-releases and thru axles are firmly secured and locked. -
Page 9: Operating & Using The Allround Display
FUNCTIONS OF THE BIKE OPERATING & USING THE ALLROUND DISPLAY buttons are used to control the electrical systems of your bike. ON/OFF: Pressing the button briefly switches the system on and pressing it longer switches it off again. ausgeschaltet. LIGHT: Briefly pressing the button turns the T4 (+) bike's lights on or off. -
Page 10: Standard Screen Display (Design Can Be Changed)
FUNCTIONS OF THE BIKE STANDARD SCREEN DISPLAY (design can be changed) Die Anzeige bietet eine Übersicht über folgende Informationen: LIGHTING: shows the current lights status of the bike (OFF / ON / AUTO). SYSTEM INFORMATION: D2 shows current system status information: Battery reserve is reached and the system is switched off An error has accured CHARGE STATUS INDICATOR: The charge status... -
Page 11: Menu And Display Settings
FUNCTIONS OF THE BIKE MENU AND DISPLAY SETTINGS To enter the display settings menu, press and hold the button for two seconds. T4 (+) T5 (-) buttons can now be used to navigate up or down the displayed list. The desired option can be accessed with the button. -
Page 12: Bluetooth Funktion Of The Display
FUNCTIONS OF THE BIKE SYSTEM Light: Activate automatic bicycle lighting or switch on bicycle lighting permanently. Units: (km/miles): The displayed units can be changed be- tween kilometers and miles Time Format: (12h/24h) the displayed time information can be changed. (optional) Battery Status: Selection between battery display as seg- ments or in percent (%). -
Page 13: Ride Assist
FUNCTIONS OF THE BIKE RIDE ASSIST During the ride, you can choose from 4 custom assist modes. It is always recommended to start in a low/light gear, regardless of the selected assistance. This significantly reduces wear. Your M1 bike is equipped with high-quality sensors that constantly monitor the mechanical systems during the ride. -
Page 14: Riding Without Battery
FUNCTIONS OF THE BIKE RIDING WITHOUT BATTERY Riding the bike is also possible without the battery. In this case, however, you will not have a speedometer display. This is also the case if you have ridden the battery to 100% empty. If the battery is removed from the e-bike or the battery is completely discharged, the light will not illuminate. -
Page 15: Charging The Battery In The E-Bike
FUNCTIONS OF THE BIKE CHARGING THE BATTERY IN THE E-BIKE To charge the battery while seated in the down tube, proceed as follows: Turn off your e-bike and make sure that all contact are clean and dry. Plug the charger into a power outlet and wait until the green LED slowly flashes. -
Page 16: Check The Charge Status Of The Battery
FUNCTIONS OF THE BIKE CHECK THE CHARGE STATUS OF THE BATTERY With the battery installed, you can see the charge status on the display screen when the display is switched on. To check the charge status of a removed battery, first briefly press the button on the underside of the battery (lock side) once. -
Page 17: Safety Instructions For The Battery And Charging Process
FUNCTIONS OF THE BIKE SAFETY INSTRUCTIONS FOR THE BATTERY AND CHARGING PROCESS Never force the plug into the charging port. The charging plug has a INFO predefined plug-in direction. Never charge your Li-ion battery unattended! After charging is com- WARNING! plete, disconnect the charger from the mains supply. - Page 18 FUNCTIONS OF THE BIKE The battery as well as the charger must not get wet or be immersed WARNING! in water! Danger of explosion! Never clean the battery with a steam cleaner or garden hose. If the temperature changes rapidly from cold to warm, there is a risk of condensation forming on the charger.
-
Page 19: Removing The Battery
FUNCTIONS OF THE BIKE REMOVING THE BATTERY Insert the key and turn the lock counter- clockwise. Lift the battery out of the frame by the cover INSERTING THE BATTERY Lock the battery lock (remove the key and keep it in a safe place). Insert the battery with the top end first (see picture). -
Page 20: The Suspension
FUNCTIONS OF THE BIKE THE SUSPENSION Negative Suspension Travel (SAG) is the distance your suspension compresses due to the load of your body weight and personal bike equipment. To adjust the suspension set- up, sit on your bike, measure the SAG using the O rings (rubber ring) and adjust the air pressure accordingly. -
Page 21: After Biking Care
MAINTENANCE, CARE AND TRANSPORT AFTER BIKING CARE Clean your chain regularly with a dry lint-free cloth. First, apply a drop of chain oil to each joint of the chain. Leave it for a while then remove excess oil with the cloth. Care instructions: Regular cleaning of all components with a light water jet or a soft, wet sponge. -
Page 22: Transporting The Bike
MAINTENANCE, CARE AND TRANSPORT TRANSPORTING THE BIKE The e-bike may generally only be transported with the battery removed! The Pedalec may be transported inside or outside of the vehicle. The front wheel can be removed and likewise, if necessary, the handlebars can also be removed. Be especially careful not to damage any electronic wiring or mechanical cables. -
Page 23: Tire Pressure
MAINTENANCE, CARE AND TRANSPORT TIRE PRESSURE When inflating the tire, be careful not to exceed the pressure specified by the manufacturer. The wheel is supplied from the factory with an inner tube. WEAR Check your M1 Bike regularly for wear. Do not use your bike with excessively worn, deformed or cracked parts. -
Page 24: Manufacturer's Warranty Of M1-Sporttechnik Gmbh & Co. Kg
On components of other brand manufacturers, such as Shimano, SRAM, Magura, Mavic, Lupine, etc., the statutory warranty regulations apply. Some manufacturers also offer an extended manufacturer's warranty. If the bike has not been purchased directly from M1-Sporttechnik, the processing is carried out exclusively by the seller. -
Page 25: Crash Replacement
The authorized service center must decide on the basis of its expertise how to proceed and, if necessary, prohibit the further use of the bike or a component for safety reasons. in the event of force majeure or events for which M1-Sporttechnik is not • responsible;... -
Page 26: Overview Of The Torque Settings
TORQUE SETTINGS OVERVIEW OF THE TORQUE SETTINGS Component Torque Setting Note Cockpit: Brake lever: Stem 5 Nm Tighten upper bolt until locked, then Topcap 3 Nm tighten lower bolt to Shift lever on handlebar 6 - 8 Nm torque! Brake lever on handlebar 3 Nm Seat clamp bolt 8 Nm... -
Page 27: Weight And Permissible Total Weight
TECHNICAL DATA WEIGHT AND PERMISSIBLE TOTAL WEIGHT The permissible total weight of the bike including rider and load must not exceed 130 kg. The unladen weight of the bike is between 23.5 kg and 26.7 kg, depending on the variant. TRAILER/CHILD SEAT USE Due to the wide variety of coupling systems on the market, towing a trailer of any type is expressly not permitted on account of the carbon frame. -
Page 28: Environmentally Friendly Disposal
TECHNICAL DATA EC DECLARATION OF CONFORMITY The described product: M1-ERZBERG Pedelec, M1-ERZBERG S-Pedelec of the manufacturer M1-Sporttechnik GmbH & Co.KG Forststraße 2 D-85653 Großhelfendorf conforms to the regulations and standards of the EC Declaration of Conformity. ENVIRONMENTALLY FRIENDLY DISPOSAL The components of the M1 models and the batteries must not be disposed of in the household waste container. - Page 29 2 years or 500 full charge cycles within 2 years CHARGER: Charging time: approx.. 4.5 h for 100 % Charger: 110 / 240 Volt AC, 4.5A M1-Sporttechnik GmbH & Co. KG Forststraße 2 D-85653 Großhelfendorf Germany Office und Showroom: Am Weiglfeld 15...
- Page 30 SERVICE DOCUMENTATION, MAINTENANCE & ERRORS...
- Page 31 SERVICE DOCUMENTATION, MAINTENANCE & ERRORS...
- Page 32 SERVICE DOCUMENTATION, MAINTENANCE & ERRORS...
- Page 33 SERVICE DOCUMENTATION, MAINTENANCE & ERRORS...
-
Page 34: First Aid
SERVICE DOCUMENTATION, MAINTENANCE & ERRORS FIRST AID Erste Hilfe – was tun bei Komplikationen: www.m1-sporttechnik.de/downloads/ First AID – what to do in case of complications: https://www.m1-sporttechnik.de/en/downloads/ I have a claim. What's the procedure? In the event of a claim - regardless of the component - your authorized M1 dealer is the central contact. - Page 35 SERVICE DOCUMENTATION, MAINTENANCE & ERRORS Error: Display remains dark or keeps flashing Symptom Turn bike on, display keeps dark Bike Erzberg PED & S-PED, Brose-Motor, Brose Allround Display Step 1: Restart -Turn bike off ( ON/OFF-Button > 2 sec.) -Turn bike on ( ON/OFF-Button < 1 sec.) Step 2: Remove battery check LEDs by pressing ON/OFF-Button on the battery no LED? -->...
- Page 36 SERVICE DOCUMENTATION, MAINTENANCE & ERRORS Error: Motor power incorrect Symptom Loss of Power or no motor assistance Bike Erzberg PED & S-PED, Brose-Motor, Brose Allround Display Step 1: Restart -Turn bike off ( ON/OFF-Button > 2 sec.) -Turn bike on ( ON/OFF-Button < 1 sec.) Step 2: Remove battery check LEDs by pressing ON/OFF-Button on the battery...
- Page 37 SERVICE DOCUMENTATION, MAINTENANCE & ERRORS Error: Range incorrect Symptom Loss of Range Bike Erzberg PED & S-PED, Brose-Motor, Brose Allround Display Step 1: Restart -Turn bike off ( ON/OFF-Button > 2 sec.) -Turn bike on ( ON/OFF-Button < 1 sec.) Step 2: REAL range after at least 2-5x FULL- CHARGING-CYCLES Important is the number of full charging cycles (0% - 100%).
- Page 38 SERVICE DOCUMENTATION, MAINTENANCE & ERRORS Error: Charging the battery incorrect Symptom Battery does not charged (completely) Bike Erzberg PED & S-PED, Brose-Motor, Brose Allround Display Step 1: Correct Charging Procedure Bike/battery is off Connect charger to mains power supply Connect charger to the battery/bike Charging only works if you can see the green LED flashing Charging finished if green light is permanently on Possible Errors if red-flashing LED:...
- Page 39 SERVICE DOCUMENTATION, MAINTENANCE & ERRORS Error: Noises Symptom Rattling or creak noises Bike Erzberg PED & S-PED, Brose-Motor, Brose Allround Display Step 1: Tighten bolts: 4x mudguard (GT) 2x license plate (S-Ped) 3x mounting license plate (S-Ped) 4x attachment to the seat stay (GT) 2x Kick stand (GT &...
-
Page 40: Social Media
SERVICE DOCUMENTATION, MAINTENANCE & ERRORS Error: Display error codes Bike Erzberg PED & S-PED, Brose-Motor, Brose Allround Display Error: 8 Check position magnet to speed-sensor Error 30, 41 Charge battery Error: 11 Check light wires & plugs for correct connection and intactness Disconnect Lights Error: Check display wires &...
Need help?
Do you have a question about the M1-ERZBERG Pedelec and is the answer not in the manual?
Questions and answers