Table of Contents
Advertisement
Quick Links
Parts included
2 -Side Panels, 1 Left and 1 Right
2 -Back panels 1 Left and 1 Right
1 -Bottom Panel with attached Spin tray
1 –Shelf with attached spin tray
1 -Top Panel
1 -Diagonal Back Panel
2 -pcs. Face Frame 1 Left 1 Right
2 – pcs toe kick 1 Left 1 Right
1 - Package of Screws & Brackets.
2 – Door Hinges
TIP:
1. Identify all parts.
2. You have 1 (qty) box for your LSB cabinet containing all the parts listed above.
3. Make sure to have clean clear area to work with so the cabinet does not get scratched (carpet, foam, rubber mat). Lay
Face Frame of Cabinet face down on soft smooth protected surface (Diagram A).
Diagram A
4. Slide left side panel into left slot on face frame making sure the pre-cut slots & shelf holes in the panel are facing
towards the inside of the cabinet (Diagram B).
tight lightly sand the edge of the dovetail.
panels in will help with the sturdiness of the cabinets. If the panel is a little too tight to slide freely, use a rubber
mallet and wood block to gently tap into place.
5.
Repeat step 4 with the right side panel.
6. Slide bottom panel (with Spin tray attached) into Dado (grooves) in the Frame Face and side panels (Diagram C).
Diagram C
Surewood Cabinets
Compass Manufacturing International / Louisville, KY /
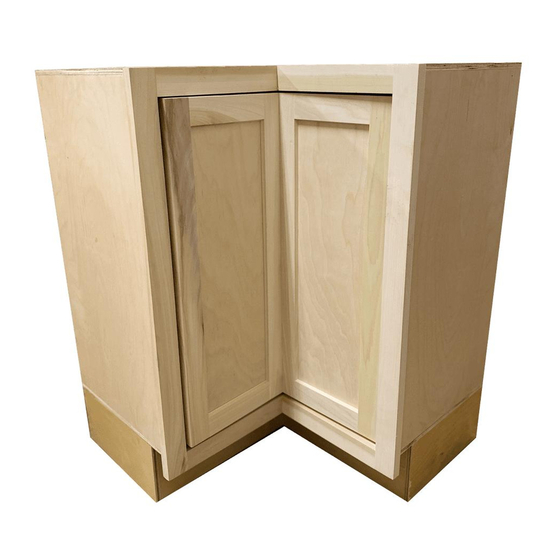
Lazy Susan Base Corner Cabinet (LSB)- Assembly Instructions
(Includes 30", 36", 42" High)
We would suggest that 2 people do the assembly of the LSB cabinets.
TIP:
www.cmiproduct.com
Tools Required
Philips Screwdriver
Wood/Rubber Mallet
Hard Wood Block
Utility Knife
Fine Sandpaper 240 grit
Tape Measure
Small wood chips or toothpicks
TIP:
Pre-fit the side panels into the Face Frame and if they seem too
Placing a thin bead of wood glue in the grooves before sliding the
Diagram D
Tools Optional
Power Drill/Screw driver
Power Pin gun w/ 5/8" pins
Square
Diagram B
Advertisement
Table of Contents

Related Manuals for Surewood Cabinetry Lazy Susan


Summary of Contents for Surewood Cabinetry Lazy Susan
- Page 1 Surewood Cabinets www.cmiproduct.com Compass Manufacturing International / Louisville, KY / Lazy Susan Base Corner Cabinet (LSB)- Assembly Instructions (Includes 30”, 36”, 42” High) Parts included Tools Required Tools Optional 2 -Side Panels, 1 Left and 1 Right Philips Screwdriver Power Drill/Screw driver 2 -Back panels 1 Left and 1 Right Power Pin gun w/ 5/8”...
- Page 2 7. Attach right back and left back (Diagram D). Line up the bottom with the Dado’s (grooves) in the left and right back panels. Push into place and screw into place using ¾” screws provided (Diagram E). MAKE SURE SCREW HEADS ARE TIP: PAST THE SURFACE OF THE SIDE PANEL.
- Page 3 Diagram J Diagram I 15. Install hinges on door at top and bottom (Diagram K). 16. Mount hinge brackets onto Face Frame of cabinet to allow for appropriate hinging. 17. Place cabinet on its side to install toe kick (Diagram L). 18.
Need help?
Do you have a question about the Lazy Susan and is the answer not in the manual?
Questions and answers