Advertisement
Advertisement
Table of Contents

Related Manuals for Costway EP24668


Summary of Contents for Costway EP24668
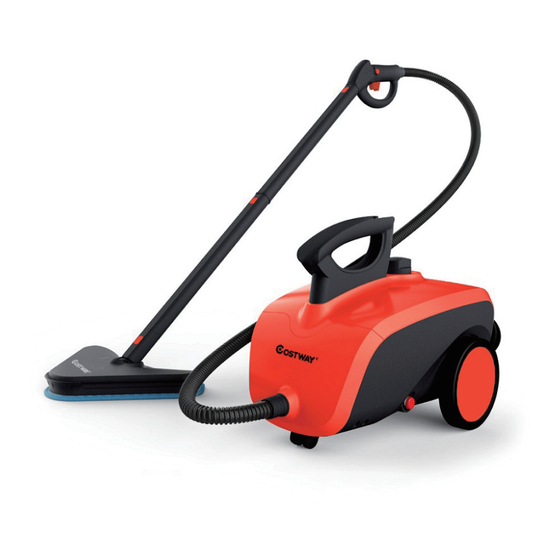
- Page 1 SHOP EASY.SAVE MONEY. USER'S MANUAL Rolling Steam Cleaner EP24668...
- Page 3 PRODUCT ASSEMBLY Rolling Steam Cleaner Model No.: EP24668 Please read this user manual before using this steam cleaner, and store it after reading in order for future reference .
-
Page 4: Important Safety Instructions
PRODUCT ASSEMBLY Important Safety Instructions Please carefully read the safety instruction as below: INTENDED USE: this product is intended to be used indoors for household cleaning. This product is not intended for commercial or industrial uses. The manufacture assumes no responsibility for damage or injury due to unauthorized use of product modification. - Page 5 PRODUCT ASSEMBLY 11. If lighted On/Off switch does not illuminate when set to “ON” position while power cord is plugged in, unit is not operating normally. Immediately disconnect cord from power supply, and then refer to troubleshooting guide on Page of this manual for assistance.
- Page 6 PRODUCT ASSEMBLY Important Safety Instructions : Hot steam. 25. To avoid burns from escaping steam when removing boiler cap to refill unit: Always allow unit to cool for 5-10 minutes. Press and hold steam button to release all remaining steam pressure ...
- Page 7 PRODUCT ASSEMBLY This appliance is not intended to be used by children and persons with reduced physical, sensory or mental capabilities or lack of experience and knowledge unless they have been given supervision or instruction concerning use of the appliance in a safe way and understand the hazards involved.
-
Page 8: Product Information
PRODUCT ASSEMBLY Product Information The following features and accessories are included with your steamer cleaner,. Carefully inspect the packing material for all parts listed below. 01. Lighted On/Off Switch 12. Mop Head 02. Boiler & Safety Cap 13. Microfiber Pads 03. - Page 9 PRODUCT ASSEMBLY 1. The Lighted On/Off Switch (1) activates and deactivates the unit, and illuminates to provide a clear visual indication of whether the unit is powered on. 2. The Boiler with Cap (2) is the internal reservoir in which water is stored and heated.
- Page 10 PRODUCT ASSEMBLY Product Information 14. The Water Funnel (14) and the Measuring Cup (15) are provided to assist in easily and consistently filling the Boiler with the optimum amount of water (17-52 oz. /500-1,500ml.). 15. The Squeegee (16) connects to either the Main Nozzle or Extension Wands, and can be used to clean mirrors, windows and other smooth glass surfaces.
- Page 11 PRODUCT ASSEMBLY Assembling Your Steam Cleaner STEAM MOPPING ACCESSORIES WARNING: Do not try to connect accessories while unit is emitting steam. EXTENTION WANDS 1. Select one of the Extension Wands, and align rear end of wand with Main Nozzle. Rectangular hole in wand should align with orange lock / release button on nozzle. 2.
-
Page 12: Microfiber Pads
PRODUCT ASSEMBLY Assembling Your Steam Cleaner MOP HEAD 1. Align Mop Head with end of second Extension Wand, so that rectangular hole in Mop Head neck aligns with orange lock/release button on wand. 2. Press down on orange lock/release button. While continuing to hold button down, slide Mop Head neck onto Extension Wand FIGURE 2-A).Press on firmly until button snaps through hole (FIGURE 2-B). - Page 13 PRODUCT ASSEMBLY FIGURE 3 The Mop Head and Microfiber Pads are perfect for use on these hard floor surfaces: Sealed Hardwood Linoleum Marble Stained Concrete Ceramic Vinyl Sealed Laminate Granite Tile IMPORTANT: Do not use on unsealed hardwood or unglazed ceramic surfaces.
- Page 14 PRODUCT ASSEMBLY Assembling Your Steam Cleaner STEAM CLEANING ACCESSORIES WARNING: Do not try to connect accessories while unit is emitting steam. STEAM JET NOZZLE/SQUEEGEE/TRIANGLE BRUSH 1. Select one of the three accessories (Steam Jet Nozzle, Squeegee or Triangle Brush-Steam Jet Nozzle shown as example), and align rear end of accessory with Main Nozzle.
- Page 15 PRODUCT ASSEMBLY UTILITY BRUSHES NOTE: Utility Brushes connect to the Steam Jet Nozzle, not the Main Nozzle. 1. Align guide tab on inside of Utility Brush (FIGURE 5-A) with groove in bottom of Steam Jet Nozzle tip (FIGURE 5-B). 2. Firmly press Utility Brush onto tip of Steam Jet Nozzle. Press it on as far as possible to prevent steam leakage (FIGURE 5-C).
- Page 16 PRODUCT ASSEMBLY Using Your Steam Cleaner FILLING BOLIER 1. Place Steam Cleaner on a flat, level surface. 2. Make sure Lighted On/Off Switch is set to “OFF” position and grounded power cord is unplugged from electrical outlet. 3. Cautiously unscrew and remove Boiler cap, an d d rain any water remaining inside Boiler into a sink or tub.
-
Page 17: Refilling Boiler
PRODUCT ASSEMBLY REFILLING BOILER If unit has been in use, always use the following safety precautions before removing the Boiler cap to add water: Allow unit to cool for 5-10 minutes. Press and hold Steam Button to release all remaining steam. Steam can ... -
Page 18: Steam Mopping
PRODUCT ASSEMBLY Using Your Steam Cleaner 7. Once steaming tasks are complete, immediately set Lighted On/Off Switch to “OFF” position and unplug grounded power cord from electrical outlet. Follow steps under Proper Storage procedure on Page 16 of this manual. STEAM MOPPING NOTE: Be sure that Boiler has been filled and that all steam mopping accessories are connected before following these steps. -
Page 19: Proper Storage
PRODUCT ASSEMBLY Storage, Care & Product Support PROPER STORAGE Preparing your Steam Cleaner for storage is quick and simple. When you have finished your steaming tasks, follow the steps listed below. 1. Set Lighted On/Off Switch to “OFF” position and unplug power cord from electrical outlet. -
Page 20: Troubleshooting
PRODUCT ASSEMBLY Storage, Care & Product Support 1. Set Lighted On/Off Switch to “OFF” position and unplug power cord from electrical outlet. 2. Allow unit to cool (at least 30 minutes for complete cooling). 3. Press and hold Steam Button to release all remaining steam pressure. 4. - Page 21 PRODUCT ASSEMBLY Troubleshooting PROBLEM POSSIBLE CAUSE SOLUTION Unit fails to heat up. Boiler is empty. Refer to Filling Boiler procedure on page 13 Lighted On/Off Switch Mineral build-up in Refer to Mineral Build-up section on page DOES illuminate unit. 16 for cleaning procedure. when set to “ON”...
-
Page 22: Product Specifications
PRODUCT ASSEMBLY Product Specifications PRODUCT SPECIFICATIONS MODEL EP24668 VOLTAGE 120V WATTAGE 1500W AMPERAGE 12.5A WATER CAPACITY 52 OZ. (1,500 ML.) HEATING TIME 8~10 MIN. ( APPROXIMATE ) CONTINUOUS STEAM TIME 45 MIN. (APPROXIMATE) NET WEIGHT 10.1 LBS. (4.6KG) UNIT DIMENSIONS 15.7”... - Page 24 Great products so far February 24, 2018 Great product so far. Fast delivery, easy setup, and working without any issues. With your inspiring rating, Costway will be more consistent to offer you EASY SHOPPING EXPERIENCE, GOOD PRODUCTS and EFFICIENT SERVICE! US office:Fontana...
Need help?
Do you have a question about the EP24668 and is the answer not in the manual?
Questions and answers
How do I know that it is ready to use? Is there a light that tells me it has heated up!