Table of Contents
Advertisement
Available languages
Available languages
Quick Links
• READ ALL INSTRUCTIONS BEFORE ASSEMBLY AND USE OF GATE.
• KEEP INSTRUCTIONS FOR FUTURE USE.
www.carlsonpetproducts.com
Carlson Pet Products, Inc.
3200 Corporate Center Drive, Suite 105 | Burnsville, MN 55306, USA
952.435.1084
Made in China
OWNER'S MANUAL MODEL:
2 IN 1 PLASTIC GATE
2360, 2365
& PET PEN
Advertisement
Table of Contents

Related Manuals for Carlson Pet Products 2360


Summary of Contents for Carlson Pet Products 2360
- Page 1 2 IN 1 PLASTIC GATE & PET PEN • READ ALL INSTRUCTIONS BEFORE ASSEMBLY AND USE OF GATE. • KEEP INSTRUCTIONS FOR FUTURE USE. www.carlsonpetproducts.com Carlson Pet Products, Inc. 3200 Corporate Center Drive, Suite 105 | Burnsville, MN 55306, USA 952.435.1084 Made in China...
- Page 2 SPANISH...
-
Page 3: Before Using Product
Before Using Product Read and follow all instructions carefully to ensure that your gate is properly installed. Improper installation could result in the gate becoming unstable or dislodged from the doorway. Always make sure the gate panels are securely attached before using. The safety of your child is your responsibility. Please keep these instructions for your reference. - Page 4 WARNING • Always ensure the gate is resting against the floor before beginning installation. • Strangulation hazard: pets can force themselves into very small openings; use this gate with pets whose heads will not fit into openings in the gate, between the gate and floor, or between the gate and wall.
-
Page 5: Before Assembly
MOUNT, WALL, THE INFORMATION CONTAINED IN THIS DRAWING IS THE SOLE PROPERTY OF REGALO INTERNATIONAL UNITS : INCHES / CARLSON PET PRODUCTS. ANY REPRODUCTION .XXX : ±.005 GATE SIDE IN PART OR AS A WHOLE WITHOUT THE WRITTEN .XX : ±.01 .X : ±.1... - Page 6 Option A: Installing Your Gate Between Two Walls STEP 1 Unfold the gate frame at each pivoting joint by loosening each cap. STEP 2 Determine the size of your opening. If you need to remove panels from your gate simply unhook the upper and lower knobs between the panels.
-
Page 7: Mounting Locations
THE INFORMATION CONTAINED IN THIS DRAWING UNITS : INCHES IS THE SOLE PROPERTY OF REGALO INTERNATIONAL .XXX : ±.005 / CARLSON PET PRODUCTS. ANY REPRODUCTION .XX : ±.01 IN PART OR AS A WHOLE WITHOUT THE WRITTEN .X : ±.1... - Page 8 STEP 5 Use a Phillips/cross-head screwdriver to fix the wall mounting bracket to the wall. Repeat for all four brackets. STEP 6 Rotate wall mounting bracket to the locked position. Repeat step for remaining wall mounting brackets. I F I &...
- Page 9 ENGLISH UNITS : INCHES IS THE SOLE PROPERTY OF REGALO INTERNATIONAL .XXX : ±.005 / CARLSON PET PRODUCTS. ANY REPRODUCTION .XX : ±.01 IN PART OR AS A WHOLE WITHOUT THE WRITTEN .X : ±.1 PERMISSION OF REGALO INTERNATIONAL / 3200 CORPORATE CENTER DRIVE ANGLES : ±2°...
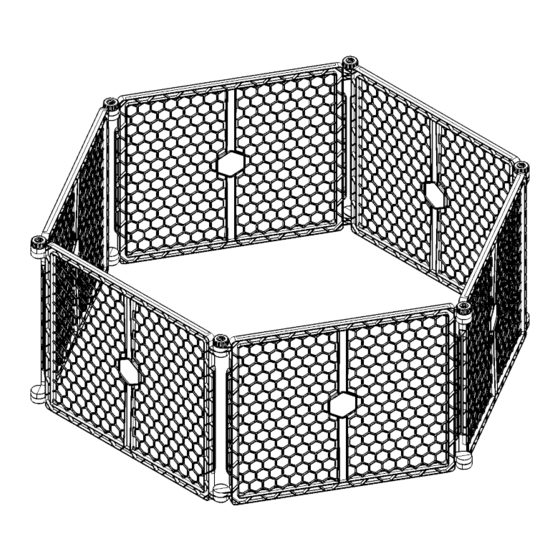
- Page 10 Option B: Installing Your Gate as a Freestanding Enclosure STEP 1 Unfold the gate frame at each pivoting joint by loosening each cap. STEP 2 Position the pet pen into your desired configuration, then join the free ends of the pet pen together at the plastic joints.
- Page 11 STEP 3 Tighten the locking knobs to secure your pet pen into your desired configuration. NOTE: When adding or removing additional panel units to the configuration, panels must be added or subtracted in sets of two for the freestanding enclosure to function properly. ENGLISH...
-
Page 12: Care And Maintenance
Carlson Pet Products, Inc. will replace or repair it at Carlson’s option. PROOF OF PURCHASE REQUIRED. - Page 13 • LIRE LE MODE D'EMPLOI DANS SON INTÉGRALITÉ AVANT L'ASSEMBLAGE ET L'UTILISATION DE CETTE BARRIÈRE. • CONSERVER LE MODE D'EMPLOI POUR RÉFÉRENCE FUTURE. www.carlsonpetproducts.com Carlson Pet Products, Inc. 3200 Corporate Center Drive, Suite 105 | Burnsville, MN 55306, É.-U. 952.435.1084 Fabriqué en Chine...
- Page 14 Avant d’utiliser le produit Lisez et suivez attentivement toutes les instructions pour vous assurer que la barrière est correctement installée. Une mauvaise installation pourrait rendre la barrière instable ou la déloger de l’encadrement de la porte. Assurez-vous toujours que les panneaux de barrière sont solidement fixés avant de l’utiliser. La sécurité...
- Page 15 MISE EN GARDE • Utilisez uniquement la barrière lorsque le mécanisme du loquet est fermement engagé. • Pour éviter les chutes, ne jamais utiliser la barrière en haut des escaliers. • N’UTILISEZ JAMAIS la barrière pour tenir l’enfant ou animal de compagnie éloigné...
-
Page 16: Avant Le Montage
MOUNT, WALL, THE INFORMATION CONTAINED IN THIS DRAWING IS THE SOLE PROPERTY OF REGALO INTERNATIONAL UNITS : INCHES / CARLSON PET PRODUCTS. ANY REPRODUCTION .XXX : ±.005 GATE SIDE IN PART OR AS A WHOLE WITHOUT THE WRITTEN .XX : ±.01 .X : ±.1... - Page 17 Option A : Installation de votre barrière entre les murs ÉTAPE 1 Dépliez le cadre de barrière à chaque joint pivotant en desserrant chaque bouchon. ÉTAPE 2 Déterminez la taille de votre ouverture. Si vous devez déposer les panneaux de votre barrière, il suffit de débrancher les boutons supérieurs et inférieurs entre les panneaux.
- Page 18 THE INFORMATION CONTAINED IN THIS DRAWING UNITS : INCHES IS THE SOLE PROPERTY OF REGALO INTERNATIONAL .XXX : ±.005 / CARLSON PET PRODUCTS. ANY REPRODUCTION .XX : ±.01 IN PART OR AS A WHOLE WITHOUT THE WRITTEN .X : ±.1...
- Page 19 ÉTAPE 5 Utilisez un tournevis Phillips/à tête cruciforme pour fixer le support de montage mural sur le mur. Répétez l’opération pour les quatre supports. ÉTAPE 6 Faites tourner le support de fixation murale en position verrouillée. Répétez l’étape pour les supports de fixation murale restants.
- Page 20 THE INFORMATION CONTAINED IN THIS DRAWING UNITS : INCHES IS THE SOLE PROPERTY OF REGALO INTERNATIONAL .XXX : ±.005 / CARLSON PET PRODUCTS. ANY REPRODUCTION .XX : ±.01 IN PART OR AS A WHOLE WITHOUT THE WRITTEN .X : ±.1...
- Page 21 Option B : Installation de votre barrière comme enceinte autonome ÉTAPE 1 Dépliez le cadre de barrière à chaque joint pivotant en desserrant chaque bouchon. ÉTAPE 2 Placez le parc de jeu dans la configuration de votre choix, puis connectez les extrémités libres du parc de jeu au niveau des jointures en plastique FRENCH...
- Page 22 ÉTAPE 3 Serrez les boutons de fixation pour fixer votre parc de jeu selon la configuration de votre choix. REMARQUE : Lors de l’ajout ou de la dépose de panneaux supplémentaires dans la configuration, vous devez ajouter ou déposer les panneaux par ensembles de deux pour que l’enceinte autonome fonctionne correctement.
-
Page 23: Entretien
à montrer quelque signe de défaillance que ce soit en raison d’un défaut de fabrication, de finition, d’assemblage ou de matériaux, tout en étant détenu par son acheteur original, Carlson Pet Products, Inc. le remplacera ou le réparera à sa seule discrétion. PREUVE D’ACHAT EXIGÉE. - Page 24 • LEA TODAS LAS INSTRUCCIONES ANTES DEL MONTAJE Y UTILIZACIÓN DE LA BARRERA DE SEGURIDAD. • CONSERVE LAS INSTRUCCIONES PARA CUALQUIER CONSULTA POSTERIOR. www.carlsonpetproducts.com Carlson Pet Products, Inc. 3200 Corporate Center Drive, Suite 105 | Burnsville, MN 55306, EE. UU. 952.435.1084 Hecha en China...
-
Page 25: Antes De Utilizar El Producto
Antes de utilizar el producto Lea y siga las instrucciones cuidadosamente para asegurarse de que haya instalado adecuadamente la puerta. La instalación inadecuada podría provocar que la puerta sea inestable o se desprenda del umbral. Asegúrese siempre de que los paneles de la puerta estén colocados de manera firme antes de usarla. La seguridad de su hijo es su responsabilidad. - Page 26 ADVERTENCIA • Para evitar caídas, no la utilice nunca en la parte superior de las escaleras. • NUNCA las use para mantener a un niño o mascota lejos de la piscina. • Antes de comenzar la instalación siempre cerciórese de que la puerta esté...
- Page 27 MOUNT, WALL, THE INFORMATION CONTAINED IN THIS DRAWING IS THE SOLE PROPERTY OF REGALO INTERNATIONAL UNITS : INCHES / CARLSON PET PRODUCTS. ANY REPRODUCTION .XXX : ±.005 GATE SIDE IN PART OR AS A WHOLE WITHOUT THE WRITTEN .XX : ±.01 .X : ±.1...
- Page 28 Opción A: Instalación de la puerta entre dos paredes PASO 1 Desdoble el marco de la puerta en cada articulación aflojando cada tapa. PASO 2 Determinar el tamaño de su abertura. Si debe retirar paneles de su puerta, sencillamente desenganche las perillas superior e inferior entre los paneles. Si está añadiendo paneles, enganche dos extremos de panel opuestos;...
- Page 29 THE INFORMATION CONTAINED IN THIS DRAWING UNITS : INCHES IS THE SOLE PROPERTY OF REGALO INTERNATIONAL .XXX : ±.005 / CARLSON PET PRODUCTS. ANY REPRODUCTION .XX : ±.01 IN PART OR AS A WHOLE WITHOUT THE WRITTEN .X : ±.1...
- Page 30 PASO 5 Utilice un destornillador Phillips o estrella para fijar la abrazadera para montaje en pared a la pared. Repita en las cuatro abrazaderas. PASO 6 Gire el soporte de montaje en pared a la posición de bloqueo. Repetir el paso para las abrazaderas para montaje en pared restantes.
- Page 31 SPANISH UNITS : INCHES IS THE SOLE PROPERTY OF REGALO INTERNATIONAL .XXX : ±.005 / CARLSON PET PRODUCTS. ANY REPRODUCTION .XX : ±.01 IN PART OR AS A WHOLE WITHOUT THE WRITTEN .X : ±.1 PERMISSION OF REGALO INTERNATIONAL / 3200 CORPORATE CENTER DRIVE ANGLES : ±2°...
- Page 32 Opción B: Instalar su puerta como una cerca independiente PASO 1 Desdoble el marco de la puerta en cada articulación aflojando cada tapa. PASO 2 Coloque el patio infantil en la configuración que desee, luego una los extremos libres del patio infantil en las juntas plásticas.
- Page 33 PASO 3 Ajuste las perillas de bloqueo para asegurar su patio infantil en la configuración deseada. NOTA: Al añadir o retirar unidades de panel adicionales a la configuración, se deben añadir o retirar los paneles en grupos de dos para que la cerca independiente funcione adecuadamente. SPANISH...
-
Page 34: Cuidado Y Mantenimiento
PARA DOBLAR SU PATIO INFANTIL PASO 1: Desconecte dos paneles de puerta al desenganchar las perillas superior e inferior. PASO 2: Ahora podrá retirar el patio infantil. PASO 3: Doble y guarde. CUIDADO Y MANTENIMIENTO Revise la puerta con frecuencia para asegurarse que no cuente con daños, desgaste, o componentes faltantes. - Page 35 SPANISH...
- Page 36 Carlson Pet Products, Inc. 3200 Corporate Center Drive, Suite 105 Burnsville, MN 55306, USA 952.435.1084 20201119ET...
Need help?
Do you have a question about the 2360 and is the answer not in the manual?
Questions and answers