Table of Contents
Advertisement
433-CMU-40/60 Instructions
Wireless Central Monitoring Unit
1
3 4
10
21 23 24
Caregiver Pocket Pager
CordLess
Bed and
®
CordLess
Floor Mats
®
Chair Sensor Pads
Wireless Nurse
Wireless Window/Door
Wireless Motion Sensor
Call Button
Exit Alarm
S M A R T C A R E G I V E R CO R P O R AT I O N
1229 North McDowell Blvd., Petaluma, CA 94954 | Tel: 800-650-3637
1
csr @ smartcaregiver.com | www.smartcaregiver.com
Advertisement
Table of Contents

Related Manuals for Smart Caregiver 433-CMU-40


Summary of Contents for Smart Caregiver 433-CMU-40
- Page 1 433-CMU-40/60 Instructions Wireless Central Monitoring Unit 21 23 24 Caregiver Pocket Pager CordLess Bed and ® CordLess Floor Mats ® Chair Sensor Pads Wireless Nurse Wireless Window/Door Wireless Motion Sensor Call Button Exit Alarm S M A R T C A R E G I V E R CO R P O R AT I O N 1229 North McDowell Blvd., Petaluma, CA 94954 | Tel: 800-650-3637...
- Page 2 Mission & Value Statement Smart Caregiver Corporation is committed to supplying the least expensive and best quality resident fall alarms so that caregivers can afford the quantity of fall alarms necessary to keep their residents safe. Founded in 1994, Smart Caregiver Corporation has been providing fall prevention and anti-wandering devices for hundreds of distributors and their customers worldwide.
-
Page 3: Table Of Contents
Table of Contents Features Page 4-5 Pre-Programmed Instructions Page 5 • *Pre-Programmed means - components are already set-up with CMU. • You received your CMU with components already programmed. Setup - Programming Page 6 • You received your CMU with NO programming. Detailed Instructions For: Page 7-9 •... -
Page 4: Features
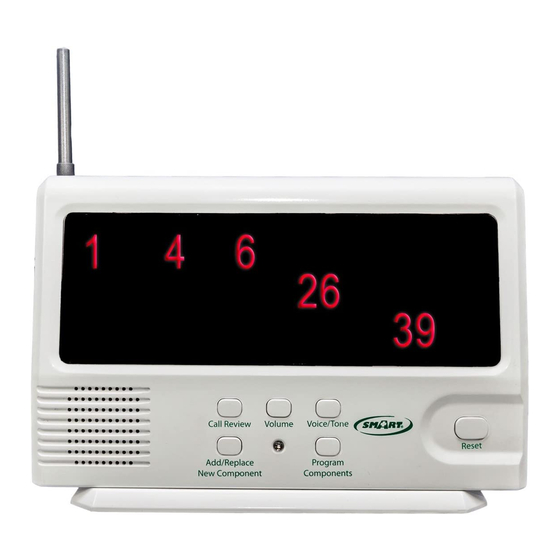
21 23 24 9. Hook for Mounting Bracket 10. Battery Compartment 11. Base / Mounting Bracket 12. Call/Alarm Switch 13. Silencer Port 14. Lock/Unlock Switch 15. AC Adapter Input 433-CMU-40/60 Front Important Icons: AC Adapter Batteries Signal In Use Received 433-CMU-40/60 Back... -
Page 5: Pre-Programmed Instructions
Features Explained 1. Call Review Button - Used to review previous alerts 2. Volume Button - Increase or decrease the alarm volume 3. Voice/Tone Button - Choose between tone alert or language option (French or Spanish) 4. Add/Replace New Component Button - Button used when adding additional components to your CMU 5. -
Page 6: Setup - Programming
Setup - Programming IF YOUR SYSTEM IS PRE-PROGRAMMED, DO NOT STOP FOLLOW THE STEPS BELOW SEE PAGE 5. To Program Components to Your New CMU: Numbers flashing across the screen of the Central Monitor indicates that there are no components currently programmed into the Central Monitor. -
Page 7: Detailed Instructions For
Detailed Instructions - READ ALL • Place components in desired order for programming. Component #1 Component #2 Component #3 • Ensure pads are placed on a hard surface with transmitters on and motion sensors are turned off. • Insert 4-C Batteries and plug in provided AC adapter •... -
Page 8: 433-Nc Nurse Call Button
Detailed Instructions Cont. - READ ALL Program your components: (Choose which apply) Once you have finished programming all desired components move to step 6. 433-NC Nurse Call Button • Press nurse call button and release. • The Central Monitor will display and speak the number the Call Button has been programmed to. -
Page 9: 433-Ext Window/Door Exit Alarm
433-EXT Window / Door Exit Alarm • Touch the 2 parts of the sensor together and then separate them. • The CMU will numerically display and audibly speak the number that the sensor has been programmed to. • Wait for the melodic confirmation tone. •... -
Page 10: Resetting The Central Monitor
Resetting Your CMU 21 23 24 To Reset The CMU: Press the reset button on the front of the CMU Reset Button To Reset The CMU Using Reset Button: Press and release center of button to reset your CMU from a remote location To Reset The CMU Using A Caregiver Pager With Reset... -
Page 11: Adding Additional Components
Adding Additional Components To Add Additional Components to your CMU: Read Directions Before Programming *MAKE SURE THAT NO COMPONENTS ARE BEING ACTIVATED WHEN YOU ARE TRYING TO ADD ADDITIONAL COMPONENTS TO THE CMU. 1. Place new components in the order that you would like to program them. Pads with transmitter will need to be on a hard flat surface and turned on in order to program correctly. -
Page 12: Mounting The Monitor
Mounting The Monitor 1. Slide mounting bracket off the bottom of the monitor 2. Mount bracket to the wall. 3. Slide hooks on back of CMU onto the mounting bracket Clearing The Monitor To Clear The Monitor: **THIS WILL REMOVE ALL PROGRAMMED COMPONENTS** Move the switch on the side of the monitor to the UNLOCK position. -
Page 13: Troubleshooting
Troubleshooting Programming: Are there flashing / scrolling numbers on the screen? • If there are numbers flashing / scrolling across the Central Monitor screen, there is no programming and the monitor is empty. Monitor needs to be programmed. Go to Page 6 Setup - Programming Is there a component that is not programming to the Central Monitor? •... -
Page 14: Warnings
Read the instructions and Legal Disclaimer. The Smart Caregiver Corporation Multi-Channel Wireless Call System & Nurse Call Paging Systems are designed to be installed by the end-user. As such, it is the entire responsibility of the buyer to insure that the system is properly installed and tested. -
Page 15: Legend
CMU Legend... -
Page 16: Notes/Contact
Call Today (800) 650-3637 We take pride in our outstanding customer service. At Smart Caregiver Customer Service Corporation we strive to keep our customers 100% satisfied. Tel: (800) 650-3637 Fax (707) 781-7440 www.smartcaregiver.com Notes • Low power affects performance. Refer to the features section inside the manual to locate the symbol indicating that battery is low.
Need help?
Do you have a question about the 433-CMU-40 and is the answer not in the manual?
Questions and answers