Advertisement
Quick Links
INSTALLATION AND PARTS LIST
Riding Aerator Seeder Attachment
Product Number 86510
For Use With The
TURFCO
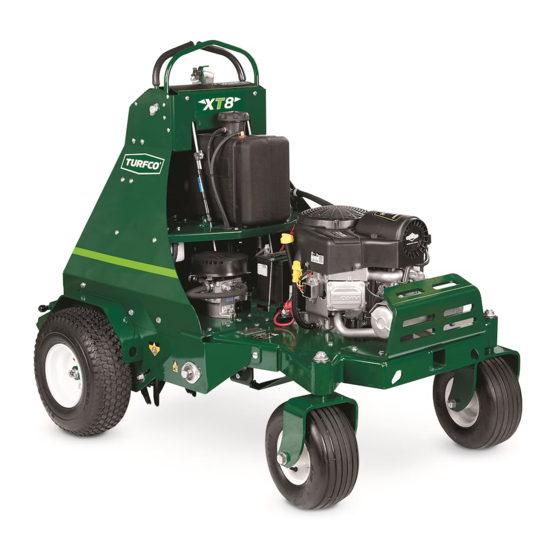
XT8 Riding Aerator
Product Number 85399
DANGER - IF INCORRECTLY USED THIS MACHINE CAN CAUSE
SEVERE INJURY. THOSE WHO USE AND MAINTAIN THIS MACHINE
SHOULD BE TRAINED IN ITS PROPER USE,
WARNED
OF
ITS
DANGERS, AND SHOULD READ THE ENTIRE MANUAL BEFORE
ATTEMPTING TO SET-UP, OPERATE OR SERVICE THE MACHINE.
Manual Number 670938 Rev A
TURFCO MFG. INC.
1655 101st Avenue NE • Minneapolis, Minnesota 55449-4420 USA
Phone (763) 785-1000 • FAX (763) 785-0556
2017 Turfco Mfg., Inc.
Advertisement

Related Manuals for TURFCO TurnAer XT8


Summary of Contents for TURFCO TurnAer XT8
- Page 1 DANGERS, AND SHOULD READ THE ENTIRE MANUAL BEFORE ATTEMPTING TO SET-UP, OPERATE OR SERVICE THE MACHINE. Manual Number 670938 Rev A TURFCO MFG. INC. 1655 101st Avenue NE • Minneapolis, Minnesota 55449-4420 USA Phone (763) 785-1000 • FAX (763) 785-0556 2017 Turfco Mfg., Inc.
- Page 2 ____ 86510 Riding Aerator Seeder Attachment Intended Use The Turfco 86510 Riding Aerator Seeder Attachment is for Turfco XT8 Riding Aerator product number 85399. The Turfco 86510 Riding Aerator Seeder Attachment fits all XT8 Riding Aerators. Seeder is a broadcast spreader with gate controls up by the console. The broadcast spinner is adjustable speed for different spread widths.
- Page 3 ____ 86510 Riding Aerator Seeder Attachment Installing Riding Aerator Seeder Attachment to an XT8 Riding Aerator (See Figures 1 thru 9) Figure 1 Step 1. Turn the engine ignition key to OFF. Disconnect both battery cables. 670938 Rev A...
- Page 4 ____ 86510 Riding Aerator Seeder Attachment Step 2. (See Figure 2) Install hopper mount assembly to hopper A. Remove 2 nuts from u-bolt on rear of hopper mounting bracket (9/16” wrench) B. Attach hopper using u-bolt and 2 bolts (400262) and 4 lock nuts (444810) Figure 2 670938 Rev A...
- Page 5 ____ 86510 Riding Aerator Seeder Attachment Step 3. (See Figure 3) Install trim deflector assembly to hopper A. Remove hopper mounting bolt (9/16” wrench). Keep mounting bolt and nut. B. Attach deflector mount to hopper using bolt (400112) and flange nut (661620) (7/16”...
- Page 6 ____ 86510 Riding Aerator Seeder Attachment Step 4. (See Figure 4) Mount hopper to riding aerator A. Slide hopper mount into receiver B. Install hitch pin (670935) thru receiver and hitch. May have to back off knobs to get hitch holes to line up C.
- Page 7 ____ 86510 Riding Aerator Seeder Attachment Step 5. Attach controls to console A. (See Figure 5) Remove 2 carriage bolts and nuts from console (7/16” wrench) B. (See Figure 6) In their place install 2 bolts (400112) and lock nuts (444830) protruding from console as shown C.
- Page 8 ____ 86510 Riding Aerator Seeder Attachment Figure 7 Step 6. (See Figure 8) Install battery harness (670940) A. Attach red wire to positive battery terminal B. Attach black wire to negative battery terminal C. Check controller switch is set to OFF D.
- Page 9 ____ 86510 Riding Aerator Seeder Attachment Step 7. (See Figure 9) Confirm operation A. Pull and push on gate knob control to confirm hopper gate opens and closes freely B. Turn controller switch to ON, confirm spinner starts to spin C.
- Page 10 ____ 86510 Riding Aerator Seeder Attachment Seeder Setup Before Operation Step 1. Determine operation speed A. Measure off 88 feet B. Drive aerator in same manner as you will be spreading seed a. If spreading before/after aerating, drive with tines out of ground b.
- Page 11 ____ 86510 Riding Aerator Seeder Attachment D. Open hopper gate and collect all the seed that comes out for 30 seconds. May have to manually shake hopper to help seed flow out of gate E. Weigh the seed and compare to the above calculation for lbs of seed in 30 seconds F.
- Page 12 ____ 86510 Riding Aerator Seeder Attachment Step 6. If spread pattern is not centered when doing the spread width test, adjust gauge plate position to center pattern A. Turn controller switch to OFF and unplug battery harness B. Loosen 2 bolts half a turn (7/16” wrench) (Figure 11) C.
- Page 13 ____ 86510 Riding Aerator Seeder Attachment Seeder Operation A. When operating the aerator without seeding, always turn the controller switch to OFF to stop spinner. When seeding, turn the controller switch to ON. B. Seed will start spreading as soon as the gate knob is pulled. Have the aerator already moving forward before pulling the gate knob to avoid over applying seed in one area.
- Page 14 ____ 86510 Riding Aerator Seeder Attachment Spreader Settings for Common Grass Seeds Wiring Diagram 670938 Rev A...
- Page 15 ____ 86510 Riding Aerator Seeder Attachment Spreader Service Parts List Item Part Description Qty. 670913 U-Bolt......................1 670914 Motor......................1 Motor Mount…………..................1 670915 Assembly, Spinner………................1 670916 670921 Plate, Guage....................1 670922 Cover......................1 670923 Dust Shield.....................1 670924 Gate.......................1 670925 Guage......................1 670926 Nipple......................1 Agitator……………………………..............1 670927 Cable Stop…………………….................1 670936 Clamp………………..................1...
- Page 16 ____ 86510 Riding Aerator Seeder Attachment Controls, Deflector, and Mounting Parts List Item Part Description Qty. 400112 Screw, Cap, 1/4-20 X 1, Hex Hd..............3 400262 Screw, Cap, 3/8-16 X 1, Hex Hd..............2 444810 Nut, Hex, 3/8-16, Nylock................7 444830 Nut, Hex, 1/4-20, Nylock................2 661620 Nut, Hex, 1/4-20 Flange.................1 664515...
Need help?
Do you have a question about the TurnAer XT8 and is the answer not in the manual?
Questions and answers