
Related Manuals for Casa Systems Verizon

Summary of Contents for Casa Systems Verizon
- Page 1 Verizon 4G LTE Network Extender 3 for Enterprise User Guide DOC-3198-01 Document Revision 3.1.0 October 2021...
- Page 2 © 2021 Casa Systems, Inc. All rights reserved. Licensed software products are owned by Casa Systems or its suppliers and are protected by United States copyright laws and international treaty provisions. The information regarding the product in this manual is subject to change without notice. All statements, information, and recommendations in this manual are believed to be accurate but are presented without warranty of any kind, express or implied.
-
Page 3: Table Of Contents
Contents Preface About this guide ....................vi Document revision history................vii Corporate facility .................... vii Personal and Product Safety ................viii Site Safety......................viii Materials ......................viii Electrical ......................ix Shipping, Transport, and Manual Handling............. ix Installation......................x Maintenance ....................x Environment..................... x Grounding ....................... - Page 4 User Guide Contents Connecting the cables ..................2-11 Optional mounting configurations ............. 2-13 Startup sequence .................... 2-14 Indoor GPS antenna ..................2-18 INT/EXT antenna .................... 2-20 PoE device ...................... 2-21 Making a call ....................2-23 Chapter 3. Web GUI PC requirements ....................3-2 Admin website access ..................
- Page 5 User Guide Contents Chapter 6. Specifications General information ...................6-1 Physical and Environmental ................6-1 Frequency bands ....................6-2 Supported services ....................6-2 User Guide...
- Page 6 User Guide Contents Network Extender 3...
-
Page 7: Preface
Preface About this guide The Network Extender 3 User Guide is intended for system administrators, support engineers, and operators who are responsible for basic installation and configuration of Network Extender units. Users who perform these tasks should be familiar with the Apex hardware and software capabilities, as well as have experience with both 3G and 4G technologies. -
Page 8: Document Revision History
Revision 2.0.0 — May 2021; revised version, R4.9.29 • Revision 3.0.0 — September 2021; initial version, R4.10.8 • Revision 3.1.0 — October 2021; revised version, R4.10.8 Corporate facility Casa Systems, Inc. 100 Old River Road Andover, MA 01810 Tel.: 978-688-6706 World Wide Web: www.casa-systems.com... -
Page 9: Personal And Product Safety
viii User Guide Preface Personal and Product Safety This product safety information includes U.S. directives that you must follow. All applicable OSHA regulations and standards shall be followed. The installation, maintenance, or removal of telecommunications equipment requires qualified, experienced personnel. Installation instructions are written for such installation personnel. -
Page 10: Electrical
User Guide Preface Electrical This product contains hazardous energy levels as defined by UL 60950. Care must be taken as injury to personnel or damage to the equipment could result from mistakes. Maintenance should only be carried out by approved workers who have adequate training and understanding and are familiar with the required procedures and instructions. -
Page 11: Installation
User Guide Preface Installation Installation shall be carried out by trained and competent workers always observing all applicable safety rules and regulations. Workers shall read, and understand the latest published installation documentation, and make sure all required workers, tools, and materials are approved and present prior to beginning any defined work task. -
Page 12: Grounding
Technical documentation Casa Systems provides the following documentation set in PDF format, viewable using current versions of Adobe Reader©. The latest documentation and revisions are uploaded on a continued basis for Casa customers. -
Page 13: Safety Warnings
User Guide Preface Safety Warnings AC System: Disconnect AC power, before servicing. RF Cable Installation: Installation shall be in accordance with the applicable parts of Chapter 8 of ANSI/NFPA 70. Circuit Breaker: Branch circuit protection. The power system must be equipped with external branch circuit protection that complies with NEC requirement and have a rating maximum of 20A. - Page 14 xiii User Guide Preface Network Extender 3...
-
Page 15: Chapter 1. Getting Started
Chapter 1. Getting Started About this chapter This chapter provides Getting Started information for the Network Extender 3. The following topics are covered in this chapter: Topic Page Introduction System Requirements Network Extender Basics User Guide... -
Page 16: Introduction
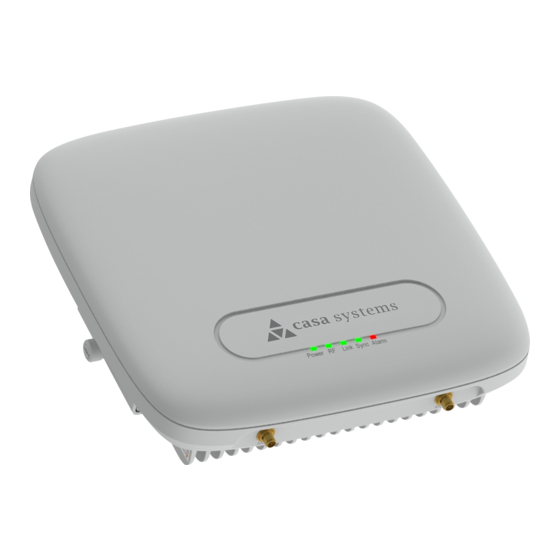
User Guide Introduction Introduction This user guide introduces the Verizon Wireless 4G LTE Network Extender 3 for Enterprise, designed to quickly enhance and extend the Verizon Wireless network experience for voice and data. Figure 1-1. Network Extender 3 This Network Extender provides the following features: •... -
Page 17: System Requirements
User Guide Introduction System Requirements • This device only supports Verizon Wireless 4G LTE mobile handsets with Advanced Calling turned on, as shown in Chapter 2, Making a call. • Internet Access: This Network Extender requires an Internet connection to operate and must be connected to an available port on a router or modem with always-on Internet connection with a recommended bandwidth greater than 50mbps. -
Page 18: Network Extender Basics
User Guide Introduction Network Extender Basics This section will guide you through the basic features and functions of your Network Extender. Figure 1-2 details the ports on the back of the Network Extender. Figure 1-2. Network Extender Ports The RF Antenna of Network Extender is embedded in the Front cover and 6 different external antenna ports are located on the top of the Network Extender. - Page 19 User Guide Introduction Table 1-1. Network Extender port descriptions (continued) Port Name Function PoE/WAN To connect to a Power over Ethernet (PoE) and/or Wide Area Network (WAN) Port. Power To connect Power Supply (12V DC). User Guide...
- Page 20 User Guide Introduction Network Extender 3...
-
Page 21: Chapter 2. Installation
Chapter 2. Installation About this chapter This chapter includes installation information for the Network Extender 3. The following items are described in this chapter: Topic Page Unpacking the box Required fasteners (not provided) Installing the wall bracket Securing the mounting bracket to the wall Securing the mounting bracket to a dropped ceiling Connecting the cables 2-11... -
Page 22: Unpacking The Box
User Guide Unpacking the box Unpacking the box The following items are provided in the Network Extender box: Figure 2-1. What’s included in the box Network Extender 3... -
Page 23: Required Fasteners (Not Provided)
User Guide Installing the wall bracket Required fasteners (not provided) The fasteners shown in Figure 2-2 (Qty: 4) are required to mount the Network Extender to the wall. Figure 2-2. Fasteners (not provided) Installing the wall bracket Marking the mounting position Before placing the Network Extender, mark the position where it will be installed and also the positions where anchor bolts will be fixed using a pen or pencil. -
Page 24: Securing The Mounting Bracket To The Wall
User Guide Securing the mounting bracket to the wall Figure 2-3. Anchor locations When anchoring on a wall, ensure the positions are marked as horizontal or vertical, as only a limited range of tuning is allowed for leveling after the system is mounted. Securing the mounting bracket to the wall Attach the upper bracket to the wall/ceiling (see Figure... - Page 25 User Guide Securing the mounting bracket to the wall Figure 2-4. Attach bracket Align the tabs on the upper bracket with the opening on the lower bracket and push inward (see Figure 2-5). Figure 2-5. Align tabs Push downward to seat the unit (see Figure 2-6).
- Page 26 User Guide Securing the mounting bracket to the wall Figure 2-6. Seat the unit Tighten the screw fasteners, one on each side (see Figure 2-7). Figure 2-7. Tighten the fasteners Network Extender 3...
-
Page 27: Securing The Mounting Bracket To A Dropped Ceiling
User Guide Securing the mounting bracket to a dropped ceiling Securing the mounting bracket to a dropped ceiling The following procedure details how to attach the Network Extender in a suspended ceiling application. WARNING: Before installing the Network Extender to a dropped ceiling, the installer should ensure that the structure is secure and capable of supporting the weight of the Network Extender. - Page 28 User Guide Securing the mounting bracket to a dropped ceiling Push the upper bracket back against the T-Rail to engage the tabs (see Figure 2-9). Figure 2-9. Engage tabs Network Extender 3...
- Page 29 User Guide Securing the mounting bracket to a dropped ceiling Push the clamp back against the T-Rail to engage tabs on both sides of the rail (see Figure 2-10). Figure 2-10. Push clamp Tighten the three M3 screws to lock the clamp and the upper bracket onto the T-Rail (see 2-11) .
- Page 30 2-10 User Guide Securing the mounting bracket to a dropped ceiling Route the cables in the cable management tabs (see Figure 2-12). Figure 2-12. Route cables Push the Network Extender up (a) and back (b) locking it into the upper bracket, then tighten the screw fasteners (c) on both sides (see Figure 2-13).
-
Page 31: Connecting The Cables
2-11 User Guide Connecting the cables Connecting the cables The Network Extender unit can be connected to the network via an Ethernet connection. The Ethernet connection is plug-and-play. Connect the GPS antenna cable to the GPS port on the unit (see Figure 2-14). - Page 32 2-12 User Guide Connecting the cables To install the power cable, it should be plugged in at 45 Degrees and twist clockwise to secure the power cord in the lock position (see Figure 2-16). Figure 2-16. Lock the power cable To unlock the power cable, twist it counterclockwise from the lock position (45 Degrees) as shown in Figure...
-
Page 33: Optional Mounting Configurations
2-13 User Guide Connecting the cables Optional mounting configurations The Network Extender can be mounted on a plenum above the ceiling (see Figure 2-18) or on a pole (see Figure 2-19). Note: The mounting bracket cross bar (shown in Figure 2-18) is an accessory that is not included with the Network Extender and is shown for reference only. -
Page 34: Startup Sequence
2-14 User Guide Startup sequence Startup sequence The following steps provide detail Network Extender states during the startup sequence. Table 2-1 provides functional details for each status LED during the startup sequence. Table 2-1. Status LED functions Color Function Power Green ON: All the power rails are present. - Page 35 Startup sequence Note: The device has completed its autonomous hardware tests and loaded all software. It will start the process of connecting to Verizon's network and coming into service. See Chapter 3, Web GUI for information on how to log into the Network Extender Admin Web page.
- Page 36 SeGW. Admin Website State: The Admin Website is accessible. Note: This confirms that the device has set up a VPN connection with Verizon's network. Authentication failure during IPSec tunnel setup to Initial SeGW (“Authentication failure to Initial Network. Unit is not provisioned. Please contact Verizon Wireless Customer Care for further assistance”).
- Page 37 Admin Website State: The Admin Website is accessible. Note: During the REM scan process, if no adjacent neighbor Network Extenders or Macro cells are detected, the Verizon Management system (AeMS) will then provide the configuration solely based on the GPS location. Operational status.
-
Page 38: Indoor Gps Antenna
2-18 User Guide Indoor GPS antenna Indoor GPS antenna The Network Extender receives timing information from the GPS. The Network Extender is required to be placed such that the GPS receiver has an unobstructed line of sight with at least 4 strong satellites in order for it to get a position fix during the booting process. - Page 39 2-19 User Guide Indoor GPS antenna Notes: If GPS signal cannot be detected, reposition the GPS antenna and place it in a new location to receive a stronger signal. This new location should be located close to a window. In some cases, if the GPS signal indoors is very weak, an external outdoor GPS (not included) may need to be installed.
-
Page 40: Int/Ext Antenna
2-20 User Guide INT/EXT antenna INT/EXT antenna The Network Extender provides a switch (INT/EXT) (see Figure 2-21) used to select an Internal or External Antenna for the Network Extender. Figure 2-21. INT/EXT switch Setting the Network Extender to EXT without an external antenna connected will end with PA damage. -
Page 41: Poe Device
2-21 User Guide PoE device PoE device The Network Extender provides the ability to be powered with an ultra-high Power over Ethernet (Class 5 PoE++) source (see Figure 2-22). Figure 2-22. PoE/WAN port Table 2-1 provides the recommended PoE specifications for the Network Extender. Table 2-1. - Page 42 2-22 User Guide PoE device The Network Extender's PoE details are as follows: Power class negotiation • Fully supported standard power negotiation protocol including PoE++ hardware negotiation and LLDP negotiation. • Have a fixed class 5 setting in the Network Extender. When it is powered by 802.3bt, it will ask for 40W and when it is powered by 802.3at, it will get maximum 25.5W.
-
Page 43: Making A Call
The Network Extender's coverage depends on environmental factors, such as physical structures and the strength of external cell towers. To turn on Advanced Calling on your 4G LTE Verizon Wireless phone, follow the steps below for your device's operating system: •... - Page 44 2-24 User Guide Making a call Network Extender 3...
-
Page 45: Chapter 3. Web Gui
Chapter 3. Web GUI About this chapter This chapter contains detailed information regarding the Casa Systems Network Extender 3 Admin Website (Local) where you can monitor the device status and make changes to settings. The following topics are covered in this chapter:... -
Page 46: Pc Requirements
User Guide PC requirements PC requirements To access the Admin Website, a PC should satisfy the following conditions: • Internet Explorer: 11 (Edge is recommended) • Chrome: 35.0.1916.153 or higher version • Firefox: 30.0 or higher version • Safari: 7.0.2 or higher version •... -
Page 47: Lmt Port
User Guide Admin website access LMT port To connect to the Network Extender, you will need to change your TCP/IPv4 settings to connect directly to the LMT port from your laptop, using an Ethernet cable. To access settings and manage the Network Extender, login to the web interface by following these steps: In Windows, click Control Panel on the Start menu. - Page 48 User Guide Admin website access Open Internet Explorer and enter https://172.31.1.1/ into the address bar. Click Continue and accept the self-signed Internet site certificate warning to launch the 4G LTE Network Extender 3 for Enterprise Admin Website. Note: The device CA certificate can be downloaded from the Certificate Management page and added to trusted certificates in the Web browser to avoid future warnings (see Figure 3-2).
-
Page 49: Same Network
User Guide Admin website access Same network To connect to the Network Extender, you need to know the Network Extender IP address and your computer needs to be connected to the same network of the Network Extender. Use a computer connected to the same network as the Network Extender. Open a browser. -
Page 50: Admin Website Overview
User Guide Admin website overview Admin website overview The Admin Website gives you detailed information on your Network Extender unit's status. You can also use the website to change settings. The Welcome page shows basic device information such as the Network Extender unit's MAC address, GPS fix location, device name, and IP address. -
Page 51: Change Admin Password Upon First Sign In
User Guide Admin website overview Change admin password upon first sign in If the user is signing in using the default password, a warning pop-up window will be displayed, asking the user to set a new password. Clicking the OK button on the pop-up will navigate the user to the Settings >... -
Page 52: Security Questions
User Guide Admin website overview Security questions Select a Security Question among the five given questions listed below: • What is your date of birth (mmddyy)? • What is your birthplace? • What was your first car? • What is your mother's maiden name? •... -
Page 53: Gui Header Bar
User Guide Admin website overview GUI header bar The top of the Web GUI includes a Header Bar (see Figure 3-4) that provides contextual information which is dynamically updated by the Web GUI application in real time without the user's intervention. Header Bar information is common to all pages. -
Page 54: 4G Service State Management
3-10 User Guide Admin website overview 4G service state management The eFemto state management and operation mode is provided on the Header Bar and is maintained dynamically (see Figure 3-6). Table 3-1 provides a short description for each eFemto state. Figure 3-6. -
Page 55: Network Extender Alarms
3-11 User Guide Admin website overview Network Extender alarms The alarms drop-down menu shows the active alarms in the system in all pages (see Figure 3-7). Figure 3-7. Active alarms The alarms drop-down menu showing a Warning alarm (see Figure 3-8). -
Page 56: Dashboard
User Guide Admin website overview Dashboard The Web GUI dashboard (see Figure 3-10) provides both system information and Network Extender settings. Refer to the Verizon Enterprise Web GUI User Guide for more information. Figure 3-10. Network Extender dashboard Network Extender 3... -
Page 57: Chapter 4. Configuration
Chapter 4. Configuration About this chapter This chapter describes firewall settings for configuring the Network Extender 3. The following topics are covered in this chapter: Topic Page Firewall settings Firewall rules for business User Guide... -
Page 58: Firewall Settings
Destination Notes Port Network Extender GPS Assistance Server Network Extender DNS Server Network Extender NTP Server Network Extender Verizon Security 500/4500 More than one port may Gateway be used for multiple device installation. Network Extender Network Extender Verizon Security ESP/50... - Page 59 User Guide Firewall settings Table 4-2 lists the IP addresses of each of the network elements that need to be included. Table 4-2. Firewall settings Network Element IP Address Fully Qualified Domain Name (FQDN) GPS Server http://xtrapath1.izatcloud.net http://xtrapath2.izatcloud.net http://xtrapath3.izatcloud.net Security Gateway (SeGW) 141.207.245.235 sg.vzwfemto.com 141.207.137.235...
-
Page 60: Firewall Rules For Business
The Network Extender will also access a DNS Server to obtain the IP Address of Verizon's Security Gateways and may access a DHCP Server for its IP addresses. Since this communication is generally done within the same subnet/network, these settings are not included in the firewall table. -
Page 61: Chapter 5. Troubleshooting
Chapter 5. Troubleshooting About this chapter This chapter provides troubleshooting information for the Network Extender 3 including status LEDs and list of alarms. The following topics are covered in this chapter: Topic Page Status LEDs Alarm troubleshooting User Guide... -
Page 62: Status Leds
User Guide Status LEDs Status LEDs Figure 5-1 shows the location of the status LEDs for the Network Extender. Figure 5-1. Network Extender status LEDs Table 5-1 provides functional details for each status LED applicable for network administrators. Table 5-1. Status LED functions Color Function... -
Page 63: Alarm Troubleshooting
The Web GUI provides a list of active alarms for the Network Extender. Access the list of active alarms from the Web GUI dashboard by clicking Alarms (see Figure 5-2). Note: Refer to the Verizon Enterprise Web GUI User Guide for more information. Figure 5-2. Web GUI alarms page User Guide... - Page 64 20005 MME connection is The device cannot communicate with If the problem persists, down Verizon's Network. Please check the LAN/ please contact Verizon Firewall settings, connectivity status and Wireless Customer Service. available bandwidth. 20006 RRM overload This alert should clear itself.
- Page 65 The device cannot communicate with The device will reboot Verizon's Network. automatically and try establishing the connection again. If the problem persists, please contact Verizon Wireless Customer Service. 20014 Ethernet error There is an issue with the Ethernet Power cycle the device to connection.
- Page 66 HTTP failed access The device cannot communicate with Please check the LAN/ Verizon's Network. Firewall settings, connectivity status and available bandwidth. If the problem persists, please contact Verizon Wireless Customer Service. 20018 OAM errors Parameters not set properly. Verify that all parameters are set per guideline.
- Page 67 The device is still functioning correctly. This alert indicates that the connection is down The device will retry automatically device cannot communicate establishing the connection again. with one of Verizon Network's redundancy systems. If the problem persists, please contact Verizon Wireless Customer Service.
- Page 68 If the problem persists, please contact Verizon Wireless Customer Service. 20037 IPsec IKE SA expiry The device cannot communicate with Please check the LAN/ Verizon's Network.
- Page 69 If the issue persists, replace the unit. 20040 Administrative This is a notification that the device was No action needed. Reboot rebooted from Verizon's Management System. 20041 Forced Reboot This is a notification that the device was No action needed. rebooted from Verizon's Management System.
- Page 70 The device will reboot automatically and try establishing the connection again. If the problem persists, please contact Verizon Wireless Customer Service. 20050 AeMS connection The device cannot communicate with Please check the LAN/ no response Verizon's Network.
- Page 71 RX RACH Overload A mobile phone is saturating the (RACH) Power cycle the device to channel. clear the issue. If symptom persists, please contact Verizon Wireless Customer Service. 20054 RX PUCCH A mobile phone is saturating the (PUCCH) Power cycle the device to Overload channel.
- Page 72 20057 Tampering detection Unit cover has been removed. This alarm is triggered when the cover of the unit is removed. Visually inspect the unit and contact Verizon Wireless Customer Service if the cover is not removed or damaged . 20058...
- Page 73 IP to the device. 20065 Unable to get The device cannot retrieve the operational Please check the LAN/ operator certificate Certificates from Verizon's Network. Firewall settings, from CMS server connectivity status and available bandwidth. The device will reboot automatically and try establishing the connection again.
- Page 74 Unique Alarm Description Recommendation Alarm ID (Code) 20067 Operator certificate The device cannot communicate with Please contact Verizon expired Verizon's Network. Wireless Customer Service. 20068 Operator certificate The device detected the operator No action is needed. Unit will within renewal...
- Page 75 5-15 User Guide Alarm troubleshooting Table 5-2. Alarm troubleshooting (continued) Unique Alarm Description Recommendation Alarm ID (Code) 20073 Connection failure The device cannot communicate with any Please check the LAN/ for all NTP servers of the configured NTP servers. Firewall settings, connectivity status and available bandwidth.
- Page 76 5-16 User Guide Alarm troubleshooting Network Extender 3...
-
Page 77: Chapter 6. Specifications
Chapter 6. Specifications General information Physical and Environmental User Guide... -
Page 78: Frequency Bands
User Guide Frequency bands Frequency bands Supported services Network Extender 3... - Page 80 100 Old River Road Andover, MA 01810 478-688-6706 Verizon 4G LTE Network Extender 3 for Enterprise User Guide © 2021 Casa Systems, Inc. All rights reserved. DOC-3198-01 Document Revision 3.1.0 October 2021 Printed in United States of America...
Need help?
Do you have a question about the Verizon and is the answer not in the manual?
Questions and answers