
Related Manuals for PICO Neo 3 Series


Summary of Contents for PICO Neo 3 Series
- Page 1 User Guide Pico Neo 3 USER GUIDE FOR PICO NEO 3 SERIES VIRTUAL REALITY ALL IN ONE HEADSET...
- Page 2 User Guide Pico Neo 3 IMPORTANT HEALTH & SAFETY NOTES This product is designed and intended to be used in an open and safe indoor area, free of any tripping or slipping hazards. To avoid accidents, remain conscious to the potential confines of your physical area and respect the boundary of your virtual area whenever you see it.
- Page 3 User Guide Pico Neo 3 6 DEGREES OF FREEDOM The device can track your translational and rotational movements in all directions (up/down, left/right, forward/backward, pitch, roll, and yaw). Your movements in the real world will be cap- tured and translated to what you see in the virtual world when using the appropriate content.
- Page 4 User Guide Pico Neo 3 QUICK GUIDE Installing Batteries Power on the Controller Press the area marked with an arrow and Short press the HOME button slide the cover down, then pull the tab to for 1 second until the status indicator remove the insulating paper.
- Page 5 User Guide Pico Neo 3 QUICK GUIDE Power on the VR Headset Long press the POWER button for 2 seconds until the status indicator turns blue. Wear the VR Headset Rotate the strap down over your head. Adjust the Headband Adjust side headband to comfortable and clear view position.
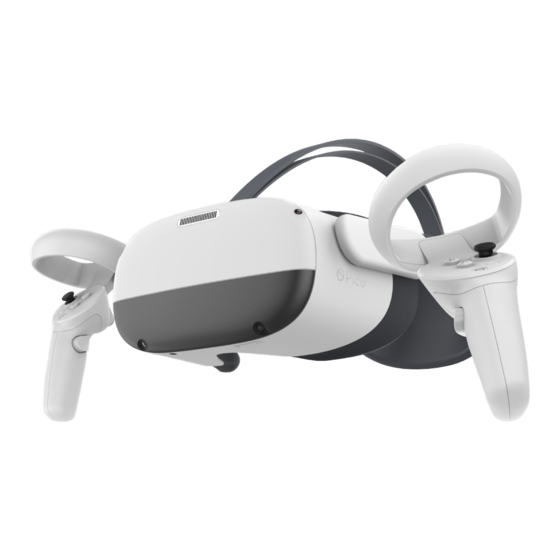
- Page 6 User Guide Pico Neo 3 PICO NEO 3 VR HEADSET DETAILS Top Power Cable POWER Button Top Strap Do not fold,punch or pull Face Cushion • Power on: Removable Removable long press for 2 seconds • Power off: Back Head-pad...
- Page 7 User Guide Pico Neo 3 PICO NEO 3 VR HEADSET DETAILS Proximity Sensor The system wakes up when VR Headset is put on, sleeps when VR Headset is taken off Left Speaker Right Speaker Inter-pupillary Distance Adjustment LENS VOLUME Button...
- Page 8 User Guide Pico Neo 3 OPERATING INSTRUCTIONS VR Headset Status Indicator Legend Blue: Powered on with battery over 20% Blue flashing: Shutting down Green: Charging complete Red: Charging: Battery is less than 20% Red flashing: Battery is less than 20%...
- Page 9 User Guide Pico Neo 3 OPERATING INSTRUCTIONS IPD Adjustment To ensure image clarity , it is necessary to line up the lenses with the distance between your pupils ( IPD) There are three lens spacing settings-58mm , 63.5mm , and 69mm . To adjust the IPD , gently move both lenses inward or outward to find the clearest setting.
- Page 10 User Guide Pico Neo 3 OPERATING INSTRUCTIONS The VR Headset adjustment This device has no myopia adjustment function. The VR Headset allows wearing most standard glasses with a frame width of less than 160mm.
- Page 11 User Guide Pico Neo 3 OPERATING INSTRUCTIONS Install Glasses Spacer If you have glasses collision with headset lens or pres- sure on the bridge of nose, please follow the picture to install Glasses Spacer to increase the space. You can install or not according to your situation.
- Page 12 User Guide Pico Neo 3 OPERATING INSTRUCTIONS Left Right Left Right Tracking Ring Dot not block during using Thumbstick TRIGGER Button Clickable Status APP/BACK Button Confirm Indicator Return previous screen Battery Cover GRIP Button Can be set as other functions in specific applications.
- Page 13 User Guide Pico Neo 3 OPERATING OPERATING INSTRUCTIONS INSTRUCTIONS Switch the pointer of the master Controller In the home screen, short press the TRIGGER button of the corresponding Controller to switch the pointer of the master Controller. Screen Re-centering Wear the VR Headset and look straight ahead, press and hold the HOME button of the Controller for more than 1 second to re-center the screen.
- Page 14 The face cushion and straps are available to purchase separate- ly. Please contact customer service at service@picovr.com, or a Pico authorized service provider or your Sales Representative. Lens care - During use or storage, please pay attention to avoid hard ob- jects touching the lens to avoid lens scratches.
- Page 15 User Guide Pico Neo 3 SAFETY WARNING Please read the following warnings and information If you allow others to use this product, you shall be re- carefully before using the VR Headset and follow all sponsible for ensuring that every user knows and fol- guidelines on safety and operation.
- Page 16 • Do not use the equipment in dusty, humid, dirty or located. For approved accessories, please contact near strong magnetic fields, so as not to cause internal Pico Customer Service Center. circuit failure of this product. • Do not use this equipment during thunderstorms.
- Page 17 fire or human injury. The bat- tery can only be replaced by Pico or Pico authorized service providers. • Do not disassemble or modify the battery, insert foreign objects, or immerse in water or other liquid.
- Page 18 PRODUCT WARRANTY TERMS Devices can be repaired, free of charge, within 12 months of the purchase date. Please contact Pico’s support if you require repair services. Limited warranty The limited warranty does not cover: - Defects or damage resulting from improper usage, maintenance or storage not includ- ed in this manual;...
- Page 19 Product Name: VR All-In-One Headset Headset Model: A7H10 Controller Model: C1710 For more information about Pico’s products , policy , and authorized servers , please visit Pico's official website :www.pico-interactive.com Company Name : Qingdao Pico Technology Co , Ltd Company Address : 4th Floor , No.3 Building , No.393 Songling Road , Qingdao,Shandong , P.R.
Need help?
Do you have a question about the Neo 3 Series and is the answer not in the manual?
Questions and answers