Advertisement
Available languages
Available languages
Quick Links
Phone: 1-877-PUMP-P2O (877-786-7726)
Web Site: http://parts2o.com
Disassembly
NOTE: Shut off the supply water. Relieve all pressure in the sys-
tem by raising the handle on the hydrant.
1. Unscrew the hydrant head from the drop pipe.
NOTE: hold the drop pipe with a pipe wrench to prevent it
from unscrewing out of the valve body .
2. Pull the hydrant head, brass clevis rod (Key No. 10), and
steel operating rod out of the drop pipe. They should come
out as an assembly, bringing the plunger (on the bottom of
the operating rod) with them.
3. Remove the long Stainless Steel bolt (Key No. 1).
4. Remove the handle and slip the links (Key No. 5) off the
handle and clevis (Key No. 6).
5. Loosen and remove the set screw (Key No. 4) from the cle-
vis (Key No. 6). Turn the clevis 90° and slide it up off the
brass clevis rod (Key No. 10).
6. Unscrew the packing nut (Key No. 7) and remove it from the
hydrant head.
7. Remove the two O-Rings (Key No. 8) from the hydrant head.
8. Remove the brass clevis rod (Key No. 10) from the steel
operating rod.
9. Unscrew the plunger (Key No. 9) from the operating rod.
Reassembly
1. Install the new O-Rings (Key No. 8) in the hydrant head.
CAREFULLY push them down into position before proceeding.
2. Install the new packing nut (Key No. 7) in the hydrant head.
NOTE: Don't tighten it yet.
3. Install the new brass clevis rod (Key No. 10) on the steel
operating rod and tighten it securely.
4. Install the plunger on the operating rod and push the assem-
bly up through the hydrant head until you can slip the new
clevis (Key No. 6) over the top of the brass clevis rod.
5. Install the new set screw (Key No. 4) in the clevis and tighten
it enough to make sure that you don't lose the operating rod.
You will adjust the rod later. Tighten the packing nut.
6. Slip the new links (Key No. 5) over the ends of the clevis and
onto the bosses on the handle.
7. Holding the link/handle assembly together, slide it into the
hydrant head and put the long stainless steel bolt (Key No.
1) through the whole assembly.
8. Install and tighten the lock washer (Key No. 2) and nut (Key
No. 3) on the long stainless steel bolt.
Hydrant Adjustment
NOTE: Over-adjustment can damage the plunger. To avoid this,
make repeated small changes in the plunger setting rather than
one big change.
NOTE: Shut off the supply water. Relieve all pressure in the sys-
tem by raising the handle on the hydrant.
1. Loosen the handle setscrew (Key No. 4) in the clevis (Key
No. 6) and push the handle back down to the closed position
(the rod should stay up).
2. Push the brass rod down by hand until it stops (the plunger
seats).
3. Raise the handle about 30° from closed position.
4. Tighten the set screw snugly.
5. Turn the water on.
6. Operate the hydrant, making sure that it both shuts off prop-
erly and allows proper flow.
7. If the hydrant does not shut off, repeat steps 1–6.
8. To check for proper drainage, run the water and then shut off
the hydrant, making sure that all flow stops once the handle
is back down. Check for drainage as follows:
For further operating, installation, or maintenance assistance:
1-877-PUMP-P2O
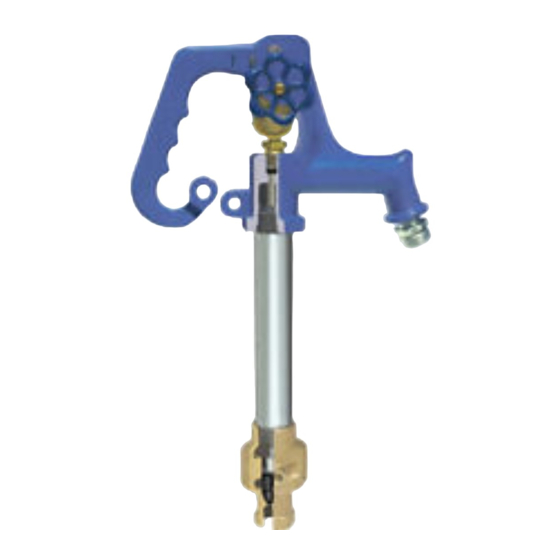
Hydrant Repair Parts Kit
2
1
Hydrant
Head
Hose
10
Adapter
Drop
Pipe
Parts Included In Kit
Key No.
Part Description
1
Long S.S. Bolt
2
S.S. Lock Washer
3
S.S. Nut
4
Set Screw
5
Link
6
Clevis
7
Packing Nut
8
O-Ring
9
Plunger
10
Brass Clevis Rod
A. Listen for water running back down the pipe.
B. Put your hand over the end of the hose after you turn
the water off. If your hydrant is draining, you will feel
suction on your hand.
9. If the riser pipe drain hole is blocked, clear it by:
A. Put a hose cap on the hydrant or put the hose on it and
then kink it.
B. Open and close the hydrant to blow the blockage out of
the drain hole.
NOTE: To verify proper drainage, repeat Step 8. If the hydrant is
still not draining, repeat step 9 to clear the drain hole. Do not
backfill until all tests have been completed and proper drainage
has been confirmed.
TROUBLESHOOTING
Leaks from the spout indicate that the plunger is leaking (rod
may be out of adjustment).
Leaks from around the plunger rod indicate that the packing in
the hydrant head is leaking and requires adjustment or
replacement.
(1-877-786-7726)
FPYRK1
5
3
4
6
5
Handle
7
8
Operating
Rod
9
Valve
Body
Qty.
1
1
1
1
2
1
1
2
1
1
P2O-36 (9/10/09)
Advertisement

Related Manuals for Parts2o FPYRK1


Summary of Contents for Parts2o FPYRK1
- Page 1 Hydrant Repair Parts Kit Phone: 1-877-PUMP-P2O (877-786-7726) FPYRK1 Web Site: http://parts2o.com Disassembly NOTE: Shut off the supply water. Relieve all pressure in the sys- tem by raising the handle on the hydrant. 1. Unscrew the hydrant head from the drop pipe.
- Page 2 Trousse de pièces de réparation de prise d’eau FPYRK1 Démontage NOTA : Fermer l’arrivée d’eau. Dissiper toute la pression du système en relevant la poignée de la prise d’eau. 1. Dévisser la tête de la prise d’eau du tuyau de descente.
- Page 3 Juego de piezas de repuesto para la toma de riego/hidrante FPYRK1 Desensamblaje NOTA: Cierre el suministro de agua. Descargue toda la presión en el sistema levantando la manija en la toma de riego. 1. Destornille el cabezal de la toma de riego de la columna Cabezal de la descendente.
Need help?
Do you have a question about the FPYRK1 and is the answer not in the manual?
Questions and answers