Advertisement
Available languages
Available languages
Phone: 1-877-PUMP-P2O (877-786-7726)
Web Site: http://parts2o.com
Hazardous voltage and
pressure. Disconnect power and drain
the pressure tank before servicing the
pump.
Disassembly
1.
Disconnect power and drain the
pressure tank before beginning work
on the pump.
2.
Remove the pump case bolts. Unbolt
the base if necessary.
3.
Use a heavy screwdriver behind the
bolt ears to pry the motor back from
the case. The seal, impeller and dif-
fuser will come with it.
4.
Remove the diffuser bolts (if neces-
sary) and take off the diffuser and
priming screen (See Fig. 1).
NOTICE Your pump may have a
priming screen mounted in front of
the diffuser (see the exploded view,
Fig. 8). If so, remove it along with
the diffuser.
Figure 1: Remove diffuser bolts and
remove diffuser. Priming screen is
not shown. Some pumps do not have
diffuser bolts.
5.
On 1/3 and 1/2 HP models, hold
the impeller with pliers and unscrew
the venturi tube (See Fig. 6). On 3/4
and 1 HP models the venturi tube is
screwed into the pump case.
6.
Remove the motor end cover.
Hazardous voltage
from capacitor; especially dangerous
to people with heart pacemakers.
Use a plastic handled screwdriver to
short the capacitor terminals and dis-
charge the capacitor. DO NOT touch
any metal on the screwdriver or
pump while doing this.
7.
Loosen the capacitor clamp screw
and remove the capacitor to allow
access to the shaft end.
8.
Remove the impeller by holding the
pump shaft with a 7/16" open end
wrench on the shaft flats (see Fig. 2)
and unscrewing the impeller (coun-
terclockwise as you look into the eye
of the impeller – See Fig. 3).
7/16"
Figure 2: Move the capacitor aside and
hold the shaft with a 7/16" wrench.
6157 0210
Figure 3: Hold the shaft with the wrench
and unscrew the impeller off the shaft.
9.
Use two screwdrivers behind the
stationary half of the shaft seal to pry
the seal out of the seal plate. (See
Fig. 4.)
Figure 4: Use two screwdrivers to pry up
on the seal.
For further operating, installation, or maintenance assistance:
1-877-PUMP-P2O (1-877-786-7726)
Jet Pump Repair Instructions
For Kits FPPK50-P2 (1/3 and 1/2 HP)
and FPPK100-P2 (3/4 and 1 HP)
Seal Replacement
NOTE:
A.
The pump shaft is an extension of
the motor shaft, and no adjustment is
required for seal replacement.
B.
The seal is in two parts:
a. The rotating assembly, consisting
of a stainless steel spring, a drive
ferrule with rubber ring and a car-
bon seal ring (the seal face).
b. The stationary half, consisting of a
ceramic seal ring (the mating seal
face) mounted in a synthetic rub-
L2
L2
B
B
ber cup.
A
A
c. ALWAYS REPLACE BOTH HALVES
L1
L1
of the seal. DO NOT try to use
one new seal half and one old
one; it will leak.
6158 0210
1.
To remove the seal plate, work it off
the motor shaft with two screwdriv-
ers behind the plate.
2.
To remove the stationary ceramic
ring from the seal plate, turn the seal
plate face down and tap the back of
the seal with a mallet and a screw-
driver.
3.
Make sure that the housing and shaft
are clean and free of sand and dirt
before installing the new seal. Wash
parts with clean water to be sure that
they are clean.
4.
Press the stationary ceramic seat
(ceramic face OUT) into the seal
plate with finger pressure. Cover the
ceramic face with cardboard before
you press it into place (no finger-
prints on the seal face!). Take care
that you don't scratch, nick, or crack
the ceramic face. To make sure it is
clean, wipe the ceramic face with a
clean, soft, lint-free cloth once it is in
position.
5.
Slide the rotating half of the seal onto
the shaft, carbon face first. Make sure
that you don't scratch, nick, or crack
the carbon face. Press it into position
with your fingers.
NOTICE When correctly installed,
the ceramic surface and the carbon
surface should face each other. (See
Fig. 7)
P2O-37 (01/15/14)
Advertisement
Table of Contents

Subscribe to Our Youtube Channel
Related Manuals for Parts2o FPPK50-P2


Summary of Contents for Parts2o FPPK50-P2
- Page 1 Jet Pump Repair Instructions Phone: 1-877-PUMP-P2O (877-786-7726) For Kits FPPK50-P2 (1/3 and 1/2 HP) Web Site: http://parts2o.com and FPPK100-P2 (3/4 and 1 HP) Seal Replacement Remove the impeller by holding the Hazardous voltage and pump shaft with a 7/16” open end pressure.
- Page 2 Thread the impeller on to the shaft When replacing the nozzle and to push the seal components into venturi, BE SURE that you do not position. cross thread anything. Be sure that the nozzle and venturi are both tight Be Careful against their respective shoulders;...
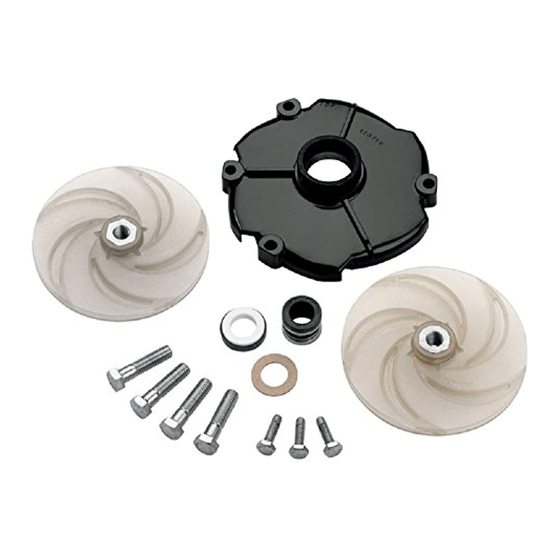
- Page 3 Figure 8: Exploded View. Kit Includes: Key No. Part Description Qty. Shaft Seal Impeller Diffuser O-ring Nozzle Venturi Kit FPPK50-P2 Kit FPPK100-P2 is Used on Models: is Used on Models: HJ50S HJ50S-1 SD-100 HJ50D HJ50S-K ACE10C HR50S HJ50-LA 123353 HR50D...
- Page 4 Instructions pour la réparation des pompes à jet Pour les trousses FPPK50-P2 (1/3 et 1/2 ch) et FPPK100-P2 (3/4 et 1 ch) Dévisser la bride du condensateur et Tension et déposer le condensateur pour permettre pression dangereuses. Couper l’accès au bout d’arbre.
- Page 5 empreinte de doigts sur la face du joint Lors de la remise en place de la buse d’étanchéité. Faire attention de ne pas et du venturi, S’ASSURER de ne pas égratigner, faire d’encoche ou fêler la fausser le filetage. S’assurer que la buse face en céramique.
- Page 6 Instrucciones para la reparación de bombas de chorro Para Juegos FPPK50-P2 (de 1/3 y 1/2 HP) y FPPK100-P2 (de 3/4 y 1 HP) Afloje el tornillo de fijación del capacitor Tensión y presión y saque el capacitor para tener acceso al peligrosas.
- Page 7 ni rajar la superficie de cerámica. Para atornillan en la envoltura del eyector asegurarse de que esté limpia, pase un (consulte la vista detallada en la Figura 8, paño limpio, suave y sin pelusa por pagina 8). la superficie de cerámica después de Cuando vuelva a colocar la boquilla y haberla colocado en su lugar.
- Page 8 Joint d’arbre Impulseur Diffuseur Joint torique Ensemble buse Venturi Modèles Juego nécessitant FPPK100-P2 Modèles nécessitant la trousse Juego FPPK50-P2 se usa la trousse FPPK50-P2 FPPK100-P2 se usa en modelos: en modelos: HJ50S ACE5C HJ50-LA SD-100 HJ50S ACE5C HJ50-LA SD-100 HJ50D 123355...
Need help?
Do you have a question about the FPPK50-P2 and is the answer not in the manual?
Questions and answers