Advertisement
Table of Contents
INSTRUCTION MANUAL
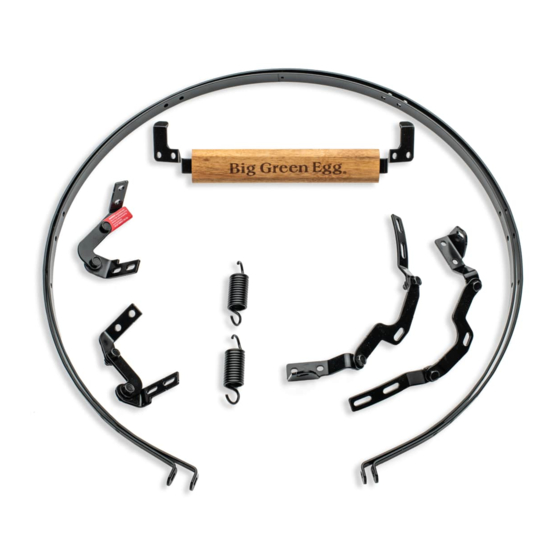
PARTS LIST
(
2) Bands (1) Handle assembly (2) Side hinge assemblies (1) Left rear hinge assembly (1) Right rear hinge
assembly (1) Hardware bag:
NOTE
: If you are installing the optional Egg-Mate tables at this time, you will want to insert the (4) ¼"-20 x 5/8" clinch studs
(provided with the tables) into the lower band only (step 1 of the Egg-Mate manual).
STEP 1
Place the egg stand of your choosing (Nest or Table) on a flat & level surface. Carefully remove all the internal
components from inside the egg bottom. With the aid of an assistant, place the egg bottom into the stand with the vent door
facing forward (note the small hole in the band attaching area above the vent door, this hole will be used to align the egg
dome). Carefully replace all the internal components back into the egg bottom. Locate the front of the egg dome by finding the
locating hole in the band attaching area. With the aid of an assistant, carefully place the egg dome centered (left to right &
front to rear) onto the egg bottom taking care to align the locating hole on the egg dome with the locating hole on the egg
bottom.
STEP 2
Open the hardware bag and locate the (2) ¼"-20 x ½" clinch studs, insert them into the handle attachment holes in
the upper band (NOTE: both bands are identical and some holes are not used, they become upper & lower after the hardware
is installed) then install & hand tighten the (2) ¼"-20 acorn nuts (Illustration A). Install the (16) ¼"-20 x 5/8" clinch studs
with ¼"-20 keps nuts hand tightened to hold them in place. (Illustration A).
STEP 3
(Illustrations A & B) Position the lower band onto the egg bottom with the band flanges at the rear of the egg
bottom (Note: the locating hole in the front of the egg base should be centered between the unused handle attachment holes)
insert a 5/16"-18 x 2" carriage bolt through the band flanges, install a 5/16" flat washer and a 5/16"-18 hex nut and hand
tighten. Make sure the lower band is down as far as possible, preferably touching the stop lip on the egg bottom and securely
tighten the hex nut (slight bending of the bolt and band flanges is normal). Next, position the upper band onto the egg dome
with the square hole in the band flanges on the same side as the lower band. Insert a 5/16"-18 x 2" carriage bolt through the
band flanges, install a 5/16" flat washer and a 5/16"-18 hex nut and hand tighten
bands all the way around by sliding the upper band up or down on the egg dome as needed. Make sure the band flanges are
vertically aligned with the flanges on the lower band and securely tighten the hex nut (slight bending of the bolt and band
flanges is normal)
1
X.L. BAND
(16) ¼" –20 x 5/8" clinch studs (16) ¼"-20 keps nuts (2) ¼"-20 x ½" clinch studs (2) ¼"-20 acorn nuts
(2) 5/16"-18 x 2" carriage bolts (2) 5/16" flat washers (2) 5/16"-18 hex nuts
Adjust a ½" gap between the upper and lower
.
Advertisement
Table of Contents

Related Manuals for Big Green Egg X.L. BAND


Summary of Contents for Big Green Egg X.L. BAND
- Page 1 X.L. BAND INSTRUCTION MANUAL PARTS LIST 2) Bands (1) Handle assembly (2) Side hinge assemblies (1) Left rear hinge assembly (1) Right rear hinge assembly (1) Hardware bag: (16) ¼” –20 x 5/8” clinch studs (16) ¼”-20 keps nuts (2) ¼”-20 x ½” clinch studs (2) ¼”-20 acorn nuts (2) 5/16”-18 x 2”...
- Page 2 (NEVER TIGHTEN THE BANDS WHEN THE GRILL IS IN USE) IMPORTANT: The ceramic material the Big Green Egg is made of is very dense and heavy; carefully open the egg dome until you familiarize yourself with the feel of the opening and closing cycles. Individuals of a smaller stature may want to use both hands until you feel comfortable.
Need help?
Do you have a question about the X.L. BAND and is the answer not in the manual?
Questions and answers