Table of Contents
Advertisement
Quick Links
Advertisement
Table of Contents

Related Manuals for SkyBell Trim II Pro

Summary of Contents for SkyBell Trim II Pro
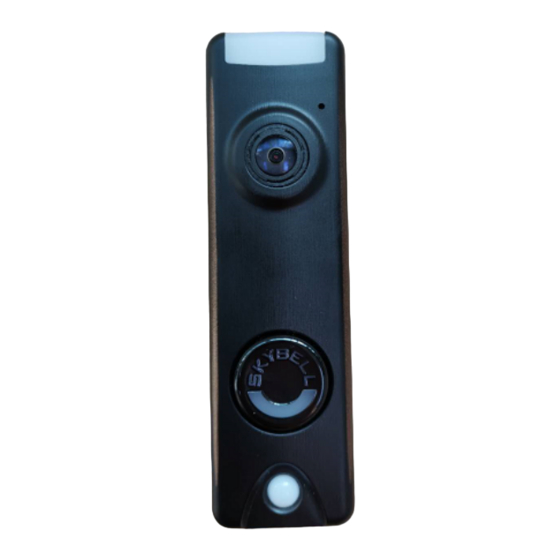
- Page 1 Trim II Pro Doorbell Camera HD video. Two-Way Audio. TRIM2 B TRIM2 S TRIM II PRO Doorbell Camera On-demand video View your front door at anytime Record video Save videos to your Alarm.com account Motion sensor Know if someone is at or near the door...
- Page 2 Install on thin door trims and frames Requirements Power: 10-30VAC, 50/60Hz,0.5A Max or12VDC,0.5 to1.0A wired to in- home mechanical chime - digital doorbell chime compatibility requires SkyBell Digital Doorbell Adapter - not included Wi-Fi: 802.11 b/g/n/ac, 2.4 and 5 GHz Upload bandwidth: 2 Mbps required...
- Page 3 • Alarm.com T r i m I I P r o Doorbell Camera SkyBell HD consumer hardware is not supported. Slim Line Doorbell Camera hardware is not supported on the SkyBell platform or other service provider platforms. Remove Existing Doorbell Button Take care to prevent the existing doorbell wires from slipping into the wall.
- Page 4 Attach the Doorbell Mounting Bracket to the Wall Feed the existing doorbell wires through the hole in the center of the bracket. Affix the bracket firmly to the wall by driving the provided wall screws through the top and bottom holes in the bracket. Failure to make the bracket flush on the wall could cause a poor power connection between the bracket and the doorbell camera.
- Page 5 Wi-Fi Connectivity If the LED is flashing Orange, the doorbell needs to be manually placed into AP mode. Press and hold the Main Button until the LED begins rapidly flashing green, then release. The LED will flash green as the Doorbell Camera scans the Wi-Fi networks in the area.
- Page 6 Notes: The Alarm.com T r i m I I P r o Doorbell Camera will flash Blue before it flashes Yellow – do not release during the flashing Blue phase (this will power cycle the device). You can factory reset the device when it is in AP Mode (see instructions above).
- Page 7 However, there is no guarantee that interference will not occur in a particular installation. If this equipment does cause harmful interference to radio or television reception, which can be determined by turning the equipment off and on, the user is encouraged to try to correct the interference by one or more of the following measures: Reorient or relocate the receiving antenna.
- Page 8 To maintain compliance with the RF exposure guidelines, place the product at least 20cm from nearby persons. Pour rester en conformité avec les consignes d'exposition aux RF, placez le produit à au moins 20 cm des personnes proches.
Need help?
Do you have a question about the Trim II Pro and is the answer not in the manual?
Questions and answers