
Related Manuals for SkyBell TRIM II PRO

Summary of Contents for SkyBell TRIM II PRO
- Page 1 TRIM II PRO Doorbell Camera PRODUCT FEATURES HD VIDEO See your visitor up to 1080p HD and 5x zoom. MOTION SENSOR SkyBell alerts you even if visitor doesn’t press button – providing additional security.
-
Page 2: Live Monitoring
Monitor your front door at any time by starting the video from the app. FREE VIDEO RECORDING SkyBell can record each video so you download or watch them at any time. MULTIPLE USERS Multiple people can receive alerts to answer the door and you can have multiple device on each account. -
Page 3: Quiet Mode
Review the day’s events while you were away – includes missed visitors, answered video calls and motion alerts. COLOR NIGHT VISION Feel safe knowing you can see a visitor at night – in full color HD video QUIET MODE Turn off your home’s doorbell chime from the app so it won’t wake up a baby! SNAP PHOTOS Capture a photo of your visitor with the touch of a button... -
Page 4: Product Design
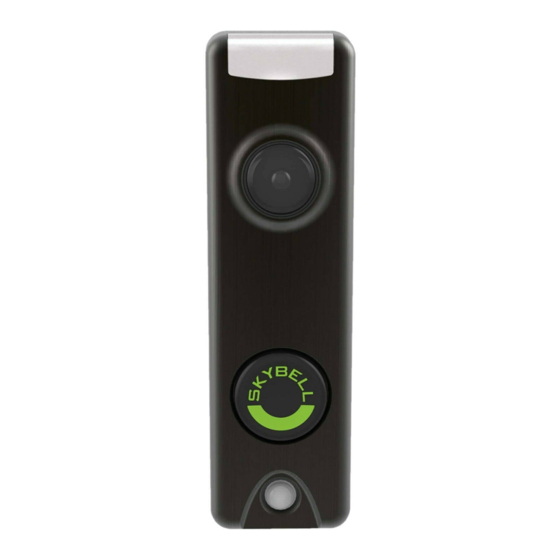
Only SkyBell can work between -40 and 140 degrees F THEFT GUARANTEE If your SkyBell is stolen, we will replace it free of charge. PRODUCT DESIGN TRIM2 B TRIM2 S TECHNICAL SPECIFICATIONS Power: 10-30VAC, 50/60Hz,0.5A Max or12VDC,0.5 to1.0A wired to in... - Page 5 Wi-Fi : 802.11 b/g/n/ac, 2.4 and 5 GHz Upload bandwidth: 2 Mbps required Mounting: Mounting plate affixes to flat surface and utilizes existing doorbell wiring Mobile device: Alarm.com app compatible with Apple iOS, Android Specifications Video camera: 1080p resolution, 180° view Night vision: IR up to 16 feet (5 m) Audio:...
-
Page 6: Motion Sensor
This activation triggers an initial motion event. The SkyBell continues monitoring this activity energy from the PIR sensor and when meeting a more stringent threshold, it sends a notification to the phone. If the notification is answered, the SkyBell records for as long as the... -
Page 7: Cloud Recording
(7) days. CLOUD RECORDING Available with all SkyBell devices. Choosing a SkyBell Device from the Devices List takes the user to the “Activity Page” and allows them to access the videos. There are no subscription fees. - Page 8 Recording include audio and video. Attach the Doorbell Mounting Bracket to the Wall Feed the existing doorbell wires through the hole in the center of the bracket. Affix the bracket firmly to the wall by driving the provided wall screws through the top and bottom holes in the bracket. Failure to make the bracket flush on the wall could cause a poor power connection between the bracket and the doorbell camera.
- Page 9 bracket and push the front of the doorbell camera toward the wall. Tighten the set screw located on the bottom of the camera, being careful to damage it (power tools should not be used with the set screw). The camera’s LED should begin to illuminate. COLORS, BUTTON FUNCTIONS...
- Page 10 begins rapidly flashing green, then release. The LED will flash green as the Doorbell Camera scans the Wi-Fi networks in the area. The Doorbell Camera should enter AP Mode after a couple of minutes and the LED should begin alternating Red and Green. Enter AP Mode (Broadcast Syncing Mode) Press and HOLD the Main Button until the LED begins a GREEN rapid strobe flash, then release the button.
- Page 11 Factory Reset Caution: If you initiate a Factory Reset, the Doorbell Camera will need to be re-connected to Wi-Fi and resynced with the account. Press and HOLD the button until the LED begins a Yellow rapid strobe flash. The reset could take up to 2 minutes. Online Resources Visit alarm.com/doorbell for troubleshooting tips, installation videos and more...
- Page 12 Warning : This device complies with part 15 of the FCC Rules.Operation is subject to the following two conditions: (1) This device may not cause harmful interference, and (2) this device must accept any interference received, including interference that may cause undesired operation.
- Page 13 the interference by one or more of the following measures: - Reorient or relocate the receiving antenna. - Increase the separation between the equipment and receiver. - Connect the equipment into an outlet on a circuit different from that to which the receiver is connected. - Consult the dealer or an experienced radio/TV technician for help.
- Page 14 brouillageradioélectriquesubi, mêmesi le brouillageest susceptible d'encompromettre le fonctionnement. This equipment complies with IC RSS-102 radiation exposure limits set forth for an uncontrolled environment. This equipment should be installed and operated with minimum distance 20cm between the radiator & your body. Cet équipement est conforme aux limites d'exposition aux rayonnements IC établies pour un environnement non contrôlé.Cet équipement doit être installé...
- Page 15 Notes: The Alarm.com T r i m I I P r o Doorbell Camera will flash Blue before it flashes Yellow –do not release during the flashing Blue phase (this will power cycle the device). You can factory reset the device when it is in AP Mode (see instructions above).
Need help?
Do you have a question about the TRIM II PRO and is the answer not in the manual?
Questions and answers