Table of Contents
Advertisement
Advertisement
Table of Contents

Related Manuals for Keurig Drinkworks Home Bar


Summary of Contents for Keurig Drinkworks Home Bar
- Page 1 Cheers! Bar-quality drinks at the push of a button. HOME BAR CARE GUIDE...
- Page 2 Welcome. We recommend that you review and carefully follow this guide as well as all warnings and instructions that accompany the Home Bar to make the most of your ® Drinkworks experience. This guide includes use, care, ® maintenance and troubleshooting information to help you make remarkable drinks every time.
-
Page 3: Table Of Contents
Contents. Electrical warnings ............4 Home Bar warnings . -
Page 4: Electrical Warnings
Electrical warnings. When using any electrical appliance, basic safety precautions should be followed, including the following: General Do not place the Home Bar on or near a hot gas or electric burner, or in a heated oven. Read all instructions before using. Keep the Home Bar away from direct sunlight The Home Bar must be properly installed and heat sources. - Page 5 SHORT CORD INSTRUCTIONS: A short power Cords and Grounding (Cont.) supply cord is provided to reduce the risk WARNING: Improper connection of the of becoming entangled in or tripping over a equipment-grounding conductor can result longer cord. If an extension cord is used, (1) in a risk of electric shock.
-
Page 6: Home Bar Warnings
Home Bar warnings. Read and follow all warnings and instructions before use. Misuse of the Home Bar may result in serious personal injury or property damage. Positioning Any servicing other than cleaning and user Set up the Home Bar on a flat, weight-bearing, maintenance should be performed by an stable, heat-resistant surface away from hot authorized Drinkworks representative. -
Page 7: Home Bar Components
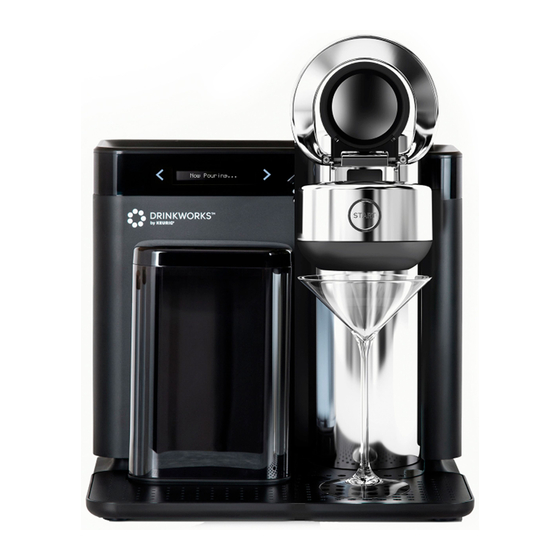
Home Bar components. Drinkworks Pod (Not Display Pod Basket included) Touch Arrow Pod Door Buttons Water Tank Handle START Button Power Button Drip Tray Power Cord Half-Gallon Container (Not included) -
Page 8: Using The Home Bar
Using the Home Bar. Positioning the Home Bar Place the Home Bar in an open, uncluttered area in your kitchen or bar area. Leave at least 2 inches (5 centimeters) around the appliance from any wall. Filling the water tank Always remove the water tank from the Home Bar when filling with ice or water. -
Page 9: Making A Drink
Using the Home Bar. Making a drink Fill the water tank as instructed by the display with ice and water. Lift the handle on the Pod door to reveal the Pod basket. 12 o’clock Place a Drinkworks Pod in the Pod basket. Make sure the Pod is fully inserted, with the bar code on the Pod label at a 12 o’clock position (i.e., away from you). - Page 10 Close the Pod door by pulling the handle down. Wait for the Home Bar to recognize your drink and prepare the recipe. Place the appropriate size of glass underneath the tap on top of the drip tray. The display will alert you to the correct size of glass to use based on the drink you have selected.
- Page 11 When the recipe is ready, the start button will flash blue. Press START to make a drink. NOTE: If you do not press START within 60 seconds, the light will stop flashing blue. Reload the drink recipe by opening and closing the Pod door. The display will notify you when your drink is ready.
-
Page 12: Getting Connected
Using the Home Bar. Getting connected The Home Bar comes with built-in Bluetooth Low Energy 4.2 technology. This technology allows the Home Bar to communicate with the Drinkworks app about its performance in order to help us improve its function. Once connected to the Drinkworks app, you will have a choice to opt in to share Home Bar data with Drinkworks for these and other purposes described during the opt-in process. -
Page 13: Home Bar Controls
Home Bar controls. Arrows and start button Display Screen Messages appear on the display screen. Follow the prompts on the screen to complete activities. Solid Arrow The touch arrow buttons appear on either side of the display. Use them to move backward and forward through options. Blinking Arrow Touch a blinking arrow button to continue to the next step. -
Page 14: Home Bar Care And Cleaning
Home Bar care and cleaning. Cleaning the exterior Keep the Home Bar looking its best by cleaning the exterior after making drinks. Wipe down the surface with a clean, moist, lint-free, non-abrasive cloth. Never immerse the Home Bar in water or other liquids. - Page 15 Cleaning the water tank The water tank and its lid should be periodically inspected and cleaned. Neither part should be cleaned in the dishwasher but rather with a damp, soapy, lint-free, non-abrasive cloth. Rinse the water tank thoroughly so that no cleaners or cleaning solutions remain in the tank, as they may contaminate the water supply in the Home Bar.
-
Page 16: Start Button Indicators
Start button indicators. Use the guide below to determine what the colored ring around the start button says about the Home Bar’s status. Unlit The Home Bar is off or in standby mode. To wake up from standby mode, simply press START or lift the handle on the Pod door. Solid Blue The Home Bar is working. -
Page 17: Troubleshooting
Troubleshooting. What do I do if... The Home Bar does not recognize a Pod? If the Home Bar fails to recognize your authentic Drinkworks Pod, open the Pod door and re-insert the Pod. Make sure the bar code is at a 12 o’clock position. After two failed attempts to determine the type of Drinkworks Pod you selected, the Home Bar will enter an override state. -
Page 18: Helpful Hints
Helpful hints. Plug the Home Bar directly into a Use bottled or filtered water grounded outlet Water quality varies from place to place. If you notice an undesirable taste in your If the electric circuit is overloaded with drinks (such as chlorine or other mineral other appliances, the Home Bar may not tastes), try using bottled water or water from function properly. - Page 19 Bedford Systems LLC. ® All third-party trademarks or logos referenced in this guide are the property of their respective owners. KEURIG is a trademark of Keurig Green Mountain, Inc., used under license. ® © 2021 Bedford Systems LLC...
Need help?
Do you have a question about the Drinkworks Home Bar and is the answer not in the manual?
Questions and answers