Table of Contents
Advertisement
Quick Links
Advertisement
Table of Contents

Related Manuals for CreativeStar JXG-213-F

Summary of Contents for CreativeStar JXG-213-F
- Page 1 Visual Intercom Face Recognition Terminal Quick Guide V1.0.6...
-
Page 2: Table Of Contents
Contents 1 Product Overview ..................1 2 Device Installation ..................2 3 Local Configurations ..................3 3.1 Initial Interface ....................3 3.2 Main Interface ....................4 3.3 Activation Config ................... 5 3.3.1 Adding Personnel Information ............6 3.3.2 Changing Activation Password ............8 3.3.3 Configuring Authentication Scene ............ - Page 3 Disclaimer and Safety Warnings ................ 26...
-
Page 4: Product Overview
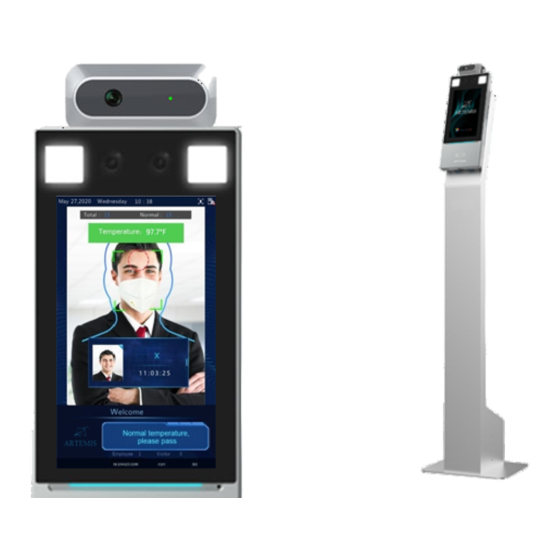
Product Overview The visual intercom face recognition terminal ("the face recognition terminal" for short) is a face recognition access control product featuring high performance and high reliability. The face recognition technology is perfectly integrated into the access control device, which relies on deep learning algorithm, to support face authentication to open the door and achieve precise control of human. -
Page 5: Device Installation
Parameters Description Mask Detection Door Opening Method Face, Password, QR code, Card Communication Mode 10/100Mbps adaptive network port Card Type Mifare 1 Card User Management Support user library addition, deletion, update Record Management Support local recording and real-time upload LAN×1, Wiegand Input×1, Wiegand Output×1, RS485×1, Alarm Input×2, Alarm Output×1, Interface USB2.0×1, Lock×1, Door Contact ×1, Exit... -
Page 6: Local Configurations
Guide. Local Configurations 3.1 Initial Interface When the face recognition terminal is used for the first time or is restored to default factory settings, you need to set the activation password, which is used to log in to the Activation Configuration interface. The activation password must contain at least eight characters (including at least two of the following types: upper case letters, lower case letters, digits, underscores, and hyphens). -
Page 7: Main Interface
3.2 Main Interface After you configure the activation password, the main interface of the visual intercom face recognition terminal displays. -
Page 8: Activation Config
Measure Forehead Temperature Measure Wrist Temperature Tips: As shown in the figures above, the numbers in highlighted in the red circles indicate temperatures. If you see these numbers, it means that the forehead temperature measurement module or the wrist temperature measurement module has been connected successfully and working normally. -
Page 9: Adding Personnel Information
3.3.1 Adding Personnel Information 1. On the Activation Config interface, tap to go to the User Management interface. 2. Configure personnel information by referring to the table below. Parameter Description and Parameter Remarks Configuration Mandatory. Name Enter the name of a person. - Page 10 Enter the gender of the person. Gender Select Male or Female from the drop- down list. The default value is Male. Enter the card No. of the person. At least one of the Card No. After successful input, the person can parameters needs swipe the card for access.
-
Page 11: Changing Activation Password
3) On the photo confirmation interface, tap to confirm the photo. 4. On the User Management interface, tap Save to save the personnel information. 3.3.2 Changing Activation Password 1. On the Activation Config interface, tap to go to the Activation Password interface. -
Page 12: Configuring Authentication Scene
3.3.3 Configuring Authentication Scene This interface allows you to configure terminal authentication scenes, temperature measurement range, temperature alarm value, and other data. 1. On the Activation Config interface, tap to go to the Authentication Scene interface. 2. Change the authentication method by selecting the radio button, as required. 3. -
Page 13: Device Maintenance
(113°F). 6. Set the Temperature Alarm Threshold, if required. By default, this field is set to 37.3°C per medical recommendations. If you change the temperature unit to Fahrenheit, it will change to 99.1°F automatically. 7. Tap Save to save the changes. 3.3.4 Device Maintenance On the Device Maintenance interface, you can restart the visual intercom face recognition terminal and restore it to default factory settings. -
Page 14: Device Operations
activation password will be restored to default configuration. • First tap , then tap Default, On the pop-up window, tap OK. All parameters will be restored to default factory settings. 3.4 Device Operations When measuring forehead temperature, a person needs to get close to the device, to fit the human shape on the screen and aim the forehead center at the red circle. -
Page 15: Web Configurations
Web Configurations You can manage and maintain the visual intercom face recognition terminal using the Web browser. It is recommended to use the Internet Explorer 10.0 running on a Windows 7.0 or Windows 10.0 Operating System. By default, the device static IP address is 192.168.1.13. If you have changed the IP address, please use the actual IP address. -
Page 16: Synchronizing Time
4.3 Synchronizing Time In most cases, it is recommended that you synchronize the device time with the computer time. 1. Go to Setup > Common > Time. 2. From the Sync Mode drop-down list, select Sync with System Configuration. 3. From the Time Zone drop-down list, select your time zone. 4. -
Page 17: Configuring Audio
1. Go to Setup > Common > User. 2. Follow the steps shown in the figure below to add a common user. Note: To edit the password of a user, including the admin account of yourself, from the user list, select the user to be edited, click Edit. 4.5 Configuring Audio On the Audio page, you can turn on or off the device audio, and also adjust the volume of the device audio. -
Page 18: Turning Off Device Lights In Darkness
box or dragging the slider. 5. Click Save. 4.6 Turning Off Device Lights in Darkness By default, the device lights will always be turned on in darkness as a supplement light for face recognition. You can perform the following steps to turn off the lights. Before you start, please make sure the Smart Illumination is turned on in the Setup >... -
Page 19: Configuring Ftp Server
3. Select the On radio button for the Energy Saving Illumination field. 4. In the Effective after Device Idle For field, set the time to enter the energy saving mode. E.g., 1 minute, the screen will be off one minute after a detecting a face. 5. -
Page 20: Configuring Osd Parameters
4. Go to Setup > Storage > FTP > Smart. Note: The General tab is not applicable to this device and will be removed. Any settings on the General tab have no impact to settings on the Smart tab. 5. In the Server Parameters section, enter the Server IP, Port, Username, and Password, as required. -
Page 21: Configuring Check Templates
Note: After you have set the position and OSD content, the symbol appears in the Status column, which means that the OSD is set successfully. You may set multiple lines of contents for each area and use to adjust the display sequence. -
Page 22: Adding Personnel Information To Face Libraries
• Set the authentication mode for each time range in a week based on actual conditions. There are four authentication modes available: o IC Card: People will need to swipe a card with valid card number to open the door. o Face: People will need to pass face authentication to open the door. - Page 23 2. On the personnel list bar, click Add. The Add Face Info interface displays.
-
Page 24: Importing Personnel Information In Batch
3. On the Add Face Info interface, complete person information as required. 4. Click OK. 4.10.2 Importing Personnel Information in Batch 1. Go to Setup > Intelligent > Face Library and select the face library to which persons are to be added. E.g., DefaultEmployeeLib. 2. -
Page 25: Advanced Settings
Note: If information about a person fails to be imported, check the failure reason in the description column, modify information and then import the person information again. 4.11 Advanced Settings On the Advanced Setting page, you can set parameters like Door Opening Mode, Mask Detection, Temperature Measurement Unit, Alarm Temperature Threshold etc. -
Page 26: Maintenance Configurations
4.12 Maintenance Configurations 4.12.1 Restoring Default Factory Settings Where necessary, for example, after you upgrade the firmware, you can restore the device to default settings on the Maintenance page. 1. Go to Setup > System > Maintenance. -
Page 27: Upgrading The Firmware
2. In the Config Management section: • When Default is clicked, all parameters are restored to default factory settings, except the administrator login password, network port parameters, system time, admin password, and activation password. • If the Restore all settings to defaults without keeping current network and user settings checkbox is selected, when Default is clicked, all parameters are restored to default factory settings. - Page 28 encounters malfunctions, you can export diagnosis information and send it to technical support for troubleshooting. 1. Go to Setup > System > Maintenance. 2. Click Export. In the displayed dialog box, select the local directory for storing the information. Note: By selecting the Collect Image Debugging Info checkbox, you can display video with debugging information at the same time, which makes troubleshooting easier.
- Page 29 Disclaimer and Safety Warnings Copyright Statement No part of this manual may be copied, reproduced, translated or distributed in any form by any means without prior content in writing from our company (referred to as us hereafter). The product described in this manual may contain proprietary software owned by our company and its possible licensors.
- Page 30 l Our company reserves the right to change any information in this manual without any prior notice or indication. Due to such reasons as product version upgrade or regulatory requirement of relevant regions, this manual will be periodically updated. Disclaimer of Liability l To the extent allowed by applicable law, in no event will our company be liable for any special, incidental, indirect, consequential damages, nor for any loss of profits, data, and documents.
- Page 31 l Keep firmware up to date: It is recommended that your device is always upgraded to the latest version for the latest functions and better security. Visit our official website or contact your local dealer for the latest firmware. The following are recommendations for enhancing network security of your device: l Change password regularly: Change your device password on a regular basis and keep the password safe.
- Page 32 l Store or use the device in a proper environment that meets environmental requirements, including and not limited to, temperature, humidity, dust, corrosive gases, electromagnetic radiation, etc. l Make sure the device is securely installed or placed on a flat surface to prevent falling. l Unless otherwise specified, do not stack devices.
- Page 33 Ø Pression d’air extrêmement basse, ou pression d’air basse à haute altitude. Ø Remplacement de la batterie. l Utilisez la batterie correctement. Mauvaise utilisation de la batterie comme celles mentionnées ici, peut entraîner des risques d’incendie, d’explosion ou de fuite liquide de gaz inflammables.
- Page 34 www.cssinco.com support@cssinco.com...
Need help?
Do you have a question about the JXG-213-F and is the answer not in the manual?
Questions and answers