
Related Manuals for ZKaccess TF1700


Summary of Contents for ZKaccess TF1700
- Page 1 Installation Guide TF1700 Standalone Outdoor Fingerprint Reader Controller & ZKAccess Classic software 3.5 ZKAccess.com...
-
Page 2: What' S In The Box
TF1700 Installation Template Rubber Gasket Back Plate AC Power Adapter Network Cable USB Cable Adaptor Cables ZKAccess Security Management Software ZKAccess Software Diode 4 Large Screws & Anchors, Screwdriver 2 Small screws TF1700 & ZKAccess CLASSIC 3.5 software INSTALLATION GUIDE... -
Page 3: Table Of Contents
Installation with Third Party Panels ......C3 Conroller Panel Connection ........... inBIO Conroller Panel Connection ........How Does TF1700 work ..........Troubleshooting ..............How to Place a Finger on Scanner ......Electrical Specifications ..........Specifications ................ TF1700 & ZKAccess CLASSIC 3.5 software INSTALLATION GUIDE... -
Page 4: Optional Accessories
Optional accessories Wiegand Card Reader Prox Card FR1200 FP Reader K1-1 Exit Button TF1700 & ZKAccess CLASSIC 3.5 software INSTALLATION GUIDE... -
Page 5: Safety Precautions
Clean the device often to remove dust on it. In cleaning, do not splash water on the device but wipe it out with smooth cloth or towel. Contact your supplier in case of a problem. TF1700 & ZKAccess CLASSIC 3.5 software INSTALLATION GUIDE... -
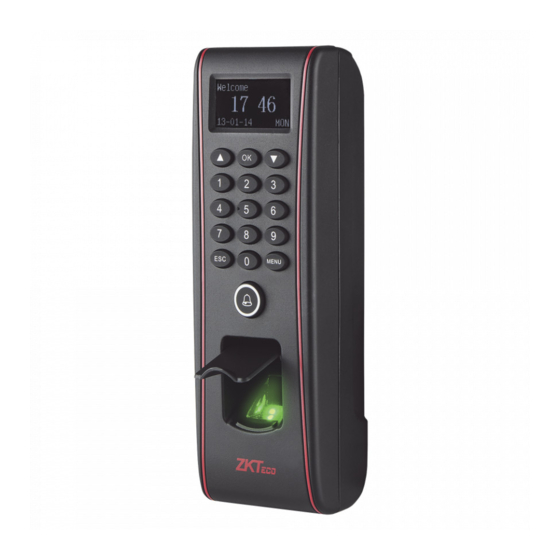
Page 6: Product Pin Diagram
Product PIN Diagram OLED Display 3x5 Keypad USB Host Reset Switch Door Bell & LED Indicator Area ZK Optical Sensor Star-shaped screw hole for fixing reader to the back plate TF1700 & ZKAccess CLASSIC 3.5 software INSTALLATION GUIDE... - Page 7 Operating Environment Temperature: 0ºC-45ºC 6 9 3 7 0 2 2 6 2008 CE FC RoHS ISO9000 : Bell LOCK Alarm Ethernet Reader WG-Out Power RJ 45 Ethernet Bell LOCK Alarm Ethernet Reader WG-Out Power TF1700 & ZKAccess CLASSIC 3.5 software INSTALLATION GUIDE...
-
Page 8: Product Dimension
Product Dimension 6.125in 7.28in (153mm) (185mm) 2.46in 1.63in (62.5mm) (41.5mm) (51mm) TF1700 & ZKAccess CLASSIC 3.5 software INSTALLATION GUIDE... -
Page 9: Cables And Connectors
Blue 5 485- Yellow PIN DESCRIPTION WIRE 1 RJ45-1 Yellow • 2 RJ45-2 Green TCP/IP 3 RJ45-3 4 RJ45-6 Black PIN DESCRIPTION WIRE • 1 12V DC Power In 2 GND Black TF1700 & ZKAccess CLASSIC 3.5 software INSTALLATION GUIDE... -
Page 10: Mounting The Reader On The Wall
We recommend drilling the mounting plate screws into solid wood (i.e. stud/beam). If a stud/beam cannot be found, then use the supplied drywall plastic mollies (anchors). Inserting Reader to backplate Use star-shaped screw to mount it TF1700 & ZKAccess CLASSIC 3.5 software INSTALLATION GUIDE... -
Page 11: Power Connection
Ethernet Reader WG-Out Power Recommended power supply • Regulated 12V DC, 1A. • Comply with standard IEC/EN 60950-1. • To share the power with other devices, use a power supply with higher current ratings TF1700 & ZKAccess CLASSIC 3.5 software INSTALLATION GUIDE... -
Page 12: Rs485 Connection
1 2 3 4 5 6 7 8 1 2 3 4 5 6 7 8 RS485 + AUXOUT1 AUXOUT2 AUXOUT3 AUXOUT1 AUXOUT4 AUXOUT2 LOCK1 AUXOUT3 AUXOUT4 LOCK2 AUXOUT1 LOCK AUXO #1TF1700 #2 TF1700 #63TF1700 TF1700 & ZKAccess CLASSIC 3.5 software INSTALLATION GUIDE... -
Page 13: Fr1200 Connection
There are six DIP switches on the back of FR1200, Switches 1-4 is for RS485 ad- dress , switch 5 is reserved , switch 6 is for reducing noise on long RS485 cable. If FR1200 is powered from TF1700 terminal ,the length of wire should be less than 100 meters or 330 ft. -
Page 14: Lock Relay Connection
Power Supply DC 12V == 3A Operating Environment Temperature: 0ºC-45ºC 6 9 3 7 0 2 2 6 ISO9000 : 2008 CE FC RoHS Bell LOCK Alarm Ethernet Reader WG-Out Power 12VDC FR107 Diode TF1700 & ZKAccess CLASSIC 3.5 software INSTALLATION GUIDE... -
Page 15: Normall Close Lock
Power Supply DC 12V == 3A Operating Environment Temperature: 0ºC-45ºC 6 9 3 7 0 2 2 6 ISO9000 : 2008 CE FC RoHS Bell LOCK Alarm Ethernet Reader WG-Out Power 12VDC FR107 Diode TF1700 & ZKAccess CLASSIC 3.5 software INSTALLATION GUIDE... -
Page 16: Aux. Input Connection
Power Supply DC 12V == 3A Operating Environment Temperature: 0ºC-45ºC 6 9 3 7 0 2 2 6 ISO9000 : 2008 CE FC RoHS Bell LOCK Alarm Ethernet Reader WG-Out Power Sensor No Touch EXIT TF1700 & ZKAccess CLASSIC 3.5 software INSTALLATION GUIDE... -
Page 17: Aux. Output Connection
Power Supply DC 12V == 3A Operating Environment Temperature: 0ºC-45ºC 6 9 3 7 0 2 2 6 ISO9000 : 2008 CE FC RoHS Bell LOCK Alarm Ethernet Reader WG-Out Power ALARM TF1700 & ZKAccess CLASSIC 3.5 software INSTALLATION GUIDE... -
Page 18: Door Bell Button Connection
SBTS Registered No: H0201 Power Supply DC 12V == 3A Operating Environment Temperature: 0ºC-45ºC 6 9 3 7 0 2 2 6 ISO9000 : 2008 CE FC RoHS Bell LOCK Alarm Ethernet Reader WG-Out Power TF1700 & ZKAccess CLASSIC 3.5 software INSTALLATION GUIDE... -
Page 19: Weigand Input Connection
SBTS Registered No: H0201 Power Supply DC 12V == 3A Operating Environment Temperature: 0ºC-45ºC 6 9 3 7 0 2 2 6 ISO9000 : 2008 CE FC RoHS Bell LOCK Alarm Ethernet Reader WG-Out Power TF1700 & ZKAccess CLASSIC 3.5 software INSTALLATION GUIDE... -
Page 20: Weigand Output Connection
Power Supply DC 12V == 3A GLED GLED Operating Environment Temperature: 0ºC-45ºC 6 9 3 7 0 2 2 6 2008 CE FC RoHS ISO9000 : Bell LOCK Alarm Ethernet Reader WG-Out Power +12V +12V TF1700 TF1700 & ZKAccess CLASSIC 3.5 software INSTALLATION GUIDE... -
Page 21: Standalone Installation
Standalone Installation FR1200 Connection RS485 TCP/IP RS232/485 Converter Switch ALARM Sensor No Touch EXIT Lock Exit Button TF 1700 TF1700 & ZKAccess CLASSIC 3.5 software INSTALLATION GUIDE... -
Page 22: Installation With Third Party Panels
BUTTON READER 2 BUTTON READER 1 BUTTON READER 2 1 2 3 4 5 6 7 8 AUXOUT1 AUXOUT2 AUXOUT3 AUXOUT4 LOCK1 LOCK2 LOCK3 LOCK4 LOCK POWER TCP/IP RS485 Switch RS232/485 Converter TF1700 & ZKAccess CLASSIC 3.5 software INSTALLATION GUIDE... -
Page 23: Inbio Conroller Panel Connection
A d v a nced A c c es s Con tr ol SWITCH SWITCH AUXOUT1 AUXOUT1 AUXOUT2 AUXOUT2 AUXOUT3 AUXOUT3 AUXOUT4 AUXOUT4 LOCK1 LOCK1 LOCK2 LOCK2 LOCK3 LOCK3 LOCK4 LOCK4 LOCK LOCK POWER POWER TCP/IP RS485 Switch RS232/485 Converter TF1700 & ZKAccess CLASSIC 3.5 software INSTALLATION GUIDE... -
Page 24: How Does Tf1700 Work
How Does TF1700 Work Fingerprint must be registered first by any finger print reader Fingerprint Database Identification Finger Registration Event Log Stored Verification failed Please try again ! Verification Granted Thank You Door Opens TF1700 & ZKAccess CLASSIC 3.5 software INSTALLATION GUIDE... -
Page 25: Troubleshooting
4. Why device display “system broken“ and the alarm is ringing. › Check whether the device and back plate are securely connected to each other. If not, a tamper switch is activated which triggers the alarm and keeps it ringing. TF1700 & ZKAccess CLASSIC 3.5 software INSTALLATION GUIDE... -
Page 26: How To Place A Finger On Scanner
• Place a finger such that the bottom end of a nail is located at the center of a sensor. TF1700 & ZKAccess CLASSIC 3.5 software INSTALLATION GUIDE... - Page 27 Try another finger if a finger is not easy to enroll due to scar or cuts. • In case of an enrolled fingerprint cannot be used due to injury or if the hand is full, it is recommended to enroll more than two fingers per user. TF1700 & ZKAccess CLASSIC 3.5 software INSTALLATION GUIDE...
-
Page 28: Electrical Specifications
13.5 Current (mA) TTL/WIEGAND OUTPUT The outputs ports are open drain type, Pull- up resistance (Ω) 4.7K pulled up with 4.7k resistors internally ZK ELECTRONIC LOCK Voltage (V) 10.8 13.2 Current (mA) TF1700 & ZKAccess CLASSIC 3.5 software INSTALLATION GUIDE... -
Page 29: Specifications
12V DC, 3A Access control interfaces Electric lock, alarm, exit button, wired door bell Dimension W: 62.5x H: 185x D: 41.5mm ( W: 3 1/8 “x H: 7 1/4” x D: 1 5/8“) Certified TF1700 & ZKAccess CLASSIC 3.5 software INSTALLATION GUIDE... - Page 30 Creating Departments/Enrolling Personnel Importing Personnel Data from Device ..... Exporting Personnel Data to Device ..... Door Settings ................. Real Time Monitoring ............Exporting Reports ............... Passage Mode ................ First-Card Normal Open ..........TF1700 & ZKAccess CLASSIC 3.5 software INSTALLATION GUIDE...
-
Page 31: Downloading
If you do not have software to extract compressed files, Scroll up on the same page to find download Winrar 32 Winrar 64 Extract Files to a Setup Folder Open the setup folder and run to install setup.exe TF1700 & ZKAccess CLASSIC 3.5 software INSTALLATION GUIDE... -
Page 32: Installation
Installation Click until asked to choose a path for storing backup files Next Click , now click Browse Make New Folder Click and then Next Install TF1700 & ZKAccess CLASSIC 3.5 software INSTALLATION GUIDE... -
Page 33: Adding An Area
Area Name Area ID [1] Click Area Click Input the Area Name, Area Code (Unique ID number up to 8 digit) Choose a Parent Area from the dropdown menu Click TF1700 & ZKAccess CLASSIC 3.5 software INSTALLATION GUIDE... -
Page 34: Adding A Device
Adding a Device To add a standalone device: Click Device Click Input a Device Name For Access Control Panel Type, select [Standalone SDK Machine] Choose an Area Input the device’s IP Address Click TF1700 & ZKAccess CLASSIC 3.5 software INSTALLATION GUIDE... -
Page 35: To Add An Access Control Panel
Search Access Control Panels Ethernet and RS485 search. Click , and it will prompt [Please wait……]; Search Click the device you wish to add. Click Add Device Input a device name, type, and area. Click TF1700 & ZKAccess CLASSIC 3.5 software INSTALLATION GUIDE... -
Page 36: Creating A Time Zone
> to enter Add access levels edit interface; Access levels Input a Time Zone Name Click and drag in each day’s frame to set up to three intervals per day or holiday TF1700 & ZKAccess CLASSIC 3.5 software INSTALLATION GUIDE... -
Page 37: Creating An Access Level
Access levels means in a specific time period, which door or door combination can be opened through verification Click > Access levels Set the access level name, time zone, doors, and personnel that will have access. Click to complete setting and quit TF1700 & ZKAccess CLASSIC 3.5 software INSTALLATION GUIDE... -
Page 38: Creating Departments/Enrolling Personnel
Creating Departmets Click > to create Departments. Department Input department name and de- partment number. Choose parent department. Then click Enrolling Personnel Click > to show personnel profile edit interface Personnel TF1700 & ZKAccess CLASSIC 3.5 software INSTALLATION GUIDE... - Page 39 Select a finger and press on the sensor three times. When you see “Succeed in fingerprint registration” Click (Optional) Register employee as Administrator through [Terminal Management] Click the tab choose the user’s Access Level. Click Alternative Access Levels TF1700 & ZKAccess CLASSIC 3.5 software INSTALLATION GUIDE...
-
Page 40: Importing Personnel Data From Device
Importing Personnel Data from Device Click . Choose a device to import personnel from. Device to import from device Get Personnel Data From Device Choose Personnel, Fingerprints, or Face Templates to download, click TF1700 & ZKAccess CLASSIC 3.5 software INSTALLATION GUIDE... -
Page 41: Exporting Personnel Data To Device
Edit Add the personnel and device to an access level. Click Go to , choose a device Device to export the personnel to, and click Sync All Data To Device Click Synchronize TF1700 & ZKAccess CLASSIC 3.5 software INSTALLATION GUIDE... -
Page 42: Door Settings
, select the door to be modified, click Door Setting Edit Set the verification mode desired for the door. (Optional) Modify the Door’s name, active time zone, passage mode, sensor type, lock open duration, and duress settings. TF1700 & ZKAccess CLASSIC 3.5 software INSTALLATION GUIDE... -
Page 43: Real Time Monitoring
Real-Time Monitoring Right click on the door icon to remote open/close. Choose door open time or Enable Intraday Passage Mode Choose close door or Disable Intraday Passage Mode TF1700 & ZKAccess CLASSIC 3.5 software INSTALLATION GUIDE... -
Page 44: Exporting Reports
Exporting Reports Click to access transaction logs Reports Set filters to examine desired transactions, click Search Click to export reports in XLS, PDF, or TXT file format Export TF1700 & ZKAccess CLASSIC 3.5 software INSTALLATION GUIDE... -
Page 45: Passage Mode
Create a new Time Zone with the hours you want the door to be unlocked. In Door Settings, Click Edit to change door settings. Click the dropdown menu titled “Door Passage Mode Time Zone” and select your new time zone TF1700 & ZKAccess CLASSIC 3.5 software INSTALLATION GUIDE... -
Page 46: First-Card Normal Open
Add Personnel Select Personnel and use the arrow buttons to move them to the Selected personnel panel. Click Design and Specifications subject to change without notice. © 2015 ZKTeco and its subsidiaries. TF1700 & ZKAccess CLASSIC 3.5 software INSTALLATION GUIDE... - Page 47 TF1700 & ZKAccess CLASSIC 3.5 software INSTALLATION GUIDE...
- Page 48 ZKAccess - a division of ZKTeco...
Need help?
Do you have a question about the TF1700 and is the answer not in the manual?
Questions and answers