
Related Manuals for Güttler GreenMaster 600


Summary of Contents for Güttler GreenMaster 600
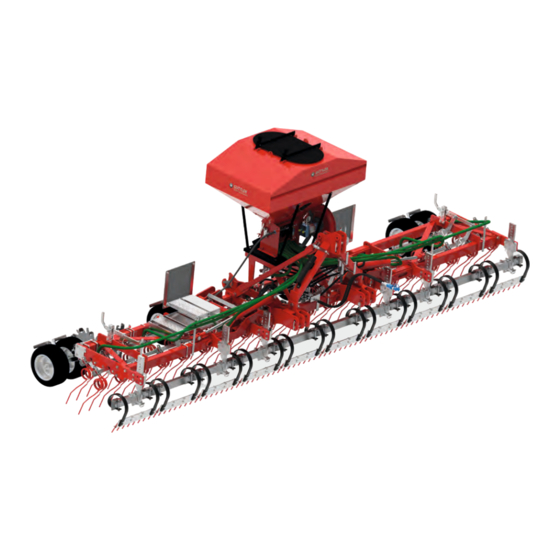
- Page 1 Instruction manual GRASSLAND MAINTENANCE GreenMaster 600 750 800 GreenMaster 450 600 Alpin GreenMaster 600 TINE SEED...
-
Page 2: Table Of Contents
INSTRUCTION MANUAL | GreenMaster Table of contents EC Declaration of conformity EG-Konformitätserklärung Pneumatikstreuer EPS 5 Safety regulations General information Safety symbols Three-point kinematics Operation of the machine Setting of the machine (with levelling bar) Setting of the machine (with Ripperboard) Setting of the machine (with front linkage Alpin 440 600) Setting of the machine (drive shaft) TINE SEED... - Page 3 INSTRUCTION MANUAL | GreenMaster EG-Konformitätserklärung...
-
Page 4: Safety Regulations
INSTRUCTION MANUAL | GreenMaster Safety regulations Foreword Handling material defects These instructions will help you in getting to know your Although the greatest care is exercised during produc- machine and in using it optimally for its intended purpose. tion and assembly of this machine, material damages or defects can never be completely ruled out. - Page 5 INSTRUCTION MANUAL | GreenMaster Safety regulations Intended use Authorised users The machine is constructed using the latest technologies Only persons have been commissioned and in accordance with the relevant recognised safety instructed by the operator may work on the machine. The regulations.
- Page 6 INSTRUCTION MANUAL | GreenMaster Safety regulations Operational safety Clean the entire machine before driving on the public road from soil that has been picked up. Read all safety instructions contained in this instruction Riding on the machine is strictly forbidden. manual and all warning labels attached to the machine.
-
Page 7: General Information
INSTRUCTION MANUAL | GreenMaster General information • Hydraulics Check the transport lock for function. Mount the trans- port lock and secure it. Disconnect the hydraulic lines. The hydraulic system is under high pressure. Any damage • Disconnect the plug for the lights. must be repaired without delay! •... - Page 8 INSTRUCTION MANUAL | GreenMaster General information Maintenance Retightening of screw connections For maintenance work, park the machine on a stable and All screw connections must be controlled and, if necessary, level ground. Secure it for to prevent a rolling away and an retightened after every use of the machine or every 50 accidentally falling.
-
Page 9: Safety Symbols
INSTRUCTION MANUAL | GreenMaster Safety symbols Safety symbols Symbol Meaning Symbol Meaning Turn off the tractor before carrying out any repairs or During operation and while maintenance. coupling and uncoupling the tractor, it is forbidden to stand Before operating the machine, in the area between the tractor read and take account of the and the machine! -
Page 10: Three-Point Kinematics
INSTRUCTION MANUAL | GreenMaster Three-point kinematics Three-point kinematics This guarantees that no tractor weight is transferred to the When coupling machines with a three-point hitch, you machine and avoids damage caused by overloading. Thus need to pay attention to the ideal pull point, the imaginary the tractor can work with its whole traction and lowest fuel intersection point of the upper link and the lower links. -
Page 11: Operation Of The Machine
INSTRUCTION MANUAL | GreenMaster Operation of the machine Operation of the machine Coupling a trailed roller The GreenMaster harrow is ideally suited for the mo- It is possible to connect a Master or Mayor the the Green- dern maintenance of pastureland. With its tines it combs Master harrow. -
Page 12: Setting Of The Machine (With Levelling Bar)
INSTRUCTION MANUAL | GreenMaster Setting of the machine (with levelling bar) 1. Adjusting the inclination of the tines: Adjust the inclination of the tines by moving the adjus- 5. Adjustment of the levelling bar ment lever to the rear and lock it behind the vertical Adjust the working depth with the lever and fix it with adjustment frame. -
Page 13: Setting Of The Machine (With Ripperboard)
INSTRUCTION MANUAL | GreenMaster Setting of the machine (with Ripperboard) HarroFlex 250 mit Ripperboard 1. Adjusting the inclination of the tines: Adjust the inclination of the tines by moving the adjus- ment lever to the rear and lock ist behind the vertical adjustment frame. -
Page 14: Setting Of The Machine (Drive Shaft)
INSTRUCTION MANUAL | GreenMaster Setting of the machine (with front linkage Alpin 440 600) Adjustment of the levelling bar and Ripperboard 4. Adjustment of the stands with self steering: Place the levelling bar and the Ripperboard uppermost For the adjustment of the levelling bar and the Ripper- and adjust the harrow tines to the desired inclination. - Page 15 INSTRUCTION MANUAL | GreenMaster Setting of the mashine (drive shaft) Adjustment - only by the specialist workshop Before the first start-up of the drive shaft: For securing, place the demounted drive shaft on the hol- der provided for this purpose, do not use the chains for to If necessary the the length of the drive shaft must be ad- suspend the drive shaft.
-
Page 16: Tine Seed
INSTRUCTION MANUAL | GreenMaster TINE SEED GreenMaster 600 TINE SEED NonStop double tines with seed tube Check the seed tubes regularly and before each sowing • Blower pressure not under 80 bar, better 100 bar. for tight fit, blockages and damage! •... -
Page 17: Coupling Kit
INSTRUCTION MANUAL | GreenMaster Coupling kit Coupling kit STANDARD for trailed rollers with Cat. 2 connection The hydraulic connections and the lighting cable of the trailed rollers Mayor or Master are coupled directly to the GreenMaster.. Required hydraulic connections: • 1x da for common pivoting GreenMaster harrow and trailed roller •... -
Page 18: Hydraulic Connections
INSTRUCTION MANUAL | GreenMaster Hydraulic connections Always pay attention to the correct connection of the hydraulic lines! When connecting the hydraulic lines, the hydraulic system must be depressurised on both at the tractor and at the machine! Unfolding the roller Folding the roller Roller transport wheels Roller transport... -
Page 19: Calibration Test (Eps 5)
INSTRUCTION MANUAL | GreenMaster Calibration test (EPS 5) A calibration test is always required when the exact application rate should be determined. Proceed as follows: 1. Release the cover of the seeder. 5. Calibration bag. 2. Take off the cover. 6. -
Page 20: Working With The Machine
INSTRUCTION MANUAL | GreenMaster Working with the machine Setting the seed quantity Attention: The higher the distance between dosing roller and Set the seed quantity with the lever on the left. scraper, the more differs the actual seed quantity from the calibrated quantity. -
Page 21: Calibration Table
INSTRUCTION MANUAL | GreenMaster Calibration table During sowing, the cover must be closed hermetical Working width in metre Revolution of the wheel for 1 are 15 ¾ 11 ¾ 9 ½ 8 ¾ Calibration: Changing the dosing roller: First, set the seed scraper above the dosing roller to the Remove the cover of the dosing roller on the right of the right grain size (1/2 grain size: rape 0 - 1 mm, grass the tank. - Page 22 INSTRUCTION MANUAL | GreenMaster Sawing table...
- Page 23 INSTRUCTION MANUAL | GreenMaster Dosing roller 8R2B optional equipment for huge quantities and volumes e.g. grass seed with more than 100 kg/ha e.g. cereals up to 6 metres widths and 180 kg/ha. Hydraulic fan drive is required! 8R3S standard equipment for grass seed up to Master 820 for cereals up to 3 metres widths (up to 120 kg/ha) max quantity for grass seed: 3 m approx.
-
Page 24: Important Information
INSTRUCTION MANUAL | GreenMaster Important information Airtightness The system transports the seeds with air through the hoses. If a significant amount of air escapes due to leakages, the output decreases considerably. The tank cover is hermetically sealed with a rubber seal. If the seal is damaged, air can escape from the system. - Page 25 INSTRUCTION MANUAL | GreenMaster Area counter Symbol Display flashes, when the area counter gets im- pulses from the sensor C-button SET button • switch on (press once) • • forward • change of working width and wheel -> HA1 -> HA2 -> working width circumference ->...
- Page 26 INSTRUCTION MANUAL | GreenMaster Area counter Power supply Installation of the sensor The counter is equipped with 2x 1,5V AA batteries. Attach the sensor with the corresponding flat bar next to the gear. Unscrew the grub screw in the clutch, which is After switching on the computer, the software version is closer to the gear, with the magnetic screw (see picture 2).
-
Page 27: Electric Fan
INSTRUCTION MANUAL | GreenMaster Electric fan In the Krummenacher Seeder EPS 5 a air flow transports When repairing a damaged cable, it is essential to make the seeds from the seeder to the dosing roller and to the sure that the plug is connected correctly.: outlet opening. - Page 28 INSTRUCTION MANUAL | GreenMaster Electric fan...
-
Page 29: Hydraulic Fan
INSTRUCTION MANUAL | GreenMaster Hydraulic fan Hydraulic fan Install the manometer so, that the oil pressure can be read from the tractor seat. The hydraulic blower is connected to the hydraulic circuit Should it not be possible to install visibly the manometre, a of the tractor through quick couplings (flow and pressure- manometer transfer kit is available as an option. - Page 30 Leading in soil structure Long-term efficiency with maximum performance. güttler® Instruction manual GreenMaster 600 750 800 450 600 ALPIN GreenMaster The rollers with the “Golden Hooves” GreenMaster 600 TINE SEED The Original. Since 1978 Canada Company: PMI-Ag Stanstead Québec +1 819 342 5819 info@pmi-ag.ca •...
Need help?
Do you have a question about the GreenMaster 600 and is the answer not in the manual?
Questions and answers