Advertisement
Quick Links
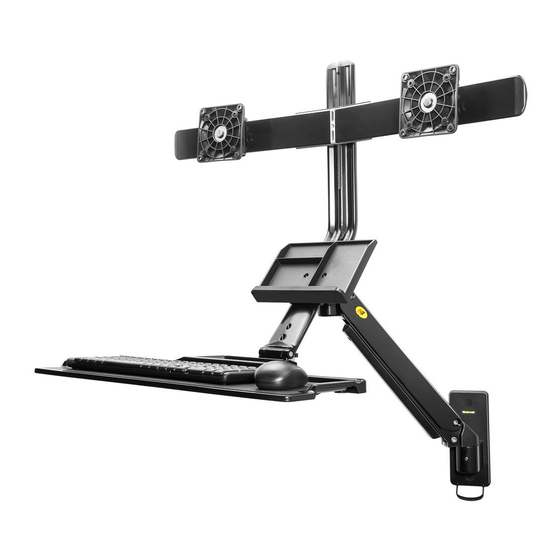
Workstation Wall Mounted
Instruction Manual
MC
27-2A
Fits Most Displays Size:22"~27"
:
Max Load 13.2~26.4
Ibs (6~12kg)
VESA:75×75,100×100mm
Severe personal injury and property damage can result from improper installation or assembly.
Read the following warning carefully before beginning.
● Products must be installed by professional or installer.
● If you do not understand the instructions or have any concerns or questions, please
contact a qualified local installer.
● Do not install or assemble if the product or hardware is damaged or missing, if you
require replacement parts, please contact you local distributor for assistance.
● This product fits most 22"-27" LCD / monitor; maximum weight of LCD / monitor:
12kg / 26.4lbs.
● Installer-friendly and straight forward.
● For safe installation, the desk you are mounting to must support minimum 3 times the
weight of the total load (the mount, the monitor and all accessories weight).
● Do not use this product for other than the original designed.
● This product contain moving parts, please use with caution.
● When installing monitor, please do not damage electrical wiring or power source.
● Installation and routing of monitor cables on the monitor bracket must comply with
electro-technical regulations.
● Importantly, mains- and data-cables must be secured against twisting and squeezing or
shearing.
● The manufacturer will bear no responsibility to the desk of mounting, or incidental
or consequential damages arising thereof.
● The manufacturer disclaims any liability for the modifications, improper installation, or
installation over the specified weight range. The manufacturer will not be liable for any
damages arising out of the use of , or inability to use, the product.
● This product is designed for indoor used only, use of this product outdoor could lead to
product failer and severe personal injury.
▲ This product contains a high pressure gas spring, fire and percussion are prohibited. Also
it is strictly prohibited to dismantle without professionals. Please return to the manufacturer
or hand over to professional agencies if the product is abandoned. In order to ensure
the performance of gas spring, full direction adjustment of the product arm is recommended
several times per month.
Symbols
+
:
Tightening Direction
Torque increased
-
:
loosening Direction
Torque reduced
拧紧方向
定点恒力加大
拧
松
方向
定点恒力减小
+
:
Tightening Direction
Torque increased
-
:
loosening Direction
Torque reduced
拧紧方向
定点恒力加大
拧
松
方向
定点恒力减小
Phillips Screwdriver
By Hand
螺丝起子
用手
Ratchet Wrench
Hex Wrench
套筒扳手
六角扳手
Adjustment
Pencil
调整
铅笔
Optional
Reminder
NOTE
可选
提示
Warning
Hand Drill
警告
手电钻
Remove
Star Wrench
移开
安全扳手
Part List
1
2
3
4
5
6
8
7
9
2x
B
A
B
M4×15mm
M5×12mm
Ф10×
Ф4.5×
4x
4x
D
E
Ф7×70mm
3mm
Ф16×
Ф8.2×
1.5mm
10-70
3x each
3x
1x
A、Full adjustment after installation
26.4"(670mm)max
360°
+10°/-12°
0~
7.5"(
0~
191mm)
180°
0~2.4"(0~60mm)
180°
Max Load:13.2-26.4lbs(6-12kg)
B1.Install wall plate onto
masonry or solid concrete
Step 1.
1.Use wall plate as guide ,mark 3
wall.
2x
Leveler
5
C
Step2.
1.Use hand drill with 10mm drill bit (Not supplied), drill
hole on marked locations with 70mm+ depth.
1.0mm
2.
Take anchors from screw pouch E, insert anchor
4x
into each hole and hammer it until flush with
wall surface.
F
a
5mm
4mm
1x
1x
Step3
1.Take wood screws and washers from pouch D, put one
each washer on wood screw, insert each through 3
wall plate screw holes and into anchor. Use socket
wrench (Not supplied) to tighten top screw first.Check
leveler and tighten the other respectively. Ensure 3
screw are well tightened.
2.Cover up 3 screws by screw caps and you are done.
a
D
B2.Install wall plate onto wood stud
Step 1.
screws location on
1.Use wall plate as guide ,mark 3
wall.
Leveler
Step2.
1.Use hand drill with 4mm drill bit (Not supplied), drill
hole on marked locations with 70mm+ depth.
b
Ф10mm
70mm+
Step3
1.Take wood screws and washers from pouch D, put one
each washer on wood screw, insert each through 3
wall plate screw holes and into drilled hole. Use socket
wrench (Not supplied) to tighten top screw first.
Check leveler and tighten the other respectively.
Ensure 3 screw are well tightened.
2.Cover up 3 screws by screw caps and you are done.
b
NOT SUPPLIED
4001080502
A1
screws location on
Ф4mm
70mm+
a
b
D
NOT SUPPLIED
Advertisement

Related Manuals for North Bayou MC27-2A

Summary of Contents for North Bayou MC27-2A
- Page 1 4001080502 B1.Install wall plate onto Part List B2.Install wall plate onto wood stud masonry or solid concrete Step 1. Step 1. 1.Use wall plate as guide ,mark 3 screws location on 1.Use wall plate as guide ,mark 3 screws location on wall.
- Page 2 C、W orkstation assembly & installation D、Display height adjustment F、Power and display lines installation H、Display rotation 360° Loosen screw but not drop off. Tighten set screw I、Keyboard tray extends adjustment flush with surface. (3mm) (3mm) (3mm) (3mm) Loosen screw but Tighten set screw not drop off.
Need help?
Do you have a question about the MC27-2A and is the answer not in the manual?
Questions and answers