Fujitsu ScanSnap FI-5110C Operator's Manual
Image duplex color scanner
Hide thumbs
Also See for ScanSnap FI-5110C:
- Getting started (27 pages) ,
- Brochure & specs (2 pages) ,
- Datasheet (2 pages)
Table of Contents
Advertisement
CONTENTS
fi-5110C Image Scanner Operator's Guide
P3PC-1082-01EN
INTRODUCTION
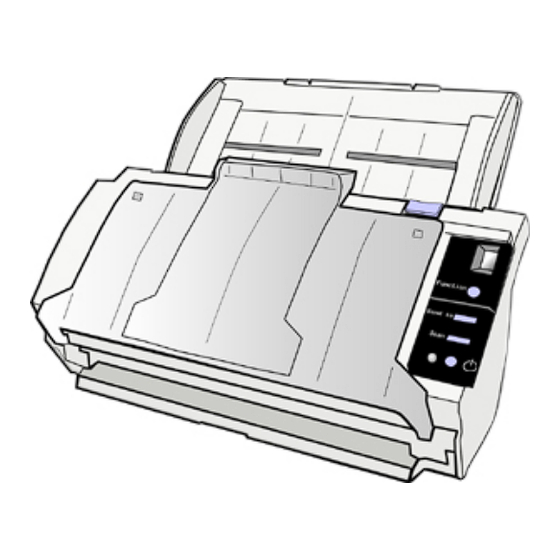
1 NAMES AND FUNCTIONS OF PARTS
2 BASIC SCANNER OPERATIONS
3 SCANNING VARIOUS TYPES OF
DOCUMENTS
4 DAILY CARE
5 REPLACING CONSUMABLES
6 TROUBLESHOOTING
7 DOCUMENT SPECIFICATIONS FOR ADF
8 OPTIONS
9 SCANNER SPECIFICATIONS
Appendix
Advertisement
Chapters
Table of Contents

Related Manuals for Fujitsu ScanSnap FI-5110C


Summary of Contents for Fujitsu ScanSnap FI-5110C
- Page 1 CONTENTS fi-5110C Image Scanner Operator's Guide P3PC-1082-01EN INTRODUCTION 1 NAMES AND FUNCTIONS OF PARTS 2 BASIC SCANNER OPERATIONS 3 SCANNING VARIOUS TYPES OF DOCUMENTS 4 DAILY CARE 5 REPLACING CONSUMABLES 6 TROUBLESHOOTING 7 DOCUMENT SPECIFICATIONS FOR ADF 8 OPTIONS 9 SCANNER SPECIFICATIONS...
- Page 2 Thank you for purchasing the fi-5110C duplex color scanner. This document describes how to handle fi-5110C Duplex Color scanner and basic operation methods. Before you start using fi-5110C Duplex Color scanner, be sure to thoroughly read this manual to ensure the correct use.
- Page 3 INTRODUCTION Regulatory Information Trademarks Note, Liability Preface Safety Precautions 1 NAMES AND FUNCTIONS OF PARTS 2 BASIC SCANNER OPERATIONS 3 SCANNING VARIOUS TYPES OF DOCUMENTS 4 DAILY CARE 5 REPLACING CONSUMABLES 6 TROUBLESHOOTING 7 DOCUMENT SPECIFICATIONS FOR ADF 8 OPTIONS...
- Page 4 INTRODUCTION Regulatory Information Trademarks Note, Liability Preface Safety Precautions 1 NAMES AND FUNCTIONS OF PARTS 2 BASIC SCANNER OPERATIONS 3 SCANNING VARIOUS TYPES OF DOCUMENTS 4 DAILY CARE 5 REPLACING CONSUMABLES 6 TROUBLESHOOTING 7 DOCUMENT SPECIFICATIONS FOR ADF 8 OPTIONS...
- Page 5 Doing the following actions may result in serious personal injuries: Do not put the substance contained in the lamp in your mouth as it has mercury. Do not incinerate, crush, or shred the lamps or scanner parts. Do not breathe the chemical liquid contained in the scanner lamps.
- Page 6 INTRODUCTION Regulatory Information Trademarks Note, Liability Preface Safety Precautions 1 NAMES AND FUNCTIONS OF PARTS 2 BASIC SCANNER OPERATIONS 3 SCANNING VARIOUS TYPES OF DOCUMENTS 4 DAILY CARE 5 REPLACING CONSUMABLES 6 TROUBLESHOOTING 7 DOCUMENT SPECIFICATIONS FOR ADF 8 OPTIONS...
- Page 7 INTRODUCTION Regulatory Information Trademarks Note, Liability Preface Safety Precautions 1 NAMES AND FUNCTIONS OF PARTS 2 BASIC SCANNER OPERATIONS 3 SCANNING VARIOUS TYPES OF DOCUMENTS 4 DAILY CARE 5 REPLACING CONSUMABLES 6 TROUBLESHOOTING 7 DOCUMENT SPECIFICATIONS FOR ADF 8 OPTIONS...
- Page 8 INTRODUCTION Regulatory Information Trademarks Note, Liability Preface Safety Precautions 1 NAMES AND FUNCTIONS OF PARTS 2 BASIC SCANNER OPERATIONS 3 SCANNING VARIOUS TYPES OF DOCUMENTS 4 DAILY CARE 5 REPLACING CONSUMABLES 6 TROUBLESHOOTING 7 DOCUMENT SPECIFICATIONS FOR ADF 8 OPTIONS...
- Page 9 INTRODUCTION Regulatory Information Trademarks Note, Liability Preface Safety Precautions 1 NAMES AND FUNCTIONS OF PARTS 2 BASIC SCANNER OPERATIONS 3 SCANNING VARIOUS TYPES OF DOCUMENTS 4 DAILY CARE 5 REPLACING CONSUMABLES 6 TROUBLESHOOTING 7 DOCUMENT SPECIFICATIONS FOR ADF 8 OPTIONS...
- Page 10 INTRODUCTION Regulatory Information Trademarks Note, Liability Preface Safety Precautions 1 NAMES AND FUNCTIONS OF PARTS 2 BASIC SCANNER OPERATIONS 3 SCANNING VARIOUS TYPES OF DOCUMENTS 4 DAILY CARE 5 REPLACING CONSUMABLES 6 TROUBLESHOOTING 7 DOCUMENT SPECIFICATIONS FOR ADF 8 OPTIONS...
- Page 11 User's Manual of the scanner application you are using. The screenshots in this manual were captured from the FUJITSU TWAIN32 scanner driver, ScandAll 21 Image Capturing Utility Software, FUJITSU ISIS scanner driver, QuickScan TM image capturing software and Adobe®...
- Page 12 Use this scanner only at the indicated power voltage. Do not connect to multiple-power strips. Use this scanner only at the indicated power voltage and current. Improper power voltage and current might cause fire or electric shock. Do not connect to multiple-power strips.
- Page 13 Doing so might cause a fire or electric shock. Turn the scanner OFF if it is damaged. If the scanner is damaged for any reason, turn the scanner off and unplug the power cable. Contact the store where you purchased the scanner.
- Page 14 Do not install the scanner on unstable surfaces. Make sure that the scanner is installed on a flat, level surface and that none of its parts extend beyond the surface top, such as a desk or table. Do not install the scanner on unstable surfaces.
- Page 15 Disconnect the power plug from the power outlet when the scanner is not used for a long period of time. When the scanner is not going to be used for a long period of time, be sure to disconnect the power plug from the power outlet.
- Page 16 CONTENTS CONTENTS INTRODUCTION 1 NAMES AND FUNCTIONS OF PARTS 1.1 Names and functions of parts 1.2 Functions of the operator panel 2 BASIC SCANNER OPERATIONS 3 SCANNING VARIOUS TYPES OF DOCUMENTS 4 DAILY CARE 5 REPLACING CONSUMABLES 6 TROUBLESHOOTING 7 DOCUMENT SPECIFICATIONS FOR ADF...
- Page 17 CONTENTS CONTENTS INTRODUCTION 1 NAMES AND FUNCTIONS OF PARTS 1.1 Names and functions of parts 1.2 Functions of the operator panel 2 BASIC SCANNER OPERATIONS 3 SCANNING VARIOUS TYPES OF DOCUMENTS 4 DAILY CARE 5 REPLACING CONSUMABLES 6 TROUBLESHOOTING 7 DOCUMENT SPECIFICATIONS FOR ADF...
- Page 18 CONTENTS CONTENTS INTRODUCTION 1 NAMES AND FUNCTIONS OF PARTS 1.1 Names and functions of parts 1.2 Functions of the operator panel 2 BASIC SCANNER OPERATIONS 3 SCANNING VARIOUS TYPES OF DOCUMENTS 4 DAILY CARE 5 REPLACING CONSUMABLES 6 TROUBLESHOOTING 7 DOCUMENT SPECIFICATIONS FOR ADF...
- Page 19 CONTENTS CONTENTS INTRODUCTION 1 NAMES AND FUNCTIONS OF PARTS 1.1 Names and functions of parts 1.2 Functions of the operator panel 2 BASIC SCANNER OPERATIONS 3 SCANNING VARIOUS TYPES OF DOCUMENTS 4 DAILY CARE 5 REPLACING CONSUMABLES 6 TROUBLESHOOTING 7 DOCUMENT SPECIFICATIONS FOR ADF...
- Page 20 U (i.e. 1, 2 and 4) refers to the type of error. To return the scanner to the ready status ("1"), press "Scan" or "Send to" button. Indicates that a device (hardware) alarm has occurred during scanning of documents.
- Page 21 In this chapter Windows XP screenshots are illustrated. The screens and operations may differ slightly if the OS that you are using is other than Windows XP. Also, when FUJITSU TWAIN32 or FUJITSU ISIS is updated the screens and operations noted in this chapter will differ slightly.
- Page 22 1. Press the power button on the operator panel. The scanner is turned ON, and the green LED on the operator panel lights. Also, while the scanner is being initialized, the indication of the Function Number display changes as follows: "8"->"P"...
- Page 23 Power Save Mode The Power Save mode keeps the scanner in a low-powered state after it has been turned ON. If no operation is performed on the scanner for 15 minutes, the scanner automatically switches to the Power Save mode.
- Page 24 Confirm that all the documents have the same width. Check the number of sheets in the document stack. The standard number of sheets that can be loaded on the scanner is as follows: A4-size paper or smaller that makes a document stack of 5mm or less Maximum 50 sheet at A4, 20 lb, or 80 g/m 2 2.
- Page 25 2 BASIC SCANNER OPERATIONS 2.1 Turning the scanner ON 2.2 Loading Documents on the ADF for Scanning 2.3 Scanning Documents 2.4 How to Use the Scanner Driver 3 SCANNING VARIOUS TYPES OF DOCUMENTS 4 DAILY CARE 5 REPLACING CONSUMABLES 6 TROUBLESHOOTING...
- Page 26 2 BASIC SCANNER OPERATIONS 2.1 Turning the scanner ON 2.2 Loading Documents on the ADF for Scanning 2.3 Scanning Documents 2.4 How to Use the Scanner Driver 3 SCANNING VARIOUS TYPES OF DOCUMENTS 4 DAILY CARE 5 REPLACING CONSUMABLES 6 TROUBLESHOOTING...
- Page 27 2 BASIC SCANNER OPERATIONS 2.1 Turning the scanner ON 2.2 Loading Documents on the ADF for Scanning 2.3 Scanning Documents 2.4 How to Use the Scanner Driver 3 SCANNING VARIOUS TYPES OF DOCUMENTS 4 DAILY CARE 5 REPLACING CONSUMABLES 6 TROUBLESHOOTING...
- Page 28 2. Lift the paper stop and swing forward by inserting your fingertips into the indentations on the scanner as shown in below figure. 5. Start up the scanner application, and scan the document. For details on how to scan documents using the ScandAll 21 application, refer to Documents"...
- Page 29 2 BASIC SCANNER OPERATIONS 2.1 Turning the scanner ON 2.2 Loading Documents on the ADF for Scanning 2.3 Scanning Documents 2.4 How to Use the Scanner Driver 3 SCANNING VARIOUS TYPES OF DOCUMENTS 4 DAILY CARE 5 REPLACING CONSUMABLES 6 TROUBLESHOOTING...
- Page 30 1. Load the document on the scanner's ADF paper chute. For details on how to load documents, see 2. Start up ScandAll 21. Select [Start] - [Program] - [Scanner Utility for Microsoft Windows] - [ScandAll 21]. This starts up ScandAll 21. 3. Select the scanner to be used.
- Page 31 2 BASIC SCANNER OPERATIONS 2.1 Turning the scanner ON 2.2 Loading Documents on the ADF for Scanning 2.3 Scanning Documents 2.4 How to Use the Scanner Driver 3 SCANNING VARIOUS TYPES OF DOCUMENTS 4 DAILY CARE 5 REPLACING CONSUMABLES 6 TROUBLESHOOTING...
- Page 32 2.4 How to Use the Scanner Driver FUJITSU TWAIN32 Scanner Driver FUJITSU TWAIN32 Scanner Driver is designed for scanning documents with FUJITSU image scanner fi series by using application software that complies with the TWAIN standard. The following describes the procedure with examples of ScandAll 21 for ordinary scanning by using this driver software.
- Page 33 For details, refer to "ScandAll 21 Help". Configure settings for scanning and click the [Scan] button. For details about the settings on this window, refer to Scanner Driver". The images of scanned documents are displayed on the [ScandAll 21] window. "Setting Window for FUJITSU TWAIN32...
- Page 34 2 BASIC SCANNER OPERATIONS 2.1 Turning the scanner ON 2.2 Loading Documents on the ADF for Scanning 2.3 Scanning Documents 2.4 How to Use the Scanner Driver 3 SCANNING VARIOUS TYPES OF DOCUMENTS 4 DAILY CARE 5 REPLACING CONSUMABLES 6 TROUBLESHOOTING...
- Page 35 You can configure settings for the FUJITSU TWAIN32 Scanner Driver on this window. The following describes the main setting items. For details on each functions, refer to "FUJITSU TWAIN32 Scanner Driver Help" (appears by pressing [Help] or the [F1] key).
- Page 36 2 BASIC SCANNER OPERATIONS 2.1 Turning the scanner ON 2.2 Loading Documents on the ADF for Scanning 2.3 Scanning Documents 2.4 How to Use the Scanner Driver 3 SCANNING VARIOUS TYPES OF DOCUMENTS 4 DAILY CARE 5 REPLACING CONSUMABLES 6 TROUBLESHOOTING...
- Page 37 [Reset] button Used to undo changes of settings. [Help] button Opens the "FUJITSU TWAIN32 Scanner Driver Help" window. The window also opens by pushing the [F1] key. [About...] button Opens an information window about the FUJITSU TWAIN32 Scanner Driver's version.
- Page 38 Select this tab when setting cache mode, multi feed detection, blank page skipping, etc. [Generic] tab Select this tab to change the unit displayed on the Setting Window for the FUJITSU TWAIN32 Scanner Driver. (Millimeters, Inches, and Pixels are available) [Startup] tab Select this tab for setting the Scanner Operation Panel.
- Page 39 Click this button for configuring the Setting Files. You can save the changed settings as a Setting File. From next scanning, the settings are quickly changed by using these Setting Files. For details of each function, refer to the "FUJITSU TWAIN32 Scsnner Driver Help".
- Page 40 2.4 How to Use the Scanner Driver(9) FUJITSU ISIS Scanner Driver FUJITSU ISIS Scanner Driver is designed for scanning documents with FUJITSU image scanner fi series by using application software that complies with The ISIS standard. The following describes the procedure with examples of QuickScan for ordinary scanning by using this driver software.
- Page 41 Select one from the already existing profiles. Scanning will be started according to the settings of the selected profile. Go to procedure 9. Select the [Scan] tab and click the [Scanner Settings] on the [Profile Editor] window. The configuration window of ISIS driver appears.
- Page 42 Scanned images are displayed on the window. Refer to the "QuickScan Overview" or the "QuickScan Help" for further information on functions and operations of QuickScan. After the installation of QuickScan, it is registered in the [Start] menu. "Configuration Window of FUJITSU ISIS Scanner...
- Page 43 7 DOCUMENT SPECIFICATIONS FOR ADF 8 OPTIONS 9 SCANNER SPECIFICATIONS Appendix 2.4 How to Use the Scanner Driver(12) 2. Configuration Window of FUJITSU ISIS Scanner Driver Image Mode Select a color mode suitable for the purpose from the menu. Black & White 16-level Grayscale...
- Page 44 2 BASIC SCANNER OPERATIONS 2.1 Turning the scanner ON 2.2 Loading Documents on the ADF for Scanning 2.3 Scanning Documents 2.4 How to Use the Scanner Driver 3 SCANNING VARIOUS TYPES OF DOCUMENTS 4 DAILY CARE 5 REPLACING CONSUMABLES 6 TROUBLESHOOTING...
- Page 45 2 BASIC SCANNER OPERATIONS 2.1 Turning the scanner ON 2.2 Loading Documents on the ADF for Scanning 2.3 Scanning Documents 2.4 How to Use the Scanner Driver 3 SCANNING VARIOUS TYPES OF DOCUMENTS 4 DAILY CARE 5 REPLACING CONSUMABLES 6 TROUBLESHOOTING...
-
Page 46: Table Of Contents
2 BASIC SCANNER OPERATIONS 2.1 Turning the scanner ON 2.2 Loading Documents on the ADF for Scanning 2.3 Scanning Documents 2.4 How to Use the Scanner Driver 3 SCANNING VARIOUS TYPES OF DOCUMENTS 4 DAILY CARE 5 REPLACING CONSUMABLES 6 TROUBLESHOOTING... - Page 47 This option excludes selected color (the three primary colors of light i.e. green, red, blue) from scanned images. For example, if the document contains black text in a red frame and when the red color is selected, the scanner reads only the text and eliminate (drop out) the red frame.
-
Page 49: Names And Functions Of Parts
In this chapter Windows XP screenshots are illustrated. The screens and operations may differ slightly if the OS that you are using is other than Windows XP. Also, when FUJITSU TWAIN32 or FUJITSU ISIS is updated the screens and operations noted in this chapter will differ slightly. -
Page 50: Basic Scanner Operations
CONTENTS CONTENTS INTRODUCTION 1 NAMES AND FUNCTIONS OF PARTS 2 BASIC SCANNER OPERATIONS 3 SCANNING VARIOUS TYPES OF DOCUMENTS 3.1 Scanning Double Sided Documents 3.2 Scanning Different-width Documents 3.3 Scanning Documents longer than A4 size 3.4 Saving Scanned Images in PDF Format 3.5 Excluding a Color in the Image (dropout... -
Page 51: Scanning Various Types Of
This starts up ScandAll 21. 4. Select [Select Source] from the [Scan] menu. 5. Select [FUJITSU fi-5110Cdj] and then click the [Select] button. 6. Click [Scan To View] on the tool bar. The [TWAIN Driver] dialogbox appears. 7. Select [ADF (Duplex)] from [Scan Type]. -
Page 52: Daily Care
For [TWAIN Driver] dialog box setting, refer to The document is scanned, and an image of the scanned document appears on the ScandAll 21 screen. For ScandAll functions and operation, refer to [ScandAll 21 Help]. "2.4 How to Use the Scanner Driver". -
Page 53: Replacing Consumables
CONTENTS CONTENTS INTRODUCTION 1 NAMES AND FUNCTIONS OF PARTS 2 BASIC SCANNER OPERATIONS 3 SCANNING VARIOUS TYPES OF DOCUMENTS 3.1 Scanning Double Sided Documents 3.2 Scanning Different-width Documents 3.3 Scanning Documents longer than A4 size 3.4 Saving Scanned Images in PDF Format 3.5 Excluding a Color in the Image (dropout... -
Page 54: Troubleshooting
CONTENTS CONTENTS INTRODUCTION 1 NAMES AND FUNCTIONS OF PARTS 2 BASIC SCANNER OPERATIONS 3 SCANNING VARIOUS TYPES OF DOCUMENTS 3.1 Scanning Double Sided Documents 3.2 Scanning Different-width Documents 3.3 Scanning Documents longer than A4 size 3.4 Saving Scanned Images in PDF Format 3.5 Excluding a Color in the Image (dropout... -
Page 55: Document Specifications For Adf
Appendix 3.3 Scanning Documents longer than A4 size(2) 3. Start up ScandAll 21. For starting up ScandAll 21, select [Programs] - [Scanner Utility for Microsoft Windows] - [ScandAll 21] from [Start]. 4. Select [Select Source] from the [Scan] menu. 5. Select [FUJITSU fi-5110Cdj] and then click the [Select] button. -
Page 56: Options
For settings in the [TWAIN Driver] dialogbox, refer to Images of scanned documents are displayed on the window of ScandAll 21. For details on functions and operations of ScandAll 21, refer to "ScandAll 21 Help". "2.4 How to Use the Scanner Driver". -
Page 57: Scanner Specifications
CONTENTS CONTENTS INTRODUCTION 1 NAMES AND FUNCTIONS OF PARTS 2 BASIC SCANNER OPERATIONS 3 SCANNING VARIOUS TYPES OF DOCUMENTS 3.1 Scanning Double Sided Documents 3.2 Scanning Different-width Documents 3.3 Scanning Documents longer than A4 size 3.4 Saving Scanned Images in PDF Format 3.5 Excluding a Color in the Image (dropout... -
Page 58: Load The Document On The Adf Paper Chute
1. Load the documents on the ADF paper chute. 2. Start up ScandAll 21. From [Start] menu, select [Program] - [Scanner Utility for Microsoft Windows] - [ScandAll 21]. This starts up ScandAll 21. 3. From the menu bar select [Scan] and then [To Adobe PDF] from the pull down menu. - Page 59 CONTENTS CONTENTS INTRODUCTION 1 NAMES AND FUNCTIONS OF PARTS 2 BASIC SCANNER OPERATIONS 3 SCANNING VARIOUS TYPES OF DOCUMENTS 3.1 Scanning Double Sided Documents 3.2 Scanning Different-width Documents 3.3 Scanning Documents longer than A4 size 3.4 Saving Scanned Images in PDF Format 3.5 Excluding a Color in the Image (dropout...
-
Page 60: Adf Paper Chute
Select [Program] - [Adobe Acrobat 6.0] from the [Start] menu. This starts up Adobe Acrobat 6.0. 3. From the [File] menu select [Create PDF] - [From Scanner]. [Create PDF From Scanner] dialog box appears. 4. Select [FUJITSU fi-5110Cdj] at [Device] and click [Scan] button. [TWAIN driver] dialog box is displayed. - Page 62 CONTENTS CONTENTS INTRODUCTION 1 NAMES AND FUNCTIONS OF PARTS 2 BASIC SCANNER OPERATIONS 3 SCANNING VARIOUS TYPES OF DOCUMENTS 3.1 Scanning Double Sided Documents 3.2 Scanning Different-width Documents 3.3 Scanning Documents longer than A4 size 3.4 Saving Scanned Images in PDF Format 3.5 Excluding a Color in the Image (dropout...
- Page 64 CONTENTS CONTENTS INTRODUCTION 1 NAMES AND FUNCTIONS OF PARTS 2 BASIC SCANNER OPERATIONS 3 SCANNING VARIOUS TYPES OF DOCUMENTS 3.1 Scanning Double Sided Documents 3.2 Scanning Different-width Documents 3.3 Scanning Documents longer than A4 size 3.4 Saving Scanned Images in PDF Format 3.5 Excluding a Color in the Image (dropout...
- Page 65 CONTENTS CONTENTS INTRODUCTION 1 NAMES AND FUNCTIONS OF PARTS 2 BASIC SCANNER OPERATIONS 3 SCANNING VARIOUS TYPES OF DOCUMENTS 3.1 Scanning Double Sided Documents 3.2 Scanning Different-width Documents 3.3 Scanning Documents longer than A4 size 3.4 Saving Scanned Images in PDF Format 3.5 Excluding a Color in the Image (dropout...
- Page 66 A selected color (primary colors: red, green or blue) can be removed (dropped out) from the scanned image data. For example, if the document contains black text in a green frame, you can set the scanner to read only the text and eliminate (drop out) the green frame.
- Page 67 CONTENTS CONTENTS INTRODUCTION 1 NAMES AND FUNCTIONS OF PARTS 2 BASIC SCANNER OPERATIONS 3 SCANNING VARIOUS TYPES OF DOCUMENTS 3.1 Scanning Double Sided Documents 3.2 Scanning Different-width Documents 3.3 Scanning Documents longer than A4 size 3.4 Saving Scanned Images in PDF Format 3.5 Excluding a Color in the Image (dropout...
- Page 68 CONTENTS CONTENTS INTRODUCTION 1 NAMES AND FUNCTIONS OF PARTS 2 BASIC SCANNER OPERATIONS 3 SCANNING VARIOUS TYPES OF DOCUMENTS 3.1 Scanning Double Sided Documents 3.2 Scanning Different-width Documents 3.3 Scanning Documents longer than A4 size 3.4 Saving Scanned Images in PDF Format 3.5 Excluding a Color in the Image (dropout...
- Page 69 "Multi feed" is a feeding error that occurs when two or more sheets in the ADF paper chute are fed simultaneously into the scanner. You can set the scanner to detect multi feed, stop scanner operation, and display an error message. To set the scanner to detect multi feed, change the settings in the [TWAIN Driver] dialog box.
- Page 70 It detects a multi feed by differences in document thickness when two or more document sheets are fed overlapping. The scanner monitors the length of documents. It detects a multi feed by changes in the document length when two or more document sheets are fed overlapping.
- Page 71 CAUTION When operating the scanner, the ADF's glass becomes very hot. Before you clean inside the scanner, turn off its power and unplug the AC adapter from the outlet. Wait for at least 15 minutes. Do not turn off the scanner when you clean the Feed rollers.
- Page 72 CA99501-0013 (or isopropyl alcohol) Lint-free dry cloth Commercially available. To purchase the Cleaner F1, please contact the FUJITSU scanner dealer where you purchased the scanner. Remarks 1 bottle (100 ml) Moisten cloth with this fluid and wipe the scanner clean.
- Page 73 9 SCANNER SPECIFICATIONS Appendix 4.2 Cleaning the Scanner Exterior Clean the scanner exterior, the ADF paper chute and the Stacker with a cloth moistened with a small amount of Cleaner F1 or any neutral detergent ATTENTION Never use paint thinner and other organic solvents.
- Page 74 The glass surface inside the ADF becomes hot during the scanner operation. Before you start to clean the inside of the scanner, disconnect the AC adapter from the outlet and wait at least 15 minutes to let the scanner cool down. ATTENTION Do not use water or neutral detergent to clean the inside of the scanner.
-
Page 75: Pad Assy
7 DOCUMENT SPECIFICATIONS FOR ADF 8 OPTIONS 9 SCANNER SPECIFICATIONS Appendix 4.3 Cleaning the Inside of the Scanner (2) 1. Open the ADF by pulling the ADF open lever. CAUTION Be careful, the ADF may close and pinch your finger. - Page 76 9 SCANNER SPECIFICATIONS Appendix 4.3 Cleaning the Inside of the Scanner (3) Turn off the scanner before cleaning the following locations. Pad ASSY (x 1) Wipe the Pad ASSY (rubber surface) downwards. When cleaning the Pad ASSY, take care to prevent the cloth from catching on the metallic parts.
- Page 78 Appendix 4.3 Cleaning the Inside of the Scanner (4) Turn on the scanner before cleaning the following locations. Feed rollers (x 4) Clean lightly taking care not to roughen the surface of the rollers. Take particular care in cleaning the feed rollers since black debris on the rollers adversely affect the pickup performance.
- Page 79 7 DOCUMENT SPECIFICATIONS FOR ADF 8 OPTIONS 9 SCANNER SPECIFICATIONS Appendix 4.3 Cleaning the Inside of the Scanner (5) With the movie below, review the procedure to clean the Feed Rollers: 3. Close the ADF. CAUTION After closing the ADF, make sure that it is completely closed.
- Page 80 In this chapter Windows XP screenshots are illustrated. The screens and operations may differ slightly if the OS that you are using is not Windows XP. Also, when FUJITSU TWAIN32 or FUJITSU ISIS is updated the screens and operations noted in this chapter will differ slightly.
- Page 81 Use only the consumables specified by PFU LIMITED. Do not use consumables and parts made by other manufacturers. To purchase the consumables, contact the FUJITSU scanner dealer where you purchased the scanner or an authorized FUJITSU scanner service provider. Parts Number Standard Replacement Cycle After 50,000 scans or one year.
- Page 82 With this product, you can learn how many times the consumables are used so that you can estimate the right timing for the replacement. 1. When turning on the power, check that the scanner is connected to the PC. Refer to "2.3 Connecting the USB cable " in fi-5110C Getting Started on the Setup CD-ROM for information about connecting the scanner to a personal computer.
- Page 83 CONTENTS CONTENTS INTRODUCTION 1 NAMES AND FUNCTIONS OF PARTS 2 BASIC SCANNER OPERATIONS 3 SCANNING VARIOUS TYPES OF DOCUMENTS 4 DAILY CARE 5 REPLACING CONSUMABLES 5.1 Consumable and Replacement Cycle 5.2 Replacing the Pad ASSY 5.3 Replacing the Pick Roller...
- Page 84 CONTENTS CONTENTS INTRODUCTION 1 NAMES AND FUNCTIONS OF PARTS 2 BASIC SCANNER OPERATIONS 3 SCANNING VARIOUS TYPES OF DOCUMENTS 4 DAILY CARE 5 REPLACING CONSUMABLES 5.1 Consumable and Replacement Cycle 5.2 Replacing the Pad ASSY 5.3 Replacing the Pick Roller...
- Page 85 9 SCANNER SPECIFICATIONS Appendix 5.1 Consumable and Replacement Cycle (5) The following message may appear while you use the scanner: Replace consumables when this message is displayed. After clicking the [Ignore] button, this message will disappear and scanning will continue.
- Page 86 CONTENTS CONTENTS INTRODUCTION 1 NAMES AND FUNCTIONS OF PARTS 2 BASIC SCANNER OPERATIONS 3 SCANNING VARIOUS TYPES OF DOCUMENTS 4 DAILY CARE 5 REPLACING CONSUMABLES 5.1 Consumable and Replacement Cycle 5.2 Replacing the Pad ASSY 5.3 Replacing the Pick Roller...
- Page 87 5.2 Replacing the Pad ASSY (2) 6. Reset the Pad Counter. When turning on the power, check that the scanner is connected to your PC. Open the [Scanners and Cameras] from the [Control Panel] of your PC. Open the [Properties] of [fi-5110Cdj] from the [Scanners and Cameras].
-
Page 88: Sheet Guide
: Pick Roller Bushing : Pick Roller Shaft 6. Remove the Pick Roller with its shaft. Hold the left part of the shaft, and raise it to remove the shaft from the scanner while pulling the shaft to the left. Caution The Pick roller Bushing is hard. - Page 89 Caution If you push up the pick roller tab using your fingernail, it may hurt or get chipped your fingernail. If you worry about that, push up the pick roller tab using a paper clip.
- Page 90 9. Install the pick roller with its shaft to the scanner. Attatch the Pick roller to the scanner in reverse order of the procedure for removing. 10. Rotate the roller bushing by rotating it in the direction of the arrow.
- Page 91 With the movie below, review the replacement procedure of the Pick Roller.
- Page 92 5.3 Replacing the Pick Roller(3) 14. Reset the pick counter. When turning on the power, check that the scanner is connected to your PC. Open the [Scanners and Cameras] from the [Control Panel] of your PC. Open the [Properties] of [fi-5110Cdj] from the [Scanners and Cameras].
- Page 93 6 TROUBLESHOOTING This chapter describes how to remedy document jams, other trouble, items to check before contacting the agent where you bought the scanner, and how to check device labels. ATTENTION About troubles that are not described here, and the details of the errors,...
- Page 94 6.2 Error Indications in the Operator Panel 6.3 Remedying Typical Troubles 6.4 Items to Check Before Contacting the Agent Where You Bought the Scanner 6.5 Checking Labels on the Scanner 7 DOCUMENT SPECIFICATIONS FOR ADF 8 OPTIONS 9 SCANNER SPECIFICATIONS Appendix 6.1 Removing Jammed Documents...
- Page 96 6.2 Error Indications in the Operator Panel 6.3 Remedying Typical Troubles 6.4 Items to Check Before Contacting the Agent Where You Bought the Scanner 6.5 Checking Labels on the Scanner 7 DOCUMENT SPECIFICATIONS FOR ADF 8 OPTIONS 9 SCANNER SPECIFICATIONS Appendix 6.1 Removing Jammed Documents(2)
- Page 97 6.2 Error Indications in the Operator Panel 6.3 Remedying Typical Troubles 6.4 Items to Check Before Contacting the Agent Where You Bought the Scanner 6.5 Checking Labels on the Scanner 7 DOCUMENT SPECIFICATIONS FOR ADF 8 OPTIONS 9 SCANNER SPECIFICATIONS Appendix 6.1 Removing Jammed Documents(3)
- Page 98 Meaning Paper Feed Error Multi Feed Error The ADF has been opened during scanning. HINT The Error Recover Guide is stored in Setup CD-ROM. When installing the application software, refer to "2.1 Installing the Scanner Application" in fi-5110C Getting Started.
- Page 99 An alarm in the memory. When you encounter any alarm, turn off and on the scanner. If the alarm is still displayed on the Function No. display, contact the dealer where you purchased the scanner or an authorized FUJITSU scanner service provider.
- Page 100 Items to Check Before Contacting the Agent Where You Bought the then contact the agent where you bought the scanner or an authorized FUJITSU service provider.
- Page 101 "6.4 Items to Check Before Contacting the Agent Where You Bought the Scanner" and contact the dealer or an authorized FUJITSU service provider. Correctly connect power cable. You must use the AC adapter and cable supplied with your scanner by the manufacturer.
- Page 102 If you cannot solve the problem after taking measures, check the items in "6.4 Items to Check Before Contacting the Agent Where You Bought the Scanner" and contact the dealer or an authorized FUJITSU service provider. The scanner operation is normal. Scanner operation is normal.
- Page 103 Agent Where You Bought the Scanner" and contact the dealer or an authorized FUJITSU service provider. *) For details, refer to "Getting Started" 2.2 Connecting the scanner to your PC. Load document correctly on ADF paper chute. Close the ADF completely.
- Page 104 "6.4 Items to Check Before Contacting the Agent Where You Bought the Scanner" and contact the dealer or an authorized FUJITSU service provider. Select halftoning or dithering on your Clean dirty locations. For details on how to clean dirty locations, see "Chapter 4 DAILY...
- Page 105 "6.4 Items to Check Before Contacting the Agent Where You Bought the Scanner" and contact the dealer or an authorized FUJITSU service provider. Clean dirty locations. For details on how to clean dirty locations, see "Chapter 4 DAILY...
- Page 106 "6.4 Items to Check Before Contacting the Agent Where You Bought the Scanner" and contact the dealer or an authorized FUJITSU service provider. Clean dirty locations. For details on how to clean dirty locations, see "Chapter 4 DAILY...
- Page 107 "6.4 Items to Check Before Contacting the Agent Where You Bought the Scanner" and contact the dealer or an authorized FUJITSU service provider. Clean the upper/lower glasses inside the ADF. For cleaning the glass, refer to "4.3...
- Page 108 7 DOCUMENT SPECIFICATIONS FOR ADF 8 OPTIONS 9 SCANNER SPECIFICATIONS Appendix Symptom 8 : The Function No. display indicates alarm after the scanner is turned ON. Back Does the Function No. display indicate any alarm after turning ON the scanner...
- Page 109 6.2 Error Indications in the Operator Panel 6.3 Remedying Typical Troubles 6.4 Items to Check Before Contacting the Agent Where You Bought the Scanner 6.5 Checking Labels on the Scanner 7 DOCUMENT SPECIFICATIONS FOR ADF 8 OPTIONS 9 SCANNER SPECIFICATIONS Appendix Symptom 9 : Multi feed errors occur frequently.
- Page 110 If you cannot solve the problem after taking measures, check the items in "6.4 Items to Check Before Contacting the Agent Where You Bought the Scanner" and contact the dealer or an authorized FUJITSU service provider.
- Page 111 "6.4 Items to Check Before Contacting the Agent Where You Bought the Scanner" and contact the dealer or an authorized FUJITSU service provider. Use documents that satisfy the requirements. For details on requirements, see "7.2...
- Page 112 "6.4 Items to Check Before Contacting the Agent Where You Bought the Scanner" and contact the dealer or an authorized FUJITSU service provider. Use the document that satisfy the requirements. For details on requirements, see "7.2...
- Page 113 For details on how to clean the rollers, "4.3 Cleaning the Inside of the Scanner". Check the items in "6.4 Items to Check Before Contacting the Agent Where You Bought the Scanner" and contact the dealer or an authorized FUJITSU service provider.
- Page 114 [Bottom] (in case there is a shadow in the bottom edge). Check the items in "6.4 Items to Check Before Contacting the Agent Where You Bought the Scanner" and contact the dealer or an authorized FUJITSU service provider.
- Page 115 If you cannot solve the problem after checking the remedies in the Trouble shooting table, contact the dealer where you bought the scanner or an authorized FUJITSU scanner service provider. Before you ask for repair service, please collect the following information.
- Page 116 Items to check before contacting the dealer where you bought the scanner Check the following items before you contact the dealer where you bought the scanner. General Details Meaning Findings Model fi-5110C Serial No. (*) (Example) 000001 Production date (*)
- Page 117 Displayed sign or number on the Operator panel at trouble Imaging system trouble Meaning Findings Type and version of scanner driver Type of interface controller (Example) made by Adaptec SCSI Card 2940AU OS (Windows) Windows XP Application software (Example) ScandAll 21, Acrobat...
- Page 118 6.5 Checking Labels on the Scanner 7 DOCUMENT SPECIFICATIONS FOR ADF 8 OPTIONS 9 SCANNER SPECIFICATIONS Appendix 6.5 Checking Labels on the Scanner The following illustrations are samples of the product labels of fi-5110C Image Scanner. The label position is as below.
- Page 119 CONTENTS CONTENTS INTRODUCTION 1 NAMES AND FUNCTIONS OF PARTS 2 BASIC SCANNER OPERATIONS 3 SCANNING VARIOUS TYPES OF DOCUMENTS 4 DAILY CARE 5 REPLACING CONSUMABLES 6 TROUBLESHOOTING 7 DOCUMENT SPECIFICATIONS FOR ADF 7.1 Document Size 7.2 Document Quality 7.3 Maximum Document Loading Capacity 7.4 Area not to be perforated...
- Page 120 CONTENTS CONTENTS INTRODUCTION 1 NAMES AND FUNCTIONS OF PARTS 2 BASIC SCANNER OPERATIONS 3 SCANNING VARIOUS TYPES OF DOCUMENTS 4 DAILY CARE 5 REPLACING CONSUMABLES 6 TROUBLESHOOTING 7 DOCUMENT SPECIFICATIONS FOR ADF 7.1 Document Size 7.2 Document Quality 7.3 Maximum Document Loading Capacity 7.4 Area not to be perforated...
- Page 121 Document Thickness Paper thickness is expressed by "paper weight." The following shows the paper weights that can be used on this scanner: 52 g/m 2 to 127 g/m 2 Only paper weight of 127 g/m 2 is acceptable for A8-size documents.
- Page 122 CONTENTS CONTENTS INTRODUCTION 1 NAMES AND FUNCTIONS OF PARTS 2 BASIC SCANNER OPERATIONS 3 SCANNING VARIOUS TYPES OF DOCUMENTS 4 DAILY CARE 5 REPLACING CONSUMABLES 6 TROUBLESHOOTING 7 DOCUMENT SPECIFICATIONS FOR ADF 7.1 Document Size 7.2 Document Quality 7.3 Maximum Document Loading Capacity 7.4 Area not to be perforated...
- Page 123 CONTENTS CONTENTS INTRODUCTION 1 NAMES AND FUNCTIONS OF PARTS 2 BASIC SCANNER OPERATIONS 3 SCANNING VARIOUS TYPES OF DOCUMENTS 4 DAILY CARE 5 REPLACING CONSUMABLES 6 TROUBLESHOOTING 7 DOCUMENT SPECIFICATIONS FOR ADF 7.1 Document Size 7.2 Document Quality 7.3 Maximum Document Loading Capacity 7.4 Area not to be perforated...
- Page 124 CONTENTS CONTENTS INTRODUCTION 1 NAMES AND FUNCTIONS OF PARTS 2 BASIC SCANNER OPERATIONS 3 SCANNING VARIOUS TYPES OF DOCUMENTS 4 DAILY CARE 5 REPLACING CONSUMABLES 6 TROUBLESHOOTING 7 DOCUMENT SPECIFICATIONS FOR ADF 7.1 Document Size 7.2 Document Quality 7.3 Maximum Document Loading Capacity 7.4 Area not to be perforated...
- Page 125 CONTENTS CONTENTS INTRODUCTION 1 NAMES AND FUNCTIONS OF PARTS 2 BASIC SCANNER OPERATIONS 3 SCANNING VARIOUS TYPES OF DOCUMENTS 4 DAILY CARE 5 REPLACING CONSUMABLES 6 TROUBLESHOOTING 7 DOCUMENT SPECIFICATIONS FOR ADF 7.1 Document Size 7.2 Document Quality 7.3 Maximum Document Loading Capacity 7.4 Area not to be perforated...
- Page 126 CONTENTS CONTENTS INTRODUCTION 1 NAMES AND FUNCTIONS OF PARTS 2 BASIC SCANNER OPERATIONS 3 SCANNING VARIOUS TYPES OF DOCUMENTS 4 DAILY CARE 5 REPLACING CONSUMABLES 6 TROUBLESHOOTING 7 DOCUMENT SPECIFICATIONS FOR ADF 7.1 Document Size 7.2 Document Quality 7.3 Maximum Document Loading Capacity 7.4 Area not to be perforated...
- Page 127 3 SCANNING VARIOUS TYPES OF DOCUMENTS 4 DAILY CARE 5 REPLACING CONSUMABLES 6 TROUBLESHOOTING 7 DOCUMENT SPECIFICATIONS FOR ADF 8 OPTIONS 8.1 Image Processing Software Option 9 SCANNER SPECIFICATIONS Appendix 8 OPTIONS This chapter describes the options (sold separately) for fi-5110C Image Scanner.
- Page 128 8.1 Image Processing Software Option fi-5110C Image Scanner option. Name Image Processing Software Option "Image Processing Software Option" is a software option for FUJITSU fi-series scanner to perform advanced binalization processing using "FUJITSU TWAIN 32" scanner driver. Spec Description PA43400-D72201...
- Page 129 3 SCANNING VARIOUS TYPES OF DOCUMENTS 4 DAILY CARE 5 REPLACING CONSUMABLES 6 TROUBLESHOOTING 7 DOCUMENT SPECIFICATIONS FOR ADF 8 OPTIONS 9 SCANNER SPECIFICATIONS 9.1 Basic Specifications 9.2 Installation Specifications 9.3 External Dimensions APPENDIX 9 SCANNER SPECIFICATIONS This chapter lists the scanner specifications.
- Page 130 (*1) For details, see "Chapter 7 DOCUMENT SPECIFICATIONS FOR (*2) The scanning speed is the maximum speed of the scanner hardware. Software processing time such as data transfer time is added to the actual scanning time. (*3) The maximum stacking capacity varies according to the document thickness. For details, see DOCUMENT SPECIFICATIONS FOR ADF".
- Page 131 Other functions (*4) If you connect the scanner with USB 2.0, it is required that the USB port and the Hub are compliant with USB 2.0. The scanning speed may slow down when you connect the scanner with USB 1.1. If your computer has the compatible USB 2.0 port, please use it.)
- Page 132 CONTENTS CONTENTS INTRODUCTION 1 NAMES AND FUNCTIONS OF PARTS 2 BASIC SCANNER OPERATIONS 3 SCANNING VARIOUS TYPES OF DOCUMENTS 4 DAILY CARE 5 REPLACING CONSUMABLES 6 TROUBLESHOOTING 7 DOCUMENT SPECIFICATIONS FOR ADF 8 OPTIONS 9 SCANNER SPECIFICATIONS 9.1 Basic Specifications 9.2 Installation Specifications...
- Page 133 CONTENTS CONTENTS INTRODUCTION 1 NAMES AND FUNCTIONS OF PARTS 2 BASIC SCANNER OPERATIONS 3 SCANNING VARIOUS TYPES OF DOCUMENTS 4 DAILY CARE 5 REPLACING CONSUMABLES 6 TROUBLESHOOTING 7 DOCUMENT SPECIFICATIONS FOR ADF 8 OPTIONS 9 SCANNER SPECIFICATIONS 9.1 Basic Specifications 9.2 Installation Specifications...
- Page 134 CONTENTS CONTENTS INTRODUCTION 1 NAMES AND FUNCTIONS OF PARTS 2 BASIC SCANNER OPERATIONS 3 SCANNING VARIOUS TYPES OF DOCUMENTS 4 DAILY CARE 5 REPLACING CONSUMABLES 6 TROUBLESHOOTING 7 DOCUMENT SPECIFICATIONS FOR ADF 8 OPTIONS 9 SCANNER SPECIFICATIONS 9.1 Basic Specifications 9.2 Installation Specifications...
- Page 135 CONTENTS CONTENTS INTRODUCTION 1 NAMES AND FUNCTIONS OF PARTS 2 BASIC SCANNER OPERATIONS 3 SCANNING VARIOUS TYPES OF DOCUMENTS 4 DAILY CARE 5 REPLACING CONSUMABLES 6 TROUBLESHOOTING 7 DOCUMENT SPECIFICATIONS FOR ADF 8 OPTIONS 9 SCANNER SPECIFICATIONS Appendix Appendix 1 Before using "Scan" button and "Send to"...
- Page 136 1. Select [ Control panel ] from the [ Start ] menu. 2. Select [ Properties ] from [ Scanner & Cameras ]. 3. Select the [ Event ] tab. 4. Select an event. For Windows XP, select the event to be performed by the application from the [ Select event ] menu.
- Page 137 CONTENTS CONTENTS INTRODUCTION 1 NAMES AND FUNCTIONS OF PARTS 2 BASIC SCANNER OPERATIONS 3 SCANNING VARIOUS TYPES OF DOCUMENTS 4 DAILY CARE 5 REPLACING CONSUMABLES 6 TROUBLESHOOTING 7 DOCUMENT SPECIFICATIONS FOR ADF 8 OPTIONS 9 SCANNER SPECIFICATIONS Appendix Appendix 1 Before using "Scan" button and "Send to"...
Need help?
Do you have a question about the ScanSnap FI-5110C and is the answer not in the manual?
Questions and answers