Table of Contents
Advertisement
Quick Links
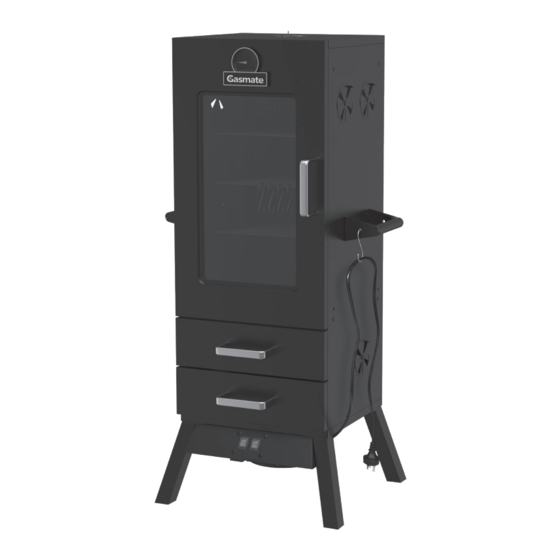
ELECTRIC
SMOKER
WITH DUAL
ELEMENT
Model No. BQ2057
Traditional style smoker for delicious
smoking and slow cooking of foods
Suitable for cold smoking
Glass viewing window
2 Independent 1000W Electric elements
- total of 2000W
Durable steel construction
4 Adjustable chrome plated wire racks
6 Hanging meat hooks
Vitreous enamel smoker box
3 Heavy duty door and drawer handles
Door mounted thermometer with chrome bezel
2 Side handles that double as tool hooks
Includes water bowl and smoker box to add
moisture and flavour when cooking
For outdoor use only
Electrically certified to Australian Standards
Size: 400mm W x 371mm D x 1155mm H
FOR OUTDOOR USE ONLY
WARNING:
Improper installation, adjustment, alteration,
service or maintenance can cause injury or
property damage.
Read the instructions thoroughly before
installing or servicing this equipment.
Gasmate® is a registered trademark of:
Important: Retain these instructions for future use.
Sitro Group Australia Pty Ltd www.gasmate.com.au
Aber Living, N.Z. www.gasmate.co.nz
03752 09/18
Advertisement
Table of Contents

Related Manuals for Gasmate BQ2057


Summary of Contents for Gasmate BQ2057
- Page 1 Read the instructions thoroughly before installing or servicing this equipment. Gasmate® is a registered trademark of: Sitro Group Australia Pty Ltd www.gasmate.com.au Aber Living, N.Z. www.gasmate.co.nz Important: Retain these instructions for future use.
-
Page 2: Installation
INSTALLATION, OPERATION AND Safe Operation MAINTENANCE INSTRUCTIONS Beware of Children and Pets Children should not be allowed to touch or Safety operate smokers or touch extension cords, if Before attempting to operate this smoker, the used. All smokers should be kept out of reach of children, preferably stored or locked in a secure following basic safety precautions should be cabinet or room when not in use. -
Page 3: Important Safety Warnings
IMPORTANT SAFETY WARNINGS We want you to assemble and use your Gasmate Smoker as safely as possible. When you see this safety alert symbol please pay particular attention to the information which follows it. Read all safety warnings and instructions carefully before assembling and operating the Smoker. - Page 4 • DO NOT touch any part of the smoker while on, hot surfaces may burn. WARNING • DO NOT use the smoker as a dryer. WARNING: Fire risk exists if this smoker is • DO NOT attempt to modify the smoker, covered by or positioned close to curtains or power cord, power plug or the supplied other combustible materials.
-
Page 5: Electrical Data
Technical Specifications pieces of food. Always use a meat thermometer to ensure food is fully cooked before removing from Model Number BQ2057 Smoker. The internal temperature of food Voltage 220~240V AC 50Hz must be above 63°C to ensure all bacteria are removed before consuming. -
Page 6: Cooking Tips
COOKING TIPS Flavouring Wood Chips To obtain your favourite smoke flavour, experiment by using chunks, sticks or chips NOTE: If your looking you’re not smoking! of flavour producing wood such as hickory, mesquite or cherry. Most fruit or nut tree wood For best results leave door closed. -
Page 7: Care And Maintenance
CARE & MAINTENANCE This smoker is suitable for both cold and hot smoking. • Wash cooking racks and water bowl with hot The achievable temperature range for this electric soapy water, rinse well and dry. Lightly coat smoker is 45°C to 120°C depending on ambient cooking racks with vegetable oil or vegetable temperature and the number of vents which are cooking spray. -
Page 8: Recipe Ideas
RECIPE IDEAS Smoked Chicken Hickory Smoked Trout 1 chicken 120g x 4 portions Trout 50ml olive oil Brown sugar Juice of one lemon Salt & Pepper Salt & Pepper 2 handfuls Hickory chips Coriander Mix the olive oil and lemon juice together in a cup or ramekin and then rub over the skin and sprinkle Fillet trout taking care to remove all bones. - Page 9 Place the fillets into the hot butter in the frying pan and cook gently for about 2mins per side. Remove from the frying pan and serve. 4. Prepare the Gasmate smoker as per the instructions, ensuring to use water in the water tray and your favourite smoking pellets/chips in the smoking box.
- Page 10 Cool Smoked Salmon with Citrus Step 5: Smoking the Fish 1. Setup your smoker for cooking at very low 900g to 1300g side of salmon, filet (pin temperatures if possible. 50°C. bones removed) 2. Salmon, as with most fish, is delicate and 4L of cold water works best with your favourite lighter tasting 1 cup coarse salt...
- Page 11 COMPONENTS Description Description Smoker Cabinet Rack Support Door Hanging Hook Temperature Gauge Cooking Rack Gasmate Bezel Rack Beam Door Handle Leg Assembly Water Bowl Control Box Water Bowl Rack Control Panel Drawer Assembly Heating Element Smoker Box Cover Element Protection Cylinder...
- Page 12 ASSEMBLY INSTRUCTIONS STEP 1 With the smoker cabinet upside down attach the legs as shown with the facia panel facing the door between the front legs using eight M6x12mm screws.
- Page 13 STEP 2 Position the element chamber ensuring that the holes line up and secure from inside the cabinet with four M6x12mm screws. Connect the male plug into the female socket on the side of the burner bowl.
- Page 14 STEP 3 Attach the handles using eight M6x12mm screws and nuts. Attach the eleven rotating air vents as shown using five M6x12mm screws, washers and nuts, ensuring that they can be fully closed.
- Page 15 STEP 4 Attach the drawer handles with fibre washers using four M4x6mm screws, then locate the Smoker Box in the bottom drawer and the Water Bowl in the top drawer.
- Page 16 STEP 5 Locate the rack supports as required on each side of the smoker cabinet or alternatively adjust the top rack then utilise the hanging hooks. Note: One hanging hook is used to support the power cord to the side handle when not in use.
- Page 17 STEP 6 Attach the temperature gauge bezel using the attachment nut and the door handle using two M4x6mm screws.
- Page 18 STEP 7 The smoker is now ready to use.
-
Page 19: Safe Appliance Locations
SAFE APPLIANCE LOCATIONS This appliance shall only be used in an above ground open-air situation with natural ventilation, without stagnant areas, where gas leakage and products of combustion are rapidly dispersed by wind and natural convection. Any enclosure in which the appliance is used shall comply with the following: An enclosure with walls on all sides, but at least one permanent opening at ground level and no overhead cover (see Example 1). - Page 20 For any queries or assistance call Customer Service (Australia Only) 1300 174 876 Hours of operation: Monday to Friday 8am - 5pm EST Do not return to place of purchase. Keep your purchase receipt, this will be required to make any claims under the 12 month warranty.
Need help?
Do you have a question about the BQ2057 and is the answer not in the manual?
Questions and answers