
Related Manuals for Canon CR-2


Summary of Contents for Canon CR-2
- Page 1 Digital Retinal Camera Operation Manual Make sure you read this manual before using the instrument. Keep this manual safely so that you can use it in the future.
-
Page 2: Installation
• The CR-2 must only be used by a doctor or a legally qualified person. • The user is responsible for managing the usage and maintenance of medical equipment. We suggest that someone be put in charge of maintenance to ensure that the CR-2 is kept in good condition and can be used safely. -
Page 3: Table Of Contents
Maintenance and Inspection ... 34 Cleaning the Objective Lens ... 35 Cleaning the Image Sensor ... 36 Cleaning the Outside of the CR-2 ... 36 Disinfecting the Forehead Rest ... 37 Refilling Chin Rest Paper ... 37 Attaching and Removing the Digital Camera ... 37 7 Troubleshooting ... -
Page 4: Introduction
45 degrees, in a naturally dilated state without using mydriatics. The CR-2 has the following features. Reduced flash intensity The CR-2 can take images at ISO 1600 at the standard flash intensity, and ISO 6400 in low flash intensity mode. This reduces patient discomfort caused by light glare. Compact, user-friendly design The CR-2 is designed to be even smaller, more lightweight and compact. -
Page 5: Components
Operation Manual for the CR-2—this document Describes the handling precautions and operating instructions for the CR-2. CD-ROM—Retinal imaging control software NM 2 Contains the Retinal imaging control software NM 2 (Rics NM 2), which is used to record, view and store photographed images taken with the CR-2. -
Page 6: Conventions Used In This Manual
A warning that incorrect operation may result in death or serious injury. A caution that incorrect operation may result in serious injury. A caution that incorrect operation may break the CR-2 or damage other devices. This symbol indicates things that must not be done (prohibited actions). -
Page 7: Safety
Safety Regulatory Information The following sections list the classifications applicable to the CR-2 and the directives and standards that the CR-2 complies with. Device Classification Protection against electric shock Degree of protection against electric shock Degree of protection against ingress of water... -
Page 8: European Union
2 Safety European Union 93/42/EEC EN 60601-1 Ed. 3.0: 2006 EN 60601-1-2: 2007 EN 60601-1-6: 2004 IEC 62304: 2006 EN 62366: 2008 EN ISO 14971: 2007 EN ISO 15004-1: 2006 EN ISO 15004-2: 2007 EN ISO 10993-1: 2003 EN ISO 10993-5: 1999 EN ISO 10993-10: 2002/A1: 2006 Deutschland Während des Betriebs liegt der Schalldruckpegel dieses Instruments bei 70 dB(A) oder weniger... -
Page 9: Safety Precautions
Fire or electric shock may result if you keep using in such condition. Immediately turn off the power of CR-2, unplug the power plug and turn off the power of all connected devices. Then, contact a Canon representative or distributor. - Page 10 Do not clean the CR-2 with flammable solvent Before cleaning the CR-2, for safety reasons, be sure to turn off the power of all the devices and unplug the power cord from the AC outlet. Do not use alcohol, benzine, thinner or any other flammable solvent.
-
Page 11: Taking An Image
The patient’s eye may be injured if the objective lens makes contact with it. Check the image before using the CR-2 Before using the CR-2, be sure to take a test image to ensure that there is no foreign matter present that can affect image readings or diagnosis. - Page 12 Prohibited Be sure to turn off the power when not in use For safety reasons, be sure to turn off the power of all the devices when the CR-2 is not being used. Also, unplug the power plug from the AC outlet and put on the cover when the CR-2 is not going to be used for a long time.
-
Page 13: Notes On Using Cr-2
• Do not wipe the lens with ethanol solution, eyeglass cleaner, or silicone-coated paper. Doing so could corrode the surface of the lens or leave streaks. • Do not clean the outside of the CR-2 with lens cleaner. Doing so could damage the outside of the CR-2. -
Page 14: Environment Of Use
Storage and transportation environment • Do not install, store, or leave the CR-2 in a very hot or humid environment. Also, do not use the CR-2 outside. Doing so may cause a malfunction or misoperation. • Always try to keep the room as clean as possible. After many years of usage, airborne dust in the room may get on the objective lens as well as the optical parts in the main unit. - Page 15 WEEE scheme or your household waste disposal service. For more information regarding return and recycling of WEEE products, please visit www.canon-europe.com/environment. * EEA: Norway, Iceland and Liechtenstein 2 Safety...
-
Page 16: Rating Label Display
2 Safety Rating Label Display The position and contents of the label attached on the CR-2 is shown below. Follow the information on the label to use the CR-2 appropriately. The following table describes the marks and indications on the rating label. -
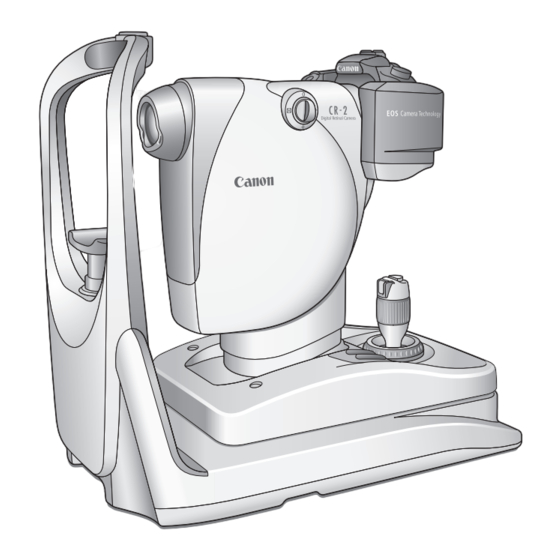
Page 17: Names Of Parts
Retinal Camera Digital camera Digital camera cover Observation monitor For viewing the anterior eye and retina. Power switch for the digital camera Operation lever Shutter release button Alignment button Switches between a view of the anterior eye and the retina. - Page 18 3 Names of Parts Connector for external eye fixation lamp (with cap) Connector for the external eye fixation lamp (sold separately). Forehead rest Objective lens Objective lens cap Face rest Chin rest Indentation for lifting Diopter compensation knob a No diopter compensation b Negative compensation c Positive compensation d Anterior eye photography...
-
Page 19: Operation Panel
Operation Panel Flash intensity button/lamp +: Flash intensity increases. –: Flash intensity decreases. Observation light brightness button/lamp +: Observation light brightness increases. –: Observation light brightness decreases. x2 photography button/lamp Enables x2 photography function. (See page 30) Small pupil photography button/lamp Enables small pupil photography function. -
Page 20: Observation Monitor
3 Names of Parts Observation Monitor During anterior eye observation Pupil alignment circles Photography ready lamp Green: Ready to shoot Red: Not ready to shoot Observation light brightness indicator During retinal observation (with x1.3 magnification) Indicator for top limit of position of main unit Appears when main unit has reached top limit. -
Page 21: Basic Operations
Basic Operations Flow of Operation The flow of operations for retinal photography is as follows. Connect the cables if necessary as described in “Connecting Cables” (see page 22). Preparing for an examination (page 22) Setup for patient (page 24) Alignment (page 25) Small pupil photography (page 30) x2 photography (page 30) Diopter compensation (page 31) -
Page 22: Connecting Cables
4 Basic Operations Connecting Cables Connect the CR-2 to a computer in which the Rics NM 2, the supplied software, has been installed. • Do not plug or unplug the power plug with wet hands. WARNING • Do not use any power cord other than the supplied. - Page 23 CAUTION The main unit and the chin rest move to the center position when the CR-2 is turned on. Do not touch the main unit and the chin rest while they are moving. At the same time, keep the patient’s chin away from the chin rest.
-
Page 24: Setup For Patient
4 Basic Operations Disinfect the forehead rest and replace the chin rest paper. If chin rest paper is not being used, disinfect the chin rest also. • To prevent the risk of infection, wipe the forehead rest with ethanol solution or any other CAUTION disinfectant whenever changing patients. -
Page 25: Alignment
Alignment Align the retinal camera with the eye to be photographed. When adjusting the position of the retinal camera in the front-back direction, slowly bring the main CAUTION unit closer to the patient while looking at the patient’s eye from the side. The patient’s eye may be injured if the objective lens makes contact with it. - Page 26 4 Basic Operations Tilt the operation lever forward or backward to unify the top and bottom of the image of the pupil. When the pupil is smaller than the inner pupil alignment circle Darken the room further to dilate the patient's pupil more. If the patient's pupil does not dilate enough, use the small pupil photography function (see page 30).
- Page 27 Have the patient stare at the internal eye fixation lamp to fix the part for the photograph. Take the following steps to guide the patient’s eye. Press the FIX TARGET buttons up, down, left, and right to move the internal eye fixation lamp to your desired position and then press the set button to make it blink.
-
Page 28: Photography
4 Basic Operations Photography Do a preliminary check before taking photos. a. The photography ready lamp lights green. b. The working distance dots appear sharpest. c. The working distance dots are on the extension line of the WD guides. d. The split lines form a single line. Photography ready lamp • Green: Ready to shoot. -
Page 29: Finishing An Examination
LOCK side to lock the stage. Align the mark on the stage lock and the mark on the right side of the base. Turn off the power to the CR-2. Exit the Rics NM 2 and turn off the computer. 4 Basic Operations... -
Page 30: Photography Auxiliary Functions
Photography Auxiliary Functions The section describes how to use x2 photography, small pupil photography function, diopter compensation, and anterior eye photography and how to connect an external monitor when one is used. x2 Photography You can take and save images that are within the x2 photography range on the observation monitor. Press the x2 photography button. -
Page 31: Diopter Compensation
Insert the diopter compensation lens into the CR-2 and take the photograph. The CR-2 can provide appropriate images if the diopter of the patient’s eye fall within each range below. • 0 position: –10 to +15 D • –... -
Page 32: Anterior Eye Photography
External Monitor The image on the observation monitor can be viewed on an external monitor. Contact the Canon representative or distributor from whom you purchased the CR-2 about which external monitors can be used. • Before connecting or disconnecting video cables, be sure to turn off the retinal camera and all other devices. - Page 33 Connect the video cable to the digital camera. 1. Securely insert the supplied video cable into the VIDEO OUT terminal on the digital camera. 2. Fit the ferrite core of the video cable into the space in the cover, and place the video cable in the notch.
-
Page 34: Maintenance
• Before using the CR-2, for safety reasons, be sure to perform the daily inspection. CAUTION • Have a regular inspection performed for the CR-2 at least once a year by the representative that is designated by Canon. Maintenance and Inspection Do the following inspections before using the CR-2 to insure that it is used safely and correctly. -
Page 35: Cleaning The Objective Lens
• Do not wipe the objective lens with disinfectant ethanol, eyeglass cleaner, or silicone-coated paper. Doing so could corrode the surface of the lens or leave streaks. For information about lens cleaning paper, lens cleaner, and blowers, contact the Canon representative or distributor from whom you purchased the CR-2. -
Page 36: Cleaning The Image Sensor
CR-2. If the outside of the CR-2 is dirty, wipe it twice with a soft cloth. First use a cloth that has been soaked in diluted neutral cleanser and well wrung out. Then use a cloth that has been soaked in water and well wrung out. -
Page 37: Disinfecting The Forehead Rest
Canon representative or distributor from whom you purchased the CR-2. Attaching and Removing the Digital Camera The CR-2 is equipped with a specialized digital camera. It is not necessary to attach or remove the digital camera during normal usage. -
Page 38: Removing The Digital Camera
DC coupler. 2. Close the battery compartment cover. While holding down the lens release button on the digital camera, turn the digital camera counterclockwise to remove it. Attach the caps to the retinal camera and the digital camera mount. -
Page 39: Installing The Digital Camera
• The power plug of the retinal camera is not plugged into an electric outlet. Attach the digital camera to the retinal camera. 1. Align the positions of the mounting alignment marks on the retinal camera and the digital camera. 2. Fit the digital camera's lens mount to the retinal camera's mount. -
Page 40: Troubleshooting
If these remedies do not eliminate the symptoms or the warning, turn off the power and contact the Canon representative or distributor from whom you purchased the CR-2. Be ready to provide a detailed description of the symptoms and message. - Page 41 There is dirt or dust on the objective lens. Clean the objective lens (see page 35). Dirt or dust is stuck to the imaging sensor of the digital camera. Use the self-cleaning sensor unit to clean it. (see page 36).
-
Page 42: Appendix
100 mm side to side, 70 mm front to back 32 mm 60 mm AC 100 V to 240 V, 50/60 Hz, 1 A to 0.4 A 305 (W) × 500 (D) × 473 (H) mm Approximately 15 kg (including 0.8 kg digital camera) -
Page 43: Emc (Electromagnetic Compatibility)
Guidance and Manufacturer’s Declaration for Electromagnetic Emission The CR-2 is intended for use in the electromagnetic environment specified below. The customer or the user of the CR-2 should assure that it is used in such an environment. Emission Test RF emissions... - Page 44 Guidance and Manufacturer’s Declaration for Electromagnetic Immunity The CR-2 is intended for use in the electromagnetic environment specified below. The customer or the user of the CR-2 should assure that it is used in such an environment. Immunity Test Electrostatic discharge ±(2, 4, 6) kV contact...
- Page 45 For assess the electromagnetic environment due to fixed RF transmitters, an electromagnetic site survey should be considered. If the measured field strength in the location in which the CR-2 is used exceeds the applicable RF compliance level above, the CR-2 should be observed to verify normal operation. If abnormal performance is observed, additional measures may be necessary, such as reorienting or relocating the CR-2.
- Page 46 The CR-2 is intended for use in an electromagnetic environment in which radiated RF disturbances are controlled. The customer or the user of the CR-2 can help prevent electromagnetic interference by maintaining a minimum distance between portable and mobile RF communications equipment (transmitters) and the CR-2 as recommended below, according to the maximum output power of the communications equipment.
-
Page 47: Warranty And Repair Service
About repairs If a problem cannot be solved even after taking the measures indicated in “7 Troubleshooting” (see page 40), contact the Canon representative or distributor from whom you purchased the CR-2 for repairs. When requesting repair, please provide us with the following information. - Page 48 CANON EUROPA N.V. Medical Products Division Bovenkerkerweg 59-61, 1185 XB Amstelveen, The Netherlands Telephone: (31)-20-545-8926 CANON SINGAPORE PTE. LTD. Medical Equipment Products Division 1 HarbourFront Avenue, #04-01 Keppel Bay Tower, Singapore 098632 Telephone: (65)-6799-8888 CANON AUSTRALIA PTY. LTD. Optical Products Division 1 Thomas Holt Drive, North Ryde, Sydney N.S.W.
Need help?
Do you have a question about the CR-2 and is the answer not in the manual?
Questions and answers