
Related Manuals for Microtronics BLE Gauge

Summary of Contents for Microtronics BLE Gauge
-
Page 1: Cover
User manual BLE Gauge Cover Valid from: Firmware version: 01v000 Server version: --- Hardware version: 1.1 300909 | Rev.02... -
Page 3: Table Of Contents
Chapter 2 Declaration of conformity Chapter 3 Specifications 3.1 Applicable regardless of the selected pressure sensor 3.2 BLE Gauge pressure sensor 0-1m 9W (300872) 3.3 BLE Gauge pressure sensor 0-3m 9W (300871) 3.4 BLE Gauge pressure sensor 0-10m 9W (300891) Chapter 4 General specifications 4.1 Translation... - Page 4 8.3.1 Use in conjunction with a compatible data logger 8.3.1.1 Using the myDatanet server 8.4 Testing communication with the device 8.4.1 Testing communication between the BLE Gauge and the data logger Chapter 9 User interfaces 9.1 Display of a compatible data logger 9.2 Site configuration of a compatible data logger...
- Page 5 Chapter 1 Table of contents 10.2 Prerequisites 10.3 Functional principle 10.3.1 USB BLE-Adapter 10.4 Installation 10.4.1 Installing the drivers for the USB BLE-Adapter 10.5 Menu of the DeviceConfig 10.5.1 Settings 10.5.1.1 Options 10.6 Establishing a connection to a sensor module with Bluetooth Low Energy interface 10.7 "Firmware"...
-
Page 7: Chapter 2 Declaration Of Conformity
Chapter 2 Declaration of conformity Chapter 2 Declaration of conformity Rev. 02... - Page 8 Rev. 02...
-
Page 9: Chapter 3 Specifications
Material: POM / Stainless Steel (BLE Gauge / pressure sensor) Weight: approx. 270g (incl. pressure sensor and 5 m cable) Protection class: IP67 Dimensions (DL): 40 x 100mm / 21 x 74mm (BLE Gauge / pressure sensor) Ex certification II 3G Ex ic IIB T4 Gc Operating temperature -20...+50°C... -
Page 10: Ble Gauge Pressure Sensor 0-3M 9W (300871)
3.3 BLE Gauge pressure sensor 0-3m 9W (300871) Level 0-3m Resolution Cable length suitable for Fresh, waste and grey water Measurement method Piezoresistive pressure sensor 3.4 BLE Gauge pressure sensor 0-10m 9W (300891) Level 0-10m Resolution Cable length suitable for... -
Page 11: Chapter 4 General Specifications
Chapter 4 General specifications Chapter 4 General specifications The information in this manual has been compiled with great care and to the best of our knowledge. The manufacturer, however, assumes no liability for any incorrect specifications that may be provided in this manual. -
Page 12: Ex Protection
1 BLE Gauge 4.5 Safety instructions For the connection, commissioning and operation of the BLE Gauge , the following information and higher legal regulations of the country (e.g. ÖVE), such as valid EX regulations as well as the applicable safety and accident prevention regulations for the respective application case must be observed. -
Page 13: Use Of The Hazard Warnings
Chapter 4 General specifications 4.5.1 Use of the hazard warnings DANGER: Indicates a potential or threatening hazardous situation that will result in death or serious injuries if not avoided. WARNING: Indicates a potential or threatening hazardous situation that can result in death or serious injuries if not avoided. -
Page 14: Safety And Precautionary Measures For The Bluetooth Module Installation
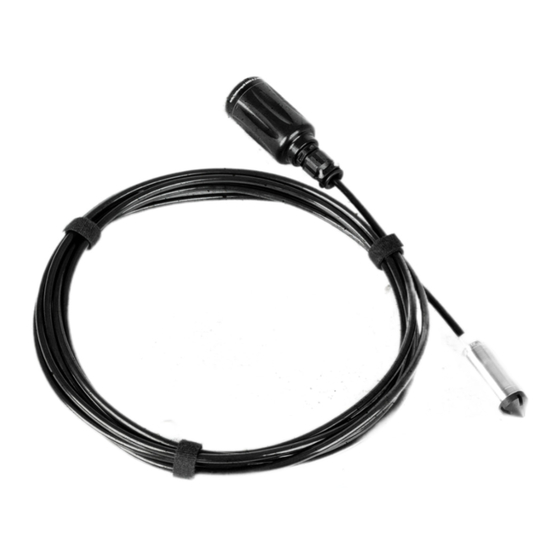
Do not install the device in any other way to the one described in the operating instructions. Improper use will invalidate the warranty. 4.6 Overview Top of the BLE Gauge Left side of the BLE Gauge (incl. pressure sensor) 1 Pressure compensation 2 Medium inlet openings 3 Pressure sensor... -
Page 15: Block Diagram
The device is a compact, portable measurement system used to determine fill levels that consists of a pressure sensor and a transmission unit. The BLE Gauge is equipped with an internal battery to supply the integrated logic (BLE module, controller and pressure sensor). The capacity of the installed battery is designed for a max. -
Page 16: Device Labelling
The information in this user manual applies exclusively to the measurement system that consists of the following components: BLE Gauge Pressure sensor The type plates of the BLE Gauge are located on the top and sides of the device and contain the following specifications: Type designation Serial number... -
Page 17: Installation Of Spare And Wear Parts
. In the event of unfavourable environmental conditions (e.g. low temperatures), it may occur that the battery capacity is depleted before this period of time has elapsed. Store the BLE Gauge in its original packaging. -
Page 18: Obligation Of The Operator
4.12 Obligation of the operator WARNING: In the EEA (European Economic Area), the national implementation of the framework directive (89/391/EEC) as well as the associated specific directives and from these in particular, the directive (2009/104/EC) about the minimum safety and health requirements for use of work equipment by workers at work, each in their respective version are to be complied with. -
Page 19: Chapter 5 Functional Principle
The device is a portable measurement instrument approved for Ex zone 2 for determining fill levels. The transmission of measurement commands to the BLE Gauge and reading out of the determined measurement values from the BLE Gauge are realised via a Bluetooth connection (Bluetooth Low Energy). -
Page 20: Determining The Fill Level
BLE Gauge . The smartphone app can also be used to transmit the configuration values for the installation height and trimming to the BLE Gauge . -
Page 21: Taking The Installation Height Into Consideration
Chapter 5 Functional principle 5.1.3 Taking the installation height into consideration The installation height of the pressure sensor can be taken into consideration in this step. The "Sensor Offset" configuration parameter is added to the fill level determined during the previous step. This means that a negative prefix must be set for the "Sensor Offset"... -
Page 23: Chapter 6 Storage, Delivery And Transport
An RMA number is mandatory for any returns and can be obtained from the Support & Service Centre (see "Contact information" on page 69). The return shipment of the BLE Gauge must occur in the original packaging and with freight and insurance paid to Microtronics Engineering GmbH (see "Contact information"... -
Page 25: Chapter 7 Installation
Important note: To prevent any damage to the device, the work described in this section of the instructions must only be performed by qualified personnel. 7.1 Dimensions Dimensions BLE Gauge and pressure sensor: Length and diameter 7.2 Installing the BLE Gauge Important note: Ensure installation is completed correctly. -
Page 26: Suspended Installation
The bend radius of the connection cable must not fall below the minimum value of 60mm . Both the BLE Gauge mounting fixture and the metallic housing of the pressure sensor must be included in the earthing concept of the facility by the installation (see "Earthing of the BLE Gauge when installed suspended "... - Page 27 Chapter 7 Installation 1. Drilling the hole for installation: If you want to use the rounded head screw included in the accessories set to secure the mounting fixture to the wall, drill one hole with a diameter of 10 mm. If you want to use your own fastening screw, the diameter of the hole will be based on the screw and wall plug that may be required.
- Page 28 4. If the connection cable is considerably longer than required to position the pressure sensor in the required installation position, you can roll up the excess part of the cable within the cable holder of the mounting fixture. The cable holder can hold up to 3m of cable. Roll up the cable in a clockwise direction. Start in such a way that the cable runs from the tension clamp towards the left upper bracket and the circle then continues towards the right upper bracket.
- Page 29 Chapter 7 Installation 5. As illustrated in the following figures, guide the BLE Gauge into the relevant bracket of the mounting fixture from above. Always ensure that the minimum permissible bend radius of 60mm is also observed. It may be necessary to remove some of the connection cable from the cable holder again.
-
Page 30: Earthing Of The Ble Gauge When Installed Suspended
EN60079-11 (Chapter 6.5: Earth conductors, connections and terminals) Earthing of the BLE Gauge when installed suspended 1 Earthing point of the BLE Gauge mounting fixture 3 Earth cable (minimum requirement: 4mm²) 2 Earth potential of the facility 4 Earthing pipe clamp... -
Page 31: Electrical Installation
"DeviceConfig " on page 45. It can be downloaded free of charge from the following website: www.microtronics.com/deviceconfig Chapter "GaugeBuster" on page 55 provides a detailed explanation of the "GaugeBuster" smartphone app. It is available for Android and iOS devices and can be downloaded free of charge from "Google Play" (Android) or the Apple "App Store"... -
Page 33: Chapter 8 Initial Start-Up
8.3.1 Use in conjunction with a compatible data logger Note: It is recommended that the BLE Gauge is first placed into operation in the office before moving the device to the place of use. During this process, you should set a site for subsequent operation on the myDatanet server (see "myDatanet Server Manual "... - Page 34 Note: If you have purchased the BLE Gauge and a compatible data logger (e.g. myDatalogGauge 3G ATEX) as a set, the serial number of the BLE Gauge is already saved in the memory of the data logger. In this case, it suffices to select "Automatic" mode. The saved serial number is displayed in the input field for the serial number, although it cannot be changed.
- Page 35 Chapter 8 Initial Start-Up 5. Wait until it is indicated in the list of measurement instruments that the device is in setup mode. This is indicated by a speech bubble with the "Setup" inscription. The speech bubble is hidden again if setup mode was completed successfully. The background colour of the speech bubble changes from white to red if a problem is detected.
-
Page 36: Testing Communication With The Device
Note: If you have purchased the BLE Gauge and a compatible data logger (e.g. myDatalogGauge 3G ATEX) as a set, the serial number of the BLE Gauge is already saved in the memory of the data logger. In this case, it suffices to select "Automatic" mode. The saved serial number is displayed in the input field for the serial number, although it cannot be changed. - Page 37 6. The status indication during normal operation should now show the current fill level in the centre of the display. If several BLE Gauge are connected to the data logger, the fill levels of the individual BLE Gauge are displayed alternately. Based on the currently displayed value, the type designation and serial number for the relevant module are shown in the upper section of the display.
-
Page 39: Chapter 9 User Interfaces
The BLE Gauge does not have any user interfaces. Compatible data loggers can, however, display status information about the BLE Gauge on the display or via the input screen for configuring the site. The data logger is configured via the web interface on the myDatanet server; the web address is provided by your responsible sales partner. -
Page 40: Site
3 Value for the zero point adjustment currently saved in the BLE Gauge (i.e. the "Trimming") 4 Installation height currently saved in the BLE Gauge (i.e. the "Sensor Offset") 5 Date when the battery of the BLE Gauge is likely to need replacing and days remaining until this date Rev. 02... -
Page 41: Measurement Channels
The serial number of the BLE Gauge , that is to be used for the measurement value acquisition, must be entered in the corresponding input field. 3 Serial number of the BLE Gauge that should be used for the measurement value acquisition. Read Only if "automatic" mode has been selected. -
Page 42: Alarms
Note: Additional explanation on the zero point adjustment and installation height of the pressure sensor Assumption: Pressure sensor 0-1 m Installation situation of the pressure sensor 1 Installation height: 15 cm 3 Output value of the pressure sensor: 6 cm 2 Pressure sensor 4 Measured fill level: 20 cm Required configuration Parameter... -
Page 43: Trigger
Chapter 9 User interfaces 9.2.2.3 Trigger There are two types of triggers: Event trigger (RI, XM) The relevant operation (e.g. initiate transmission) is only executed once when the trigger event occurs. Level trigger (RA, QX) The relevant operation (e.g. use alternative record interval) is executed as long as the trigger is active. "Measurement channels –... -
Page 45: Chapter 10 Deviceconfig
10.1 General The DeviceConfig configuration program can be downloaded free of charge from the following website: www.microtronics.com/deviceconfig The tool is used for configuration, maintenance, fault analysis and synchronisation purposes. It is compatible with all myDatanet devices equipped with a USB interface, wireless M-bus interface or Bluetooth Low Energy. -
Page 46: Functional Principle
10.3 Functional principle The following description particularly relates to the use of the configuration program DeviceConfig in conjunction with the BLE Gauge . Functional principle 1 BLE Gauge 3 PC with the DeviceConfig configuration program installed 2 USB BLE-Adapter The configuration program DeviceConfig communicates wirelessly (Bluetooth Low Energy) with the BLE Gauge using the USB BLE-Adapter (300685). -
Page 47: Usb Ble-Adapter
10.3.1 USB BLE-Adapter The USB BLE-Adapter (300685) is not included in the scope of delivery of the BLE Gauge . It is required because standard PCs and laptops often do not have a Bluetooth Low Energy interface that is necessary for communication with the BLE Gauge . - Page 48 2. Follow the instructions of the setup wizard until the following screen is displayed. The following drivers must be installed to ensure correct operation. Installation of the USB drivers for the devices Installation of the drivers for the USB BLE-Adapter Installation of the USB drivers for the devices on a M1 basis Installation of the USB drivers for the devices on a M2/M3 basis Rev.
-
Page 49: Installing The Drivers For The Usb Ble-Adapter
3. Once the following screen is displayed, close the installation process by clicking on the "Finish" button. Complete the setup 10.4.1 Installing the drivers for the USB BLE-Adapter Note: Information on the USB BLE-Adapter (300685) is provided in chapter "USB BLE-Adapter " on page 47. -
Page 50: Menu Of The Deviceconfig
10.5 Menu of the DeviceConfig 10.5.1 Settings "Settings" menu item 10.5.1.1 Options The settings for the COM ports to which the USB radio transmitter (206.657) or the USB BLE-Adapter (300685) are connected can be specified and the automatic search for the available firmware versions can be activated or deactivated via the "Settings ->... -
Page 51: Establishing A Connection To A Sensor Module With Bluetooth Low Energy Interface
10.6 Establishing a connection to a sensor module with Bluetooth Low Energy interface The USB BLE-Adapter (300685) is required to establish a connection to a sensor module with a Bluetooth Low Energy interface. First of all complete the steps described in chapter "Installing the drivers for the USB BLE-Adapter "... - Page 52 4. Wait until the DeviceConfig has received the configuration of the sensor module. Depending on the sensor module, additional tabs may be displayed. "Instrument" tab when actively connected to the sensor module 1 Radio signal strength [dBm] Note: To ensure a stable connection, the wireless signal level should be higher than -90dBm , i.e. for example -85dBm .
-
Page 53: Firmware" Tab
10.7 "Firmware" tab This tab enables firmware to be installed directly via the Bluetooth Low Energy interface. "Firmware" tab 1 Currently installed software version 2 Button to install a previously downloaded firmware package Rev. 02... -
Page 55: Chapter 11 Gaugebuster
Chapter 11 GaugeBuster Chapter 11 GaugeBuster The "GaugeBuster" smartphone app is currently still being developed. Rev. 02... -
Page 57: Chapter 12 Maintenance
(e.g. low temperatures), it may occur that the battery capacity is depleted before this period of time has elapsed. To replace the battery, the BLE Gauge must be sent back to the manufacturer in the original packaging (see "Return" on page 23). The remaining number of days until the battery of the BLE Gauge must be replaced is shown on the display of the data logger connected to the device (see "Display of a compatible data logger"... -
Page 59: Chapter 13 Removal/Disposal
The device includes a battery or rechargeable battery (lithium) that must be disposed of separately. Depleted BLE Gauge can also be returned to the manufacturer to be disposed of correctly (see "Contact information" on page 69). -
Page 61: Chapter 14 Troubleshooting And Repair
14.1 General problems Problem Cause/solution Communication problems Reduce the distance between the BLE Gauge and the data (between BLE Gauge and the logger, and try to avoid obstacles such as walls and similar. The capacity of the battery is virtually depleted. -
Page 63: Chapter 15 Spare Parts And Accessories
BLE Gauge mounting fixture 300881 15.3 Pressure sensors Note: The required pressure sensor with the relevant measurement range must be specified when ordering BLE Gauge . The pressure sensor cannot be replaced by the user. Measurement Description Quantity Order number... -
Page 65: Chapter 16 Document History
Kapitel "Suspended installation" on page 26 Note added that the device must be included in the earthing concept of the facility Chapter "Earthing of the BLE Gauge when installed suspended " on page 30 Chapter added Kapitel "General maintenance" on page 57 Note added indicating that the device must not be rubbed with cloths in the Ex zone Chapter "Removal/disposal"... -
Page 67: Chapter 17 Glossary
Chapter 17 Glossary Chapter 17 Glossary NaN value The myDatanet uses special encoding to display different error statuses in the measurement values, for example. By setting a measurement value to "NaN", it is clearly marked as invalid and is thus not used for any further calculations. -
Page 69: Chapter 18 Contact Information
Chapter 18 Contact information Chapter 18 Contact information Support & Service: Microtronics Engineering GmbH Hauptstrasse 7 3244 Ruprechtshofen Austria, Europe Tel. +43 (0)2756 7718023 support@microtronics.com www.microtronics.com Microtronics Engineering GmbH (Headquarters) Hauptstrasse 7 3244 Ruprechtshofen Austria, Europe Tel. +43 (0)2756 77180 Fax. - Page 70 Certified by TÜV AUSTRIA: EN ISO 9001:2015, EN ISO 14001:2015, EN ISO 50001:2011 for myDatanet | TÜV SÜD: ATEX Directive 2014/34/EU © Microtronics Engineering GmbH. All rights reserved. Photos: Microtronics Microtronics Engineering GmbH | www.microtronics.com Hauptstrasse 7 | 3244 Ruprechtshofen | Austria | +43 2756 77180 | office@microtronics.com 300909 | Rev.02...
Need help?
Do you have a question about the BLE Gauge and is the answer not in the manual?
Questions and answers