
Related Manuals for Aura AR-40-201


Summary of Contents for Aura AR-40-201
- Page 1 User Manual AR-40-201/ AR-40-202 HDMI over IP Streaming Encoder/Decoder All Rights Reserved Version: AR-40-201/ AR-40-202_2020V1.0...
-
Page 2: Table Of Contents
1.1 Features ......................1 1.2 Package List ...................... 1 2. Specification ....................... 2 3. Panel Description ......................3 3.1 AR-40-201 Encoder ................... 3 3.2 AR-40-202 Decoder ................... 4 4. System Connection ..................... 5 4.1 Connection Type ....................5 4.2 System Diagram ....................5 4.3 Hardware Setup .................... - Page 3 HDMI over IP Streaming Encoder/Decoder 5.8.1 Decoder (RX) Settings Options ............. 25 5.8.1.1. Video Format Setting ..............26 5.8.1.2. Device Setting ................27 5.8.1.3. Factory Reset ................29 5.8.1.4. Device Reboot ................29 5.8.1.5. Firmware Upgrade ..............29 5.8.1.6. Video File Management .............. 29 5.8.2 Encoder (TX) Settings Options ..............
-
Page 4: Product Introduction
100Mbps or higher to control a variety of functions via the IP Streaming Management software. The AR-40-201/AR-40-202 features 1080p HDMI video switching, video matrix, audio de-embedding, audio switching, IR&RS232 transmission, video recording, PoE, etc. The control software “IP Streaming Management” merge all functions for user control the IP streaming system. -
Page 5: Specification
HDMI over IP Streaming Encoder/Decoder 2. Specification AR-40-201 Video Input (1) HDMI In Video Input Connector (1) Type-A female HDMI HDMI Input Resolution Up to 1080p@60Hz 444 10/12bit Video Output (1) HDMI Out Video Output Connector (1) Type-A female HDMI... -
Page 6: Panel Description
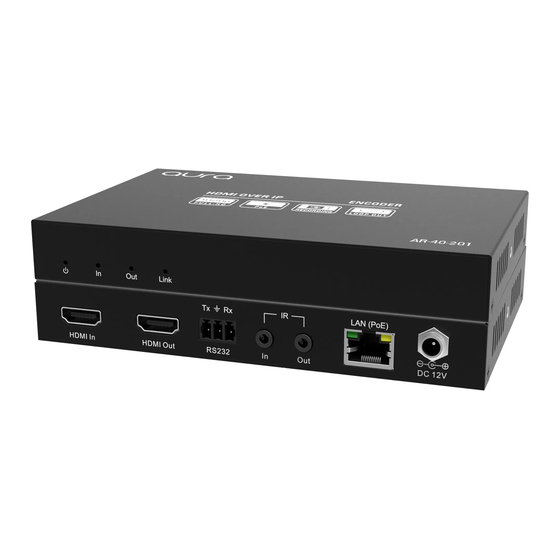
HDMI over IP Streaming Encoder/Decoder 3. Panel Description 3.1 AR-40-201 Encoder ① POWER LED: The LED illuminates green when power is applied. ② In LED: The LED illuminates blue when the encoder detects HDMI source input. ③ Out LED: The LED illuminates blue when the HDMI Out port is connected to display device. -
Page 7: Ar-40-202 Decoder
HDMI over IP Streaming Encoder/Decoder 3.2 AR-40-202 Decoder ① POWER LED: The LED illuminates green when power is applied. ② Out LED: The LED illuminates blue when the HDMI Out port is connected to display device. ③ Link LED: The LED illuminates blue when there is a valid LAN link between the decoder and the network switch. -
Page 8: System Connection
HDMI over IP Streaming Encoder/Decoder 4. System Connection 4.1 Connection Type There are three types of possible applications: Extender (Point-to-Point) In a point-to-point configuration, there is no need for a switch. Distribute full, uncompressed data up to 1080p@60Hz resolution and RS232, IR control signals over a single Cat-x cable. - Page 9 HDMI over IP Streaming Encoder/Decoder Control PC connection: To ensure the stability of the system, a router should be connected to the system, and the control PC needs to be connected to the router or switch with a network cable instead of a wireless connection.
-
Page 10: Hardware Setup
HDMI over IP Streaming Encoder/Decoder 4.3 Hardware Setup Please follow the steps below to complete the system installation: Connect the video/graphics source device to the HDMI input connector on each TX unit. (Optional) Connect the video display device to the HDMI output connector on each TX unit. -
Page 11: Operation Of Ip Streaming Management
HDMI over IP Streaming Encoder/Decoder 5. Operation of IP Streaming Management 5.1 General Information The IP Streaming Management is a control software used to configure and control signal extension, routing and switching between Encoder and Decoder units. The IP Streaming Management can be used on any Windows PC using Microsoft .Net framework 4.0 or later Windows version. - Page 12 HDMI over IP Streaming Encoder/Decoder Upon launch, the IP Streaming Management main window will open up in the “Video Switching” tab as shown in the picture below: After starting the IP Streaming Management application, it will show discovered devices as tiles. There are few things to take note of: The application has many different tabs for controlling the HDMI routing, as well as ⚫...
- Page 13 HDMI over IP Streaming Encoder/Decoder source device will appear within the respective tile along with information about the video feed. Similarly, if a display device is connected to the RX, an illustration of a display will appear within the corresponding RX tile. If no device is visible within the tile, it means that the device is connected and detected but no source (or display) device is connected to the TX (RX).
-
Page 14: General Setting
HDMI over IP Streaming Encoder/Decoder 5.2 General Setting Click on at the bottom-left corner to enter system setting interface. Basic Setting: Log Out: Click the button to exit the current login account. ⚫ Initial Page: Select initial interface for system operating easily. ⚫... - Page 15 HDMI over IP Streaming Encoder/Decoder Preview Interval Seconds: Set the refresh time of video preview. ⚫ Log Setting: Log Save Days: Set the number of days to save the software log. ⚫ 12 / 45...
- Page 16 HDMI over IP Streaming Encoder/Decoder Audio Setting: Follow Video Switch: Enable the function of audio follow video switching. When ⚫ switching video signal at Video Switching tab, the audio will automatically follow the video switch. Note that it is invalid that switch audio separately at Audio Switching tab.
-
Page 17: Video Routing Tab
HDMI over IP Streaming Encoder/Decoder 5.3 Video Routing Tab The "Video Switching" tab is used to manage signal routing between TX and RX devices. All RX devices are listed in the top half of the "Decoder (RX)" section. Similarly, all TX devices are listed in the bottom half, in the "Encoder (TX)"... -
Page 18: Video Recording
HDMI over IP Streaming Encoder/Decoder Verify that the HDMI cable being used is of good quality. This is particularly ⚫ important for high-bandwidths of up to 1080p@60Hz resolution, requiring a "HDMI Premium High Speed" cable. To assign a different input source to a Decoder (RX), repeat the steps mentioned above, dragging a different TX over an RX to associate the decoder itself to the new source device. -
Page 19: Sending Single Source To All Rx Devices
HDMI over IP Streaming Encoder/Decoder 5.3.3 Sending Single Source to All RX Devices To send the same source signal input to all receivers at the same time, simply drag and drop the TX unit that the desired source is connected to onto the blue tile in the Decoder (RX) section, labeled "Group: ALL". -
Page 20: Preset Management
HDMI over IP Streaming Encoder/Decoder 5.3.5 Preset Management To rename a preset, delete a stored preset or save the current video switching setting, recall a saved preset by selecting “Preset #1~9” and click the gear icon to select the desired option: “Rename”, “Clear Preset”, “Save Preset”, “Recall Preset”. 5.4 Video Preview Tab The "Video Preview"... - Page 21 HDMI over IP Streaming Encoder/Decoder Drag and drop the desired encoder/decoder unit over the screen block it is to be displayed. Full screen. Shrink screen. Clear the current screen. The product uses H.264 standard, so the application “VLC Media Player (Downloaded from website)”...
- Page 22 HDMI over IP Streaming Encoder/Decoder The “192.168.0.106” of network URL can be modified according the IP address of different encoder. Note: When the VLC media player plays a video, if there is no sound, the audio encoding standard of the encoder can be set to AAC at “Audio Setting” tab. Please refer to the 5.8.2.1.
-
Page 23: Audio Routing Tab
HDMI over IP Streaming Encoder/Decoder 5.5 Audio Routing Tab The "Audio Switching" tab is used to setup and manage audio routing between TX and RX devices. All the RX devices are listed in the top half of the Decoder (RX) section. Similarly, all the TX devices are listed in the bottom half in the Encoder (TX) section. -
Page 24: Rs232 Routing Tab
HDMI over IP Streaming Encoder/Decoder 5.6 RS232 Routing Tab The "RS232 Routing" tab is used to setup and manage RS232 data distribution for devices. There are two sections provided in the IP Streaming Management interface, "Encoders (TX)" and "Decoders (RX)". Each device discovered on the network is listed in both groups, because each of them can send and receive RS232 data. -
Page 25: Assign Encoder To All Decoders
HDMI over IP Streaming Encoder/Decoder 5.6.1 Assign Encoder to all Decoders To distribute RS232 data from a single encoder to all decoders, drag and drop the respective encoder's tile onto the tile labeled "Group: ALL" in the "Decoders" section of the "RS232 Routing"... -
Page 26: Assign Encoder To All Decoders
HDMI over IP Streaming Encoder/Decoder Verify, which Encoders and Decoders are joined together. Click on the device tile you want to see the connection status of. All joined together tiles will be highlighted blue. To pair devices, drag the tile representing the Encoder (TX) and drop it over the desired Decoder (RX) to create one-way communication. - Page 27 HDMI over IP Streaming Encoder/Decoder 5) Enter the IR string you want to send. 6) Click the "Send" button to send out the string. 7) Paired devices will receive the IR command. Infrared Limitations A Sender can either send IR data to a specific device (unicast) or broadcast to all devices active on the network (broadcast).
-
Page 28: Global Command Options And Settings
HDMI over IP Streaming Encoder/Decoder 5.8 Global Command Options and Settings To access a device’s options, click the menu icon of any connected TX or RX. Note: Device options can be accessed from any detected device and from any of the interface tabs, "Video Switching", "Audio Switching", etc. -
Page 29: Video Format Setting
HDMI over IP Streaming Encoder/Decoder 5.8.1.1. Video Format Setting To set the video format of decoder, click the menu icon of the respective RX tile and select "Video Formats". The following resolution, color space, Deep Color can be selected: 1080p@25Hz, 1080p@30Hz, 1080p@50Hz, 1080p@60Hz Video Resolution (Default), 720p@50Hz, 720p@60Hz, 1080I@50Hz, 1080I@60Hz... -
Page 30: Device Setting
HDMI over IP Streaming Encoder/Decoder 5.8.1.2. Device Setting Click the menu icon of the respective RX tile and click "Device Options", then select “Setting” to enter the below device setting interface. Analog Audio Setting: Select “Enable/Disable” to turn on/off the analog audio output of decoder. Network Setting: Use this tab to modify the device's host name and configure the IP address. - Page 31 HDMI over IP Streaming Encoder/Decoder To rename a device, enter a name (e. g. “AR-40-201”) into the "Host Name" edit box. Press the "Save" button to save the new host name. The host name is persistent and kept until the device is forced back to factory defaults.
-
Page 32: Factory Reset
HDMI over IP Streaming Encoder/Decoder 5.8.1.3. Factory Reset Click the menu icon of the respective RX tile and click "Device Options", then click “Factory Reset” to open prompt box. Click “Yes” to restore factory default. 5.8.1.4. Device Reboot Click the menu icon of the respective RX tile and click "Device Options", then click “Reboot”... -
Page 33: Encoder (Tx) Settings Options
HDMI over IP Streaming Encoder/Decoder 5.8.2 Encoder (TX) Settings Options The following section illustrates the Encoder (TX) device's settings dialog box. Leave Multicast Mode: Exit multicast mode. ⚫ Device Setting: Network Setting and Audio Setting. ⚫ Factory Reset: Restore factory default. ⚫... -
Page 34: Device Setting
HDMI over IP Streaming Encoder/Decoder 5.8.2.1. Device Setting Click the menu icon of the respective TX tile and click "Device Options", then select “Setting” to enter the below setting interface. Audio Setting: Use this tab to set the audio coding standard of the encoder to AAC or PCM. Network Setting: Use this tab to modify the device's host name and configure the IP address. -
Page 35: Video Format Setting
HDMI over IP Streaming Encoder/Decoder Select "DHCP" to receive the IP address from a DHCP server or to be auto- ⚫ assigned with an IP from the 192.168.X.X range, in case there is no DHCP server on the network. Select "STATIC" to set a static IP address (IPV4 address, subnet mask and ⚫... -
Page 36: Factory Reset
HDMI over IP Streaming Encoder/Decoder 5.8.2.3. Factory Reset Click the menu icon of the respective TX tile and click "Device Options", then click “Factory Reset” to open prompt box. Click “Yes” to restore factory default. 5.8.2.4. Device Reboot Click the menu icon of the respective TX tile and click "Device Options", then click “Reboot”... -
Page 37: System Management Tab
HDMI over IP Streaming Encoder/Decoder 5.9 System Management Tab 5.9.1 Security Settings Select the “Security” tab in the IP Streaming Management interface to enter the section for modifying the password. Click “New” to add new user account and set its access permission. ⚫... -
Page 38: System Logs
HDMI over IP Streaming Encoder/Decoder 5.9.2 System Logs Select the “System Logs” tab in the IP Streaming Management interface to enter the section for inquiring the system logs. Select system log file, and then click “Save To” to save the log file, or click “Clear” ⚫... -
Page 39: Group Management
HDMI over IP Streaming Encoder/Decoder 5.9.3 Group Management Select the “Group” tab in the IP Streaming Management interface to enter the section for group setting. Click “+” to add new group. ⚫ Select one group on the list, and then click “-” to delete the group. ⚫... -
Page 40: Routing Table
HDMI over IP Streaming Encoder/Decoder 5.10 Routing Table The routing table allows to gather info about the video, HDMI audio, analog audio and RS232 routing status. Video Routing Table: Audio Routing Table: 37 / 45... - Page 41 HDMI over IP Streaming Encoder/Decoder RS232 Routing Table: IR Routing Table: 38 / 45...
-
Page 42: Customer Service
1080p IP Streaming Encoder/Decoder 6. Customer Service The return of a product to our Customer Service implies the full agreement of the terms and conditions hereinafter. There terms and conditions may be changed without prior notice. 1) Warranty The limited warranty period of the product is fixed five years. 2) Scope These terms and conditions of Customer Service apply to the customer service provided for the products or any other items sold by authorized distributor only. - Page 45 www.aura-av.com...
Need help?
Do you have a question about the AR-40-201 and is the answer not in the manual?
Questions and answers